주요 콘텐츠로 건너뛰기

Repair guides and information for the Nintendo Switch Joy-Con controllers.

165 질문 전체 보기

Right joycon not charging after analogue stick change

I'm hoping that some people have come across this before as it's new to me. I changed out the analogue stick on this joycon and now it won't charge. Iv done loads of these and it's the first time I've had this. Before I dig into it I wondered if there was a simple answer.

Works when connected to the console.

Won't charge when plugged in.

All connectors checked and all good from the rails to the battery.

Works when portable but it has to be plugged into the charger to recognise it then can be unplugged from the charger and works fine until the console is turned off. I then have to do that process again to use portabley.

Thanks for any help.

Block Image

답변되었습니다! 답변 보기 저도 같은 문제를 겪고 있습니다

좋은 질문 입니까?

점수 8
댓글 8개

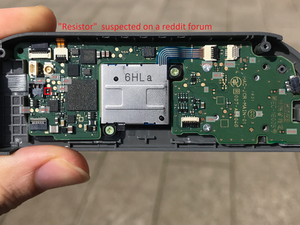
Hey there, did you find a fix for this? I have exactly the same issue after changing my joycon shells. I read on one forum that it could be a tiny resistor blowing to protect the motherboard and am really hoping this isn't the case...

This is the case unfortunately (most probably).

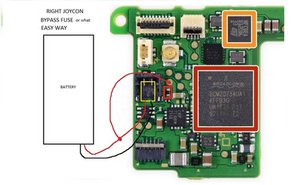
I Have the same issue with my right joycon after changing the flex for the L & R buttons. I am a total noob and touched the battery connector with the tip of the metal twezers. After some fault finding with a multimeter i found a short on one of the capacitors. I cant find any documentation on the surface components ( specially those unmarked capacitors) . If anyone can help we can bening to figure out what happend.

Can anyone add I pic of the resistor on the board please.

I have pictures of the components i found shorted on my board and the suspected resistor that is mentioned above but i cant find how to post them.

댓글 3개 더보기

댓글 달기

답변 6개

선택된 답변

antcolony  unfortunately i have no new information on this problem. I have not fix it either

Update (02/11/2021)

FINALLY!!! found a solution !! It turns out the reddit forum was right. There is a “resistor”?? that protects the rest of the board when you touch the battery terminals. There was a comment that i decided to try . Now ….. This was EXTREMELY difficult to me and i think in the end it was pure luck that i manage to do this with my tools.

I just bypassed the resistor with a blob of soder. and that is it . Joycon came back to life.

해당 답변은 도움이 되었습니까?

점수 6

댓글 4개:

Well you little beauty. Three Joycons had been sat there for a year and I'd just about given up on them. This fixed all of them. I found the reddit post you mentioned.

Small piece of wire the jump the fuse and back up and running. Ideally I would have liked to replace it but I've since bought new ones so took the easy option.

Just hoping it won't damage the actual switch.

2 years right controller used only connected to console, not charging at all. Small drop of solder to this little bastard on picture below and now joy-con work perfect.

Is it possible for you to post where to place the small drop of solder on please

I would also like a little clarification on where to place the "small blob of solder" if possible.

Just changed the shells on my console and joycons and the right one is doing just as the original picture shows.

댓글 달기

Block Image

For the definate answer answered by a reddit user. This is the fuse to be bridged or replaced

해당 답변은 도움이 되었습니까?

점수 6

댓글 2개:

Is this where a would place a drop of solder on?

I would also like a little clarification on where to place the "small blob of solder" if possible.

Just changed the shells on my console and joycons and the right one is doing just as the original picture shows.

댓글 달기

Same problem. Did you find a fix?

해당 답변은 도움이 되었습니까?

점수 0

댓글 3개:

Not yet. The only thing I haven't tried is replacing the ffc from the side rail from the connecting pins to the mother board

If you mean Sl Sr pins, i got two. Before replacing analog stick they were working fine, now both of them dont.

So the only fix to this is to replace the JoyCon? if "resistor blowing to protect the motherboard" is the cause?

댓글 달기

Block Image

Block Image

Nevermind, Found it XD

해당 답변은 도움이 되었습니까?

점수 0

댓글 2개:

Cool thank you. I'll look again and if it's shorted I'll replace it and see what happens. It will be a nightmare to replace with the plastic connector and other components so close.

Even if you find it shorting how are you going to tell the right capacitance for the component ? I’ ve been searching information on the surface components and found none. For now the only way I see that happening is taking a working one off a board and measuring it. Hope you find the problem !

댓글 달기

Any updates about this specific problem? I really want to avoid replacing the whole board for a broken capacitor..

해당 답변은 도움이 되었습니까?

점수 0

댓글 4개:

FINALLY!!! found a solution !! It turns out the reddit forum was right. There is a “resistor”?? that protects the rest of the board when you touch the battery terminals. There was a comment that i decided to try . Now ….. This was EXTREMELY difficult to me and i think in the end it was pure luck that i manage to do this with my tools.

I just bypassed the resistor with a blob of soder. and that is it . Joycon came back to life.

Hope it helps you all

Was it the resistor that you showed in the pics? To be honest I've not bothered looking again for moths.

Yes, the tiny resistor that is next to the battery connector

What do you mean by bypassing it? What exactly do I do? I’m sorry, this is all completely new to me. But I have a soldering iron and am a quick learner

댓글 달기

Block Image

The so called “fuse” is very difficult to bridge with solder or a wire and when I tried it the result was to destroy one end of the fuse making it impossible to bridge. Luckily I found out that one side of the battery(the positive) is connected to one side of the fuse and the other side is connected to a nearby small pad which makes it easier to bridge. I enclose a picture of what I did…hope it helps.

This fix is for the right joycon but I guess the left joycon has something similar which an ohmeter can discover….

해당 답변은 도움이 되었습니까?

점수 0

댓글 3개:

it works thx so much

Can you make a video about it or make more clear , apologize I'm noob and didn't understand the picture quite good. Thanks

Samer, in the pictures above you will find a high quality one that says "resistor suspected on reddit forum" .

Its the tiny resistor just next to where the bttery connector is.

As i said in the original post it was extremely difficult for me and i was only lucky. I would advice finding someone with adequate equipment like a phone repair service.

댓글 달기

귀하의 답변을 추가하세요

Tom Owens 님은 대단히 고마워 할 것입니다.
조회 통계:

24 시간 전: 7

7일 전: 36

30일 전: 130

전체 시간: 10,606