
S162 Drone Motor Not Working
Hi I'm new. Nice to join the forum looks great. Hope I can be of some value in return.
I have a S162 drone, it got caught in a tree. I managed to get it down shaking the branch. But landed in some wet mud. That got in one of the motors and cogs. I've replaced both it still wont go. The other 3 motors spin.
I've plugged the new motor built up in the arm in to the opposite side motor and all moves freely. So its like there's no power coming from the board. Ive checked the ESC and cannot see anything wrong.
Any ideas?
Thank you
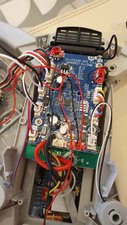
Update (07/18/2020)
Pictures posted of the board hopefully


좋은 질문 입니까?
점수
0
댓글 6개
Just want to make sure I understand you correctly, so you have tried a motor that doesn't work on one mount but it works on the other ones?
Please add some pictures of the mount, connections and circuit board, it will help to understand what the problem may be. 기존 질문에 이미지 추가하기
Erik Eriksson 의
Hi thanks for the reply. I bought a new motor and cog as the other was dead. Built it up in the arm. Doesnt work in the plug. But if I plug it in to the motor the other side it spins. So know its not the motor.
I cannot see anything obvious with the board. Will post some pics.
Colin Branagh 의
@Colin Branagh
How does it look if you unplug the connector, can you see any bent/dirty pins?
Erik Eriksson 의
Found this looks like its exploded
Colin Branagh 의
@Colin Branagh
Can you add a picture on it?
Erik Eriksson 의
댓글 1개 더보기