주요 콘텐츠로 건너뛰기

iPhone 6s Display Replacement

보관된 가이드
해당 안내서는 단지 역사적인 목적으로 보관됩니다. 최신 버전 안내서를 사용하여 수리 하십시오.

필요한 것

  1. iPhone 6s Display Replacement, Battery Connection: 1 단계, 이미지 1/1
    • Power off your iPhone before beginning disassembly.

    • Remove the two 3.4 mm Pentalobe screws surrounding the Lightning connector.

  2. iPhone 6s Display Replacement: 2 단계, 이미지 1/1
    이 단계에 사용된 도구:
    iSclack
    $24.99
    구매
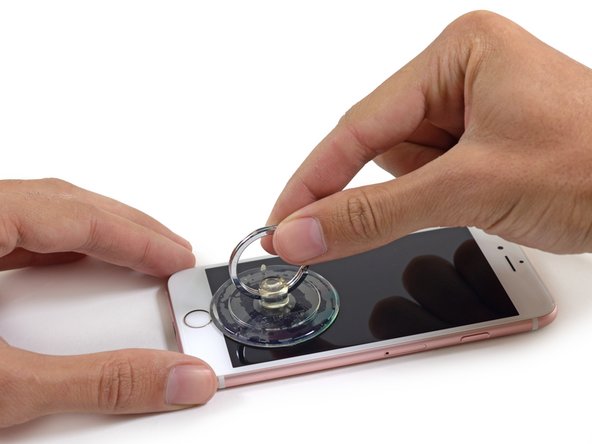
    • If you don't have an iSclack, use a single suction cup to lift the front panel:

    • Press a suction cup onto the screen, just above the home button.

    • Be sure the cup is pressed securely onto the screen to get a tight seal.

  3. iPhone 6s Display Replacement: 3 단계, 이미지 1/3 iPhone 6s Display Replacement: 3 단계, 이미지 2/3 iPhone 6s Display Replacement: 3 단계, 이미지 3/3
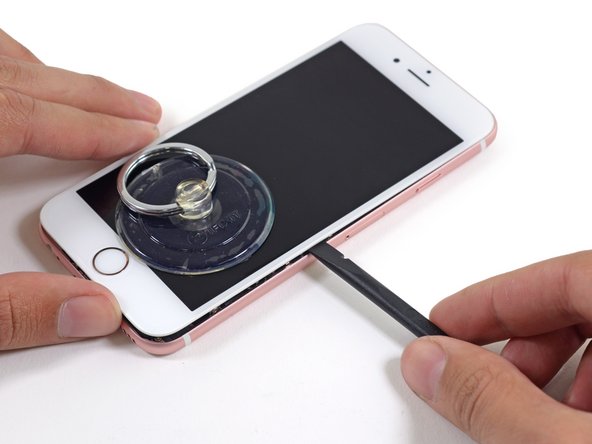
    • There is a notch on the underside of the display just above the headphone jack that is the safest place to begin prying the phone open.

    • Pull up on the suction cup to slightly separate the front panel assembly from the rear case.

    • Take your time and apply firm, constant force. The display assembly is a much tighter fit than most devices and is held down with adhesive.

    • Once a small gap has been opened, insert the flat end of a spudger above the headphone jack.

  4. iPhone 6s Display Replacement: 4 단계, 이미지 1/2 iPhone 6s Display Replacement: 4 단계, 이미지 2/2
    • Twist the spudger to open the gap more and break it free from the adhesive.

    • Keep pulling up on the suction cup while twisting the spudger.

  5. iPhone 6s Display Replacement: 5 단계, 이미지 1/2 iPhone 6s Display Replacement: 5 단계, 이미지 2/2
    • Use the edge of a spudger to slice through the adhesive on either side of the phone.

  6. iPhone 6s Display Replacement: 6 단계, 이미지 1/2 iPhone 6s Display Replacement: 6 단계, 이미지 2/2
    • Use the edge of a spudger to slice through the adhesive on either side of the phone.

  7. iPhone 6s Display Replacement: 7 단계, 이미지 1/3 iPhone 6s Display Replacement: 7 단계, 이미지 2/3 iPhone 6s Display Replacement: 7 단계, 이미지 3/3
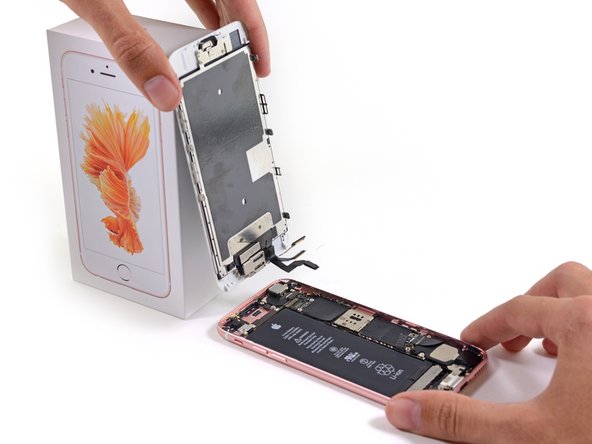
    • Use the suction cup to open the display, breaking the last of the adhesive.

    • Don't open the display more than 90 degrees, as it is still connected at the top by three cables that may break if stretched.

  8. iPhone 6s Display Replacement: 8 단계, 이미지 1/1
    • Lean the display against something to keep it propped up while you're working on the phone.

  9. iPhone 6s Display Replacement: 9 단계, 이미지 1/1
    • Remove the following screws from the battery connector bracket:

    • One 3.0 mm Phillips #00 screw

    • One 2.3 mm Phillips #00 screw

  10. iPhone 6s Display Replacement: 10 단계, 이미지 1/1
    • Remove the metal battery connector bracket from the iPhone.

  11. iPhone 6s Display Replacement: 11 단계, 이미지 1/3 iPhone 6s Display Replacement: 11 단계, 이미지 2/3 iPhone 6s Display Replacement: 11 단계, 이미지 3/3
    • Use the flat end of a spudger to disconnect the battery connector from the logic board.

    • Push the connector to the side to ensure it doesn't accidentally make contact and power on the phone while you're working on it.

  12. iPhone 6s Display Replacement, Display: 12 단계, 이미지 1/1
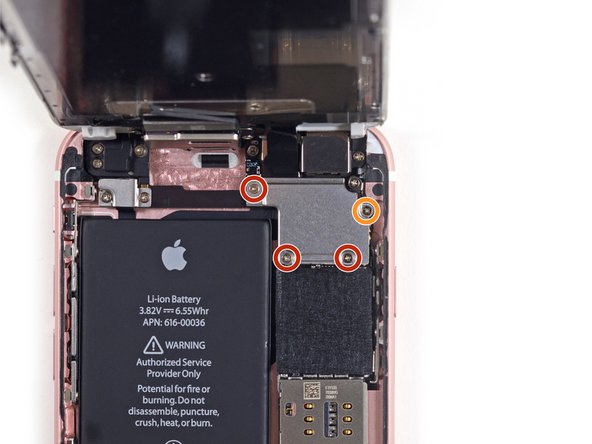
    • While holding the front panel open at about a 90º angle, remove the following screws securing the front panel assembly cable bracket:

    • Three 1.3 mm Phillips #00 screws

    • One 3.0 mm Phillips #00 screw

    • Don't lose track of this screw! It's very important that the one 3.0 mm screw goes in the top-right corner of the plate. Anywhere else may cause damage to the logic board.

  13. iPhone 6s Display Replacement: 13 단계, 이미지 1/1
    • Remove the front panel assembly cable bracket from the logic board.

  14. iPhone 6s Display Replacement: 14 단계, 이미지 1/3 iPhone 6s Display Replacement: 14 단계, 이미지 2/3 iPhone 6s Display Replacement: 14 단계, 이미지 3/3
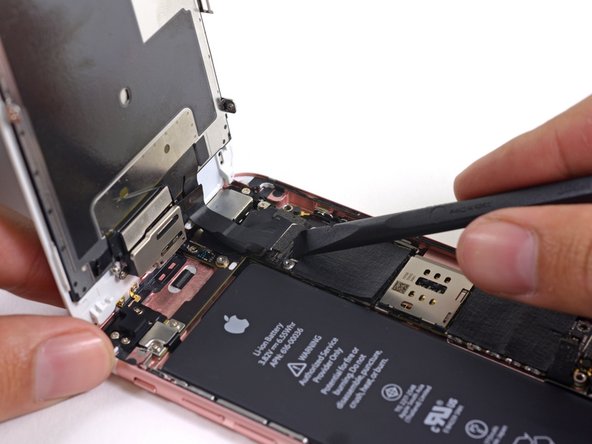
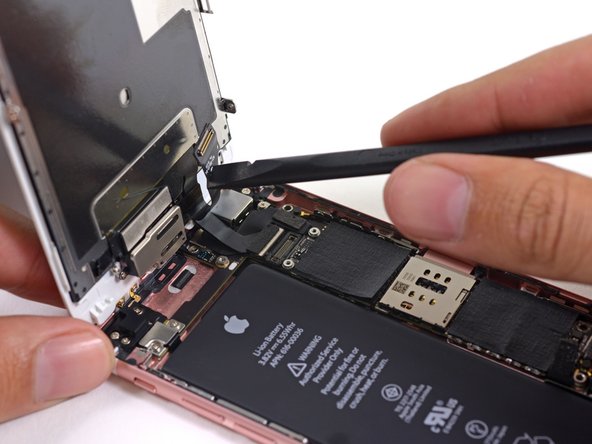
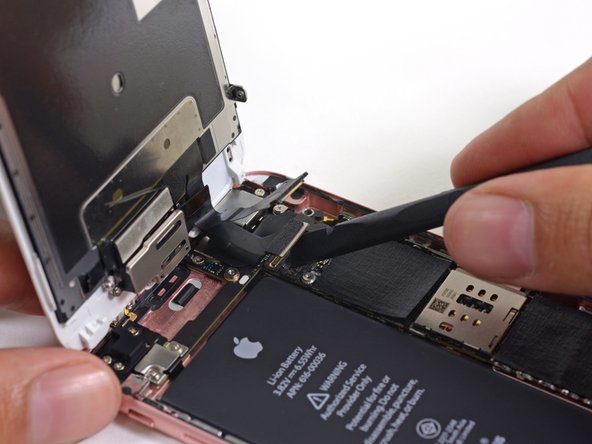
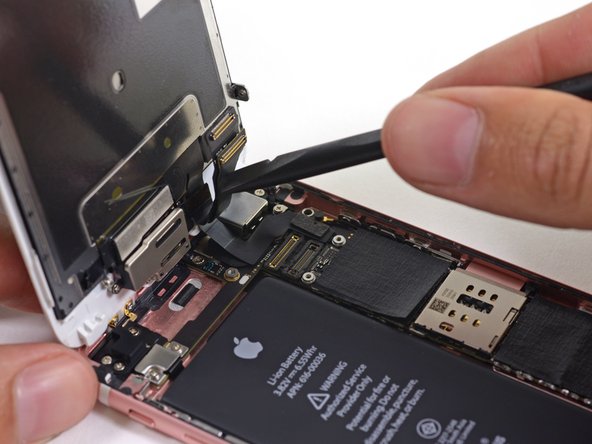
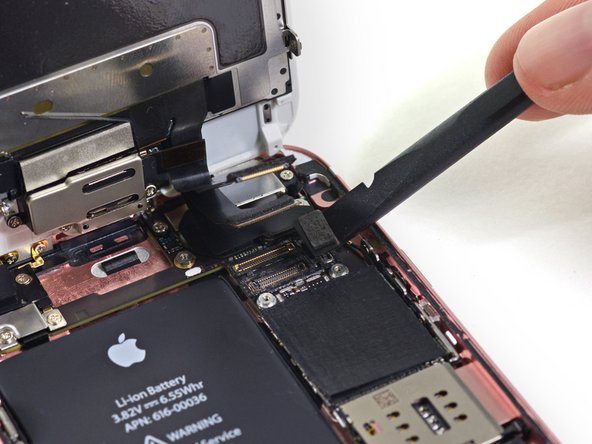
    • In the next three steps, take care to pry up only on the cable connectors, and not on their sockets on the logic board.

    • Use the flat end of a spudger to disconnect the front-facing camera and sensor cable connector.

  15. iPhone 6s Display Replacement: 15 단계, 이미지 1/3 iPhone 6s Display Replacement: 15 단계, 이미지 2/3 iPhone 6s Display Replacement: 15 단계, 이미지 3/3
    • Use the flat end of a spudger to disconnect the display data cable connector.

    • When reassembling your phone, the display data cable may pop off its connector. This can result in white lines or a blank screen when powering your phone back on. If that happens, simply reconnect the cable and power cycle your phone. The best way to power cycle your phone is to disconnect and reconnect the battery connector.

  16. iPhone 6s Display Replacement: 16 단계, 이미지 1/2 iPhone 6s Display Replacement: 16 단계, 이미지 2/2
    • Finally, use the flat end of a spudger to disconnect the digitizer cable connector.

  17. iPhone 6s Display Replacement: 17 단계, 이미지 1/2 iPhone 6s Display Replacement: 17 단계, 이미지 2/2
    • Remove the display assembly from the rear case.

결론

To reassemble your device, follow these instructions in reverse order.

다른 153명이 해당 안내서를 완성하였습니다.

Sam Goldheart

회원 가입일: 10/18/12

465,602 평판

안내서 538개 작성하였습니다

iFixit iFixit 회원

Staff

135 회원들

안내서 16,718개 작성하였습니다

댓글 21개

while technically correct, this guide is not complete in the sense that a new tech cannot follow it step-by-step to successfully complete a screen replacement. You should include the steps necessary to move the parts over from the old screen. Yes you can buy screen replacements with small parts but most repair operations don't do that as it isn't that hard to move them and much less expensive.

There are many small parts involved in moving from one screen to another. There are also a few steps that require prying a flex from the frame that is taped down. Having the additional steps in this guide that point out exactly where each small parts go and how to successfully pull the flex off without tearing it would be a huge improvement to this guide (and all the other screen replacement guides as they all have the same gap)

thanks - this is a great site and my techs use it for training every day.

Marty Morrow - 답글

The demo ends before it does what is stated in the heading (Display Replacement.) This demo is for Front Panel Assembly Replacement.

PJL500 -

As stated in the intro, this is just the full front panel assembly guide. We'll be posting more thorough screen replacement guides in the future. Stay tuned ;)

Sam Goldheart -

When will you be selling the 6S replacement screen. I only see on for the 6 and it says not compatible with the 6S.

Additionally is it possible to replace just the glass and not all the other parts?

dougross - 답글

That is what i am curious about as well!!!

just cracked the glass in the bottom left corner of my 6s Plus.

brink28 -

댓글 쓰기

조회 통계:

24 시간 전: 0

7일 전: 0

30일 전: 3

전체 시간: 185,371