주요 콘텐츠로 건너뛰기

Samsung Galaxy S III Screen Replacement

필요한 것

  1. Samsung Galaxy S III Screen Replacement, Screen: 1 단계, 이미지 1/1
    • If your phone already has a screen protector, proceed to the next step.

    • If not, just cut a piece of tape to size and stick it on the glass. This will help you remove the broken glass later.

  2. Samsung Galaxy S III Screen Replacement: 2 단계, 이미지 1/2 Samsung Galaxy S III Screen Replacement: 2 단계, 이미지 2/2
    • Remove the back cover using a plastic spatula. It comes off without much effort.

  3. Samsung Galaxy S III Screen Replacement: 3 단계, 이미지 1/1
    • Take out the battery. It has no adhesive or wires attached to it.

  4. Samsung Galaxy S III Screen Replacement: 4 단계, 이미지 1/2 Samsung Galaxy S III Screen Replacement: 4 단계, 이미지 2/2
    • Remove the SIM card by gently pushing it inward until it clicks, then slide it out.

  5. Samsung Galaxy S III Screen Replacement: 5 단계, 이미지 1/2 Samsung Galaxy S III Screen Replacement: 5 단계, 이미지 2/2
  6. Samsung Galaxy S III Screen Replacement: 6 단계, 이미지 1/1
    • You must be patient to perform this step. It will take some time.

    • Using an infrared thermometer, heat the surface to 70-80oC. This will weaken the glue, but will not damage the electronics.

    • Hold the hair dryer at a distance of 7-8 centimeters from the phone (approximately as in the picture). After setting a weak hair dryer mode, heat the frame for three to five minutes, depending on the strength of your hair dryer.

    • Be careful! If you overheat the matrix, you can cause color distortion. If you notice the slightest color distortion, turn off the hair dryer immediately.

    • If you work with a hair dryer, it may take up to an hour.

    • It melts the glue that fastens the glass to the frame and display.

  7. Samsung Galaxy S III Screen Replacement: 7 단계, 이미지 1/1
    • Using a mediator or plastic spatula, start separating the edges of the glass very carefully.

    • Start from above, and continue moving down.

    • You will need a hair dryer several times while you separate the glass. If your glass is badly damaged, be very careful, otherwise you risk damaging the matrix with fragments.

  8. Samsung Galaxy S III Screen Replacement: 8 단계, 이미지 1/1
    • You should start to separate the glass from the top edge, gradually moving towards the center, peeling off the entire screen from top to bottom. Leave some tools between the glass and body to prevent the glass from sticking back.

    • Be extremely careful with the bottom edge, the touch buttons are glued to the glass

    • Do not remove the glass yet, you may damage the cables. Start removing the glass from the top until you see the button cables.

  9. Samsung Galaxy S III Screen Replacement: 9 단계, 이미지 1/2 Samsung Galaxy S III Screen Replacement: 9 단계, 이미지 2/2
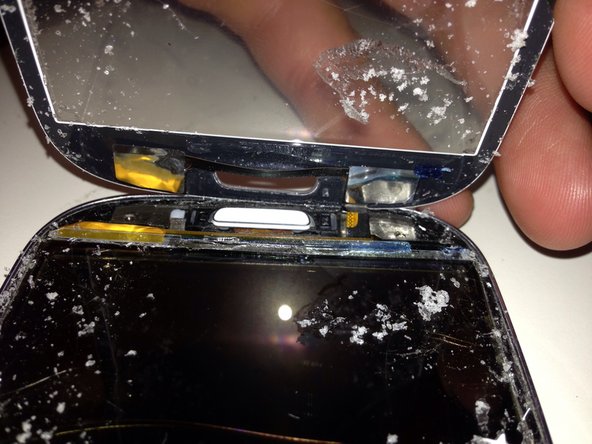
    • At this step, you need to be very careful not to damage the buttons or cable! Using a spudger, separate the buttons from the inside of the glass. It may need to be warmed up a bit. Perhaps the best option is to start in the middle, under the middle cable connecting the two buttons, then separate each button.

  10. Samsung Galaxy S III Screen Replacement: 10 단계, 이미지 1/1
    • Remove broken glass. I managed to remove it in one piece.

    • If your glass is badly broken, remove all fragments with tweezers, or glue with tape before removing the glass.

  11. Samsung Galaxy S III Screen Replacement: 11 단계, 이미지 1/1
    • Remove this little piece of metal from your old glass, it will need to be inserted into the new one.

  12. Samsung Galaxy S III Screen Replacement: 12 단계, 이미지 1/1
    • Remove any remaining adhesive remaining on the frame. A small microfiber with a little WD-40 can help remove the adhesive.

    • Don't use too much WD-40.

    • Cut out two small pieces of thin double-sided tape and glue the buttons to the case.

    • It is important to glue the buttons exactly as in the picture.

  13. Samsung Galaxy S III Screen Replacement: 13 단계, 이미지 1/1
    • Stick strips of double-sided tape on the frame.

    • Wipe the sensor with a clean cloth. I used a lens cleaner for best results.

  14. Samsung Galaxy S III Screen Replacement: 14 단계, 이미지 1/1
    • Remove the protective film from both sides of the new glass. Do not touch the inside of the glass.

  15. Samsung Galaxy S III Screen Replacement: 15 단계, 이미지 1/1
    • Look at the glass against the light and make sure there is no dirt. If there is, then wipe it with glass cleaner, and let it dry before use.

    • Peel off the film from the double-sided tape and insert a new glass. For reliability, press on the edges.

결론

To reassemble your device, follow these instructions in reverse order.

다른 7명이 해당 안내서를 완성하였습니다.

다음 번역가들에게 특별히 감사 드립니다:

ru en

100%

이 번역자 분들은 저희가 세상을 수리하는데 동참해 주시는 분입니다! 기여하시겠습니까?
번역 시작하기 ›

Ilya Lukyanov

회원 가입일: 06/19/14

433 평판

안내서 1개 작성함

Ru Translators iFixit Ru Translators iFixit 회원

Community

11 회원들

안내서 6개 작성하였습니다

댓글 0개

댓글 쓰기

조회 통계:

24 시간 전: 1

7일 전: 8

30일 전: 16

전체 시간: 1,717