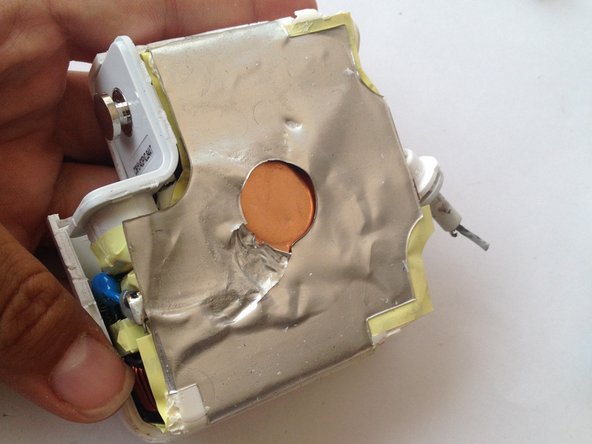
주요 콘텐츠로 건너뛰기

如何修理Apple AC Adapter(电源适配器)的破损的电源线

필요한 것

  1. 如何修理Apple AC Adapter(电源适配器)的破损的电源线, 如何修理Apple AC Adapter(电源适配器)的破损的电源线: 1 단계, 이미지 1/1
    • 從破損位置切斷。

  2. 如何修理Apple AC Adapter(电源适配器)的破损的电源线: 2 단계, 이미지 1/1
    • 拔除AC電源線。

  3. 如何修理Apple AC Adapter(电源适配器)的破损的电源线: 3 단계, 이미지 1/3 如何修理Apple AC Adapter(电源适配器)的破损的电源线: 3 단계, 이미지 2/3 如何修理Apple AC Adapter(电源适配器)的破损的电源线: 3 단계, 이미지 3/3
    • 充電器頭結合部份是用強粘度的膠水粘合防止被輕易拆除。

    • 你只能用刀沿著結合線切割塑料外殼。

    • 這會費一點時間,你需要將4個面的結合都切開。當你切斷大部份的時候,你就會意識到是這樣子。

    • 最後一張圖片顯示的那一面,在切割時需要特別小心,有一些零件可能會被切壞。

  4. 如何修理Apple AC Adapter(电源适配器)的破损的电源线: 4 단계, 이미지 1/3 如何修理Apple AC Adapter(电源适配器)的破损的电源线: 4 단계, 이미지 2/3 如何修理Apple AC Adapter(电源适配器)的破损的电源线: 4 단계, 이미지 3/3
    • 使用扁頭螺絲刀將塑料外殼從充電器上分離。可能需要花點力氣去完成。

    • 當你完成每個面的分離后,塑料外殼并不會脫離,因為內部還有膠水。

    • 將螺絲刀伸入充電頭的頂部,并小心的將銅箔從塑料外殼上拆下。需要小心避免使銅箔從充電器零件上脫離。

  5. 如何修理Apple AC Adapter(电源适配器)的破损的电源线: 5 단계, 이미지 1/3 如何修理Apple AC Adapter(电源适配器)的破损的电源线: 5 단계, 이미지 2/3 如何修理Apple AC Adapter(电源适配器)的破损的电源线: 5 단계, 이미지 3/3
    • 這一步時,我已經移除了一面的塑料外殼。

    • 使用螺絲刀,將電源接口兩側的背膠鬆開。

    • 將螺絲刀伸入另一面塑料外殼內部,并仔細的鬆開其他的背膠。

  6. 如何修理Apple AC Adapter(电源适配器)的破损的电源线: 6 단계, 이미지 1/1
    • 拆卸完如圖,將塑料殼先收起來。

  7. 如何修理Apple AC Adapter(电源适配器)的破损的电源线: 7 단계, 이미지 1/3 如何修理Apple AC Adapter(电源适配器)的破损的电源线: 7 단계, 이미지 2/3 如何修理Apple AC Adapter(电源适配器)的破损的电源线: 7 단계, 이미지 3/3
    • 抓住將電線連接到AC充電器的小塑料件。

    • 盡可能靠近小塑料件的區域切斷電線。

  8. 如何修理Apple AC Adapter(电源适配器)的破损的电源线: 8 단계, 이미지 1/1
    • 使用刀或剝線器剝除部份電線的外被。

  9. 如何修理Apple AC Adapter(电源适配器)的破损的电源线: 9 단계, 이미지 1/3 如何修理Apple AC Adapter(电源适配器)的破损的电源线: 9 단계, 이미지 2/3 如何修理Apple AC Adapter(电源适配器)的破损的电源线: 9 단계, 이미지 3/3
    • 取連接MAC book的線,使用刀或剝線器仔細的剝除外被。

    • 撥開編織露出中心線。

    • 將編織捲起,并將白色線撥開一小段用於和AC充電器連接。

  10. 如何修理Apple AC Adapter(电源适配器)的破损的电源线: 10 단계, 이미지 1/3 如何修理Apple AC Adapter(电源适配器)的破损的电源线: 10 단계, 이미지 2/3 如何修理Apple AC Adapter(电源适配器)的破损的电源线: 10 단계, 이미지 3/3
    • 將兩端的白線焊接在一起

    • 需注意將AC適配器的白色線需要焊接至MacBook接口的白色線。

    • 線材上的黑色絕緣熱縮套管是待會用於隔離線材用的,可以加熱使其收縮。

    • 最後一張就是黑色絕緣套管,可以按需求切成適合的長度。

    • 將兩根電線絕緣開是很重要的,不然會造成短路(或爆炸)。

  11. 如何修理Apple AC Adapter(电源适配器)的破损的电源线: 11 단계, 이미지 1/3 如何修理Apple AC Adapter(电源适配器)的破损的电源线: 11 단계, 이미지 2/3 如何修理Apple AC Adapter(电源适配器)的破损的电源线: 11 단계, 이미지 3/3
    • 繼續講黑色的電線焊接至對應的黑色電線上。

    • 將電線絕緣。你不需要將整個編織的外露部份都覆蓋上絕緣套管,只要確保它不會接觸到白色電線或者AC適配器上的線路板。

    • 你可以使用黑色橡膠管或者絕緣電膠布。如果你使用的是黑色的橡膠管,請確保焊接時盡可能的遠離焊接位置,避免覆蓋焊接位置前收縮。

  12. 如何修理Apple AC Adapter(电源适配器)的破损的电源线: 12 단계, 이미지 1/3 如何修理Apple AC Adapter(电源适配器)的破损的电源线: 12 단계, 이미지 2/3 如何修理Apple AC Adapter(电源适配器)的破损的电源线: 12 단계, 이미지 3/3
    • 使用電膠布將剛剛焊接后,剩餘的白色/黑色/編織包裹起來。

    • 用電膠布將他們包裹成一根。將其置於AC適配器的一個塑件外殼內。

    • 使用白色的電膠布會更好看。

    • 取3根束線帶并將電線束緊避免其被從塑料外殼上拉出。

  13. 如何修理Apple AC Adapter(电源适配器)的破损的电源线: 13 단계, 이미지 1/1
    • 在外殼的邊緣塗覆強力膠水,并將AC適配器的另一面外殼蓋上。

    • 不要忘記將電線可以卷附在充電器上的塑料片。即使它是電線撕裂的主要原因。 我通常選擇將它們留出或將它們粘到外殼上,以防再次斷線。

  14. 如何修理Apple AC Adapter(电源适配器)的破损的电源线: 14 단계, 이미지 1/2 如何修理Apple AC Adapter(电源适配器)的破损的电源线: 14 단계, 이미지 2/2
    • 使用4根大一點的紮帶將外殼固定好,每面2根。

    • 有些人更樂意僅使用強力膠,因為看起來好看些,但是紮帶會使得更安全些。如果你更樂意不要紮帶,可以再幾小時后移除,以確保強力膠已經完全貼合。

  15. 如何修理Apple AC Adapter(电源适配器)的破损的电源线: 15 단계, 이미지 1/2 如何修理Apple AC Adapter(电源适配器)的破损的电源线: 15 단계, 이미지 2/2
    • 使用膠槍將剩餘的空隙區域填補上。

    • 不用太多,只要確保沒有開口就可以了。

결승점

다른 240명이 해당 안내서를 완성하였습니다.

다음 번역가들에게 특별히 감사 드립니다:

en zh

100%

이 번역자 분들은 저희가 세상을 수리하는데 동참해 주시는 분입니다! 기여하시겠습니까?
번역 시작하기 ›

Angela Penaherrera

회원 가입일: 05/06/13

12,574 평판

안내서 5개 작성하였습니다

댓글 55개

Some tips:

* There is a better way to open the enclosure without damaging the edge: using a pliers to push the two sides apart where the bunny ears lift up (google for videos).

* The cable can actually be threaded through the rubber/plastic grommet if you have the patience to remove the broken cable from it and make the two small holes bigger with a drill bit. This can be frustrating but is the only way to keep the original appearance. Be sure to leave enough cable after the grommet for soldering.

* Thin (2-3mm) heat shrink is a good way to insulate the exposed wire after threading it through the grommet.

* If you trust your soldering skills, consider de-soldering the old cables from the terminals.

* Applying a little super glue along the edge and clamping for a few hours is all that is needed to keep it closed permanently.

don - 답글

Thanks for the tips! If you have pictures of the processes please feel free to modify this guide (especially the opening of the enclosure!) ^__^

* I have seen that in some tutorials and I wanted to to drill a hole through the rubber plastic grommet but didn't have a drill at my office =(

* I did consider de-soldering the old cables but that involved de-soldering other components that are attached to copper plates to get to those terminals. In earlier versions of the AC Adapter this can be done with not so much trouble.

I really appreciate your feedback! Thanks!

Angela Penaherrera -

I didn't try that... We actually ended up just heating it to soften the plastic and that worked, wouldn't advise it though

deavisdude -

Same for me, don: see this as a much easier way to open the case: https://www.youtube.com/watch?v=Yqa9uUKu...

Would be nice if you refer to this solution as alternative, befor starting to cut the case.

Thanks for the manual, I just fixed it!

Lukas -

Is it possible to remove the cord entirely from the circuit board and solder new replacement? I have ordered a replacement and I wonder if its safe to do so? Thank you for your prompt response!

Shawn - 답글

댓글 쓰기

조회 통계:

24 시간 전: 22

7일 전: 158

30일 전: 781

전체 시간: 555,478