이 번역은 원본 안내서의 최신 업데이트를 반영하지 않을 수 있습니다. 번역 업데이트를 돕거나 아니면 원본 안내서 보기를 참조하세요.
소개
귀하의 기기 맞춤형 접착 스트립 사용법을 잘 모르겠으면 이 안내서를 따르세요. 접착제는 스크린, 후면 커버, 배터리 등에 사용할 수 있습니다. 접착제를 사용하기 전에 안내서 전부를 읽으세요.
기기 수리 안내서에 구체적인 접착 지침을 포함하는 경우에는 그 지침이 이 안내서보다 우선입니다.
Samsung Galaxy S 휴대폰은 이 안내서를 따르세요.
iPhone은 이 안내서를 따르세요.
iPad는 이 안내서를 따르세요.
일반 Tesa/테사 접착제를 사용하는 경우에는 이 안내서를 따르세요.
필요한 것
-
-
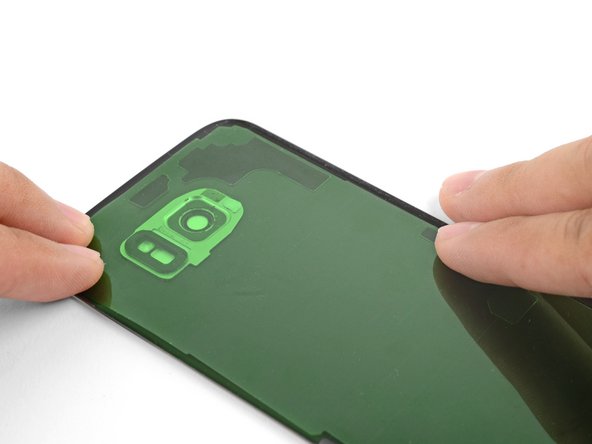
맞춤형 접착 스트립을 살펴보고 적합한 용도를 찾으세요.
-
스크린 또는 후면 커버 접착 스트립—일반적으로 기기 모양
-
후면 커버 호환 접착 스트립—후면 커버에 붙어있는 부품의 윤곽과 일치
-
배터리 접착 스트립—보통 휴대폰 배터리 모양과 비슷한 직사각형
-
부품 접착 스트립—카메라 및 지문 센서처럼 다양한 부품의 윤곽과 일치
-
-
-
손가락, spudger/스퍼저, 플라스틱 여는 도구 또는 핀셋으로 큼직한 접착제 덩어리를 제거하세요.
-
접착제 제거제 또는 고농도 (>90%) 이소프로필 알코올을 사용하여 금속 표면의 잔류물을 제거하세요. 무보풀 천 또는 커피 필터로 모든 접착제 잔여물이 없어질 때까지 한 방향으로 닦으세요.
-
-
-
-
라이너를 벗기기 전에, 무색 면이 붙을 표면을 찾으십시오.
-
접착제를 쉽게 붙이기 위해서, 스트립을 휴대폰의 원하는 위치에 맞춘 다음 스트립의 한쪽 가장자리를 붙여 스트립을 제위치에 고정하세요.이렇게 하면 라이너를 벗길때 스트립의 맞춘 위치를 놓치지 않고 접착제를 드러낼 수 있습니다.
-
접착 스트립이 표면에 어떻게 붙어야 하는지 잘 안다면 무색 라이너를 벗겨내세요.
-
U-자형 오려내기 부분 (만일 있다면) 부터, 흰색 (종이) 및 검정색 (접착) 레이어의 중앙 부분을 조심스럽게 벗기세요.
-
나머지 종이 라이너를 벗겨내고 아랫면의 접착제를 드러내세요.
-


제대로 사용할 경우 접착제는 접착성을 오래 유지합니다.
수리는 기기의 방수 기능을 복원하지 않습니다. 기기를 액체에 노출시키지 않도록 주의하세요.
제대로 사용할 경우 접착제는 접착성을 오래 유지합니다.
수리는 기기의 방수 기능을 복원하지 않습니다. 기기를 액체에 노출시키지 않도록 주의하세요.
다른 97명이 해당 안내서를 완성하였습니다.
다음 번역가들에게 특별히 감사 드립니다:
20%

Christian Kim님은 저희가 세상을 수리하는데 동참하신 분입니다! 기여하시겠습니까?
번역 시작하기 ›


댓글 8개
Diese Anleitung sollte im Akku-Tausch Tutorial verlinkt sein und auch in der Produktbeschreibung. Ich habe diesen Artikel erst gefunden, nachdem ich die Rückseite schon befestigt hatte (zum Glück richtig).
Although obvious to anyone who has used this type of strip, I didn't realize it until my first experience gluing a screen into my phone: the adhesive is ONLY the black goo attached to the strips. Once you peel off the clear side, place the strip and then peel off the coloured side, all that's left is the black goo, hopefully exactly where it needs to be. Mine could be carefully re-aligned with tweezers as necessary before setting the screen into place.
What's the popular recommendation regarding how long to leave weight on these pre-cut adhesive strips?
It merely says 'a few hours'?
Is it okay to check on it or is it like opening the oven door?
It's okay to check, and 2 hours is usualy plenty enough.
If you have any OLED display, DO NOT put books on it!!! Unlike LCDs, some Hard OLEDs cannot handle the pressure. If you have bought a display from ifixit they will also not warranty it and consider it user damage!!! That last section need to put in a warning for OLEDs.
Great point, wished i would have read this earlier... :(
Ruined a pixel 3a screen after replacing a battery and placing some books on the screen for the adhesive as instructed.
Screen now has to be replaced since it's leaking / purple as a result of the books pressure.
MHacking -
i'm replacing a front screen and wondering about the order of putting the adhesive strip on the screen back, attaching ribbon cable from new screen to phone, then taking off coloured side of the adhesive strip, or should i take of coloured side, then attach ribbon cable, then place screen with glue onto phone frame?
obviosuly if one puts the ribbon cable on before taking off coloured side of adhesive, then one would be stuck with fiddly job of manouevering the coloured paper around the screen (or cutting the coloured thing, whereas if one takes of coloured paper, then one has to try and attach ribbon cable without messing up the adhesive now on the edges of the screen....
oh wait, it also isn't obvious whether one puts first side on phone or on new screen....help! (this is pixel 3a screen replacement with ifixit template)
endlich wieder freie Luft zum atmen hatte mir samsung flip angeschafft und damit in die Android Falle geraten.
vor lauter schreck hab ich mir ein neues z2bestellt 348,00€
und meinen 4 moto´s ein fünftes hinzugefügt
meist sind es ja Kleinigkeiten z.B ist bei einem der SD slot kaputt iss ja nicht schlimm mit dem Elleful Stick hat man auch sensible Daten
u.a. weg wenn internetzugang läuft bei der Werkseinstellung um rauszukriegen was nicht klappt
wer was braucht kann über mail belezebub10.jul@gmail.com kommunizieren.
hans
If you're installing a screen, you might need to cut out a hole on the backing so that you can attach the first side, and attach the screen ribbon connector through the hole before removing the second backing.
Asela Gunawardana - 답글