주요 콘텐츠로 건너뛰기

2004-2006 Honda Rancher 350 Four Wheeler Carburetor Repair

필요한 것

  1. 2004-2006 Honda Rancher 350 Four Wheeler Carburetor Repair, Disconnect Battery: 1 단계, 이미지 1/2 2004-2006 Honda Rancher 350 Four Wheeler Carburetor Repair, Disconnect Battery: 1 단계, 이미지 2/2
    • As a safety precaution, use a Phillips screwdriver to disconnect the negative battery terminal.

    • Make sure you never disconnect the positive terminal of the battery before the negative terminal.

  2. 2004-2006 Honda Rancher 350 Four Wheeler Carburetor Repair, Loosen Carburetor Intake Band Clamp: 2 단계, 이미지 1/2 2004-2006 Honda Rancher 350 Four Wheeler Carburetor Repair, Loosen Carburetor Intake Band Clamp: 2 단계, 이미지 2/2
    • Use a ratchet with a 10 mm socket to loosen the clamp that connects the carburetor to the intake manifold.

  3. 2004-2006 Honda Rancher 350 Four Wheeler Carburetor Repair, Remove Plastic Side Panels: 3 단계, 이미지 1/2 2004-2006 Honda Rancher 350 Four Wheeler Carburetor Repair, Remove Plastic Side Panels: 3 단계, 이미지 2/2
    • Use a flat blade screwdriver to pry and remove the rivets securing both of the side panels so that you will be able to easily access the carburetor.

    • There are about 10 rivets to remove.

  4. 2004-2006 Honda Rancher 350 Four Wheeler Carburetor Repair, Remove Black Plastic Side Panel: 4 단계, 이미지 1/2 2004-2006 Honda Rancher 350 Four Wheeler Carburetor Repair, Remove Black Plastic Side Panel: 4 단계, 이미지 2/2
    • Use a T30 Torx screwdriver to remove the screw securing the black plastic panel on the left side of the four wheeler.

  5. 2004-2006 Honda Rancher 350 Four Wheeler Carburetor Repair, Remove Bolt That Secures Right Side Panel: 5 단계, 이미지 1/1
    • Use a wrench with a 10 mm socket to remove the hex bolt that secures the green plastic panel on the right side of the four wheeler.

  6. 2004-2006 Honda Rancher 350 Four Wheeler Carburetor Repair, Disconnect Air Vent Line from Engine: 6 단계, 이미지 1/1
    • Disconnect the air vent line from the engine.

  7. 2004-2006 Honda Rancher 350 Four Wheeler Carburetor Repair, Disconnect Air-Intake Tube from Metal Frame: 7 단계, 이미지 1/1
    • Remove the plastic rivet that connects the air-intake tube to the metal frame of the four wheeler.

  8. 2004-2006 Honda Rancher 350 Four Wheeler Carburetor Repair, Pull Air-Intake Tube Back: 8 단계, 이미지 1/1
    • Pull the air-intake tube backwards away from the air filter box.

  9. 2004-2006 Honda Rancher 350 Four Wheeler Carburetor Repair, Remove Screw from Bottom of Air Filter Box: 9 단계, 이미지 1/3 2004-2006 Honda Rancher 350 Four Wheeler Carburetor Repair, Remove Screw from Bottom of Air Filter Box: 9 단계, 이미지 2/3 2004-2006 Honda Rancher 350 Four Wheeler Carburetor Repair, Remove Screw from Bottom of Air Filter Box: 9 단계, 이미지 3/3
    • Use a 10 mm socket wrench to remove the screw on the right hand side of the bottom of the black air filter box.

  10. 2004-2006 Honda Rancher 350 Four Wheeler Carburetor Repair, Remove Air Filter Box: 10 단계, 이미지 1/1
    • At this point, the black air filter box should be loose. Lift the air filter box vertically out of the four wheeler.

  11. 2004-2006 Honda Rancher 350 Four Wheeler Carburetor Repair, Disconnect Carburetor Gas Line: 11 단계, 이미지 1/2 2004-2006 Honda Rancher 350 Four Wheeler Carburetor Repair, Disconnect Carburetor Gas Line: 11 단계, 이미지 2/2
    • Use your fingers to pull the gas line off of the carburetor.

  12. 2004-2006 Honda Rancher 350 Four Wheeler Carburetor Repair, Remove Vacuum Line from Carburetor: 12 단계, 이미지 1/1
    • Use your fingers to disconnect the vacuum line from the carburetor.

  13. 2004-2006 Honda Rancher 350 Four Wheeler Carburetor Repair, Disconnect Electrical Sensor: 13 단계, 이미지 1/2 2004-2006 Honda Rancher 350 Four Wheeler Carburetor Repair, Disconnect Electrical Sensor: 13 단계, 이미지 2/2
    • Disconnect the electrical sensor connector located on the top frame of the right side of the four wheeler.

    • Be gentle so you do not break the plastic connector.

    • You will probably have to pry the clip on the connector with a small flat blade screwdriver to separate the two halves of the connector.

  14. 2004-2006 Honda Rancher 350 Four Wheeler Carburetor Repair, Remove Carburetor Cover: 14 단계, 이미지 1/1
    • Use a Phillips screwdriver to remove the screw that secures the black cover on the right side of the carburetor.

  15. 2004-2006 Honda Rancher 350 Four Wheeler Carburetor Repair, Remove Throttle Cable: 15 단계, 이미지 1/2 2004-2006 Honda Rancher 350 Four Wheeler Carburetor Repair, Remove Throttle Cable: 15 단계, 이미지 2/2
    • Twist the spring-loaded mechanism located underneath the black cover that was just removed in the previous step in order to loosen and slip the throttle cable out of the inside of the carburetor.

  16. 2004-2006 Honda Rancher 350 Four Wheeler Carburetor Repair, Remove Choke Cable: 16 단계, 이미지 1/2 2004-2006 Honda Rancher 350 Four Wheeler Carburetor Repair, Remove Choke Cable: 16 단계, 이미지 2/2
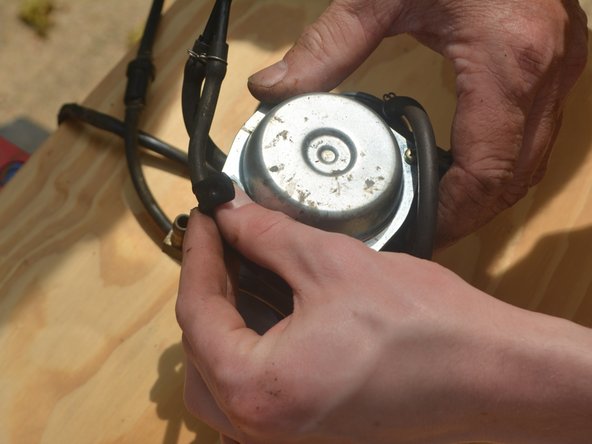
    • Remove the choke cable attached to the carburetor by twisting the carburetor around to unscrew it.

  17. 2004-2006 Honda Rancher 350 Four Wheeler Carburetor Repair, Remove the Carburetor from the Four Wheeler: 17 단계, 이미지 1/1
    • At this point, the carburetor should be fully disconnected. Lift the carburetor up out of the four wheeler and gently place it on a table where it can be further disassembled.

  18. 2004-2006 Honda Rancher 350 Four Wheeler Carburetor Repair, Remove Primer Assembly: 18 단계, 이미지 1/2 2004-2006 Honda Rancher 350 Four Wheeler Carburetor Repair, Remove Primer Assembly: 18 단계, 이미지 2/2
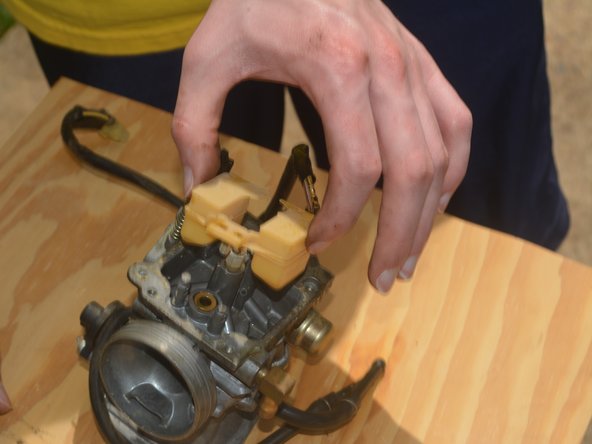
    • Use the Phillips screwdriver to remove the two screws holding the primer assembly on the carburetor.

    • When you take this screw out, be careful that you do not lose the spring underneath it.

  19. 2004-2006 Honda Rancher 350 Four Wheeler Carburetor Repair, Remove Top Cover: 19 단계, 이미지 1/3 2004-2006 Honda Rancher 350 Four Wheeler Carburetor Repair, Remove Top Cover: 19 단계, 이미지 2/3 2004-2006 Honda Rancher 350 Four Wheeler Carburetor Repair, Remove Top Cover: 19 단계, 이미지 3/3
    • Use a Phillips screwdriver to unscrew the four screws that secure the top metal cover of the carburetor, and remove the cover.

    • After you remove the metal cover, pull out the spring and rubber bellows that was underneath it.

    • Be sure to remember the position of the vacuum holder highlighted in the picture so that you can put it back in the same position later.

  20. 2004-2006 Honda Rancher 350 Four Wheeler Carburetor Repair, Remove Float-Bowl Assembly: 20 단계, 이미지 1/3 2004-2006 Honda Rancher 350 Four Wheeler Carburetor Repair, Remove Float-Bowl Assembly: 20 단계, 이미지 2/3 2004-2006 Honda Rancher 350 Four Wheeler Carburetor Repair, Remove Float-Bowl Assembly: 20 단계, 이미지 3/3
    • Use a Phillips screwdriver to remove the four screws that secure the float-bowl assembly.

  21. 2004-2006 Honda Rancher 350 Four Wheeler Carburetor Repair, Remove Float Assembly: 21 단계, 이미지 1/2 2004-2006 Honda Rancher 350 Four Wheeler Carburetor Repair, Remove Float Assembly: 21 단계, 이미지 2/2
    • Use a punch or small flat blade screwdriver to drive out the pin holding the float and lift the float out.

  22. 2004-2006 Honda Rancher 350 Four Wheeler Carburetor Repair, Clean Carburetor: 22 단계, 이미지 1/2 2004-2006 Honda Rancher 350 Four Wheeler Carburetor Repair, Clean Carburetor: 22 단계, 이미지 2/2
    • Thoroughly spray the disassembled carburetor pieces with Super Clean and scrub everything with a toothbrush.

    • Rinse the parts with water from a garden hose.

  23. 2004-2006 Honda Rancher 350 Four Wheeler Carburetor Repair, Dry with Compressed Air: 23 단계, 이미지 1/1
    • Use an air compressor to blow air through all of the openings in the carburetor to dry it.

  24. 2004-2006 Honda Rancher 350 Four Wheeler Carburetor Repair, Clean with Carburetor Cleaner: 24 단계, 이미지 1/2 2004-2006 Honda Rancher 350 Four Wheeler Carburetor Repair, Clean with Carburetor Cleaner: 24 단계, 이미지 2/2
    • Thoroughly spray carburetor cleaner all over the outside, inside, and openings of the carburetor.

    • Be careful not to get carburetor cleaner on your skin or eyes or breathe it in.

  25. 2004-2006 Honda Rancher 350 Four Wheeler Carburetor Repair, Replace Idle Speed Adjustment Screw and Spring: 25 단계, 이미지 1/1
    • Unscrew and replace the idle speed adjustment screw and spring provided in the carburetor kit.

  26. 2004-2006 Honda Rancher 350 Four Wheeler Carburetor Repair, Replace the Idle Air Adjustment Needle: 26 단계, 이미지 1/2 2004-2006 Honda Rancher 350 Four Wheeler Carburetor Repair, Replace the Idle Air Adjustment Needle: 26 단계, 이미지 2/2
    • Use a flat blade screwdriver to unscrew and replace the idle air adjustment needle along with its rubber o-rings provided in the carburetor kit.

    • Be sure to take note of the number of turns that the screw is initially screwed in, as this is the factory adjusted idle air for the four wheeler; you will want to put this screw in the exact same position when you screw the new needle in.

  27. 2004-2006 Honda Rancher 350 Four Wheeler Carburetor Repair, Replace Carburetor Jet: 27 단계, 이미지 1/1
    • Use a flat blade screwdriver to unscrew and replace the carburetor jet provided in the carburetor kit.

  28. 2004-2006 Honda Rancher 350 Four Wheeler Carburetor Repair, Replace Orifice #1: 28 단계, 이미지 1/1
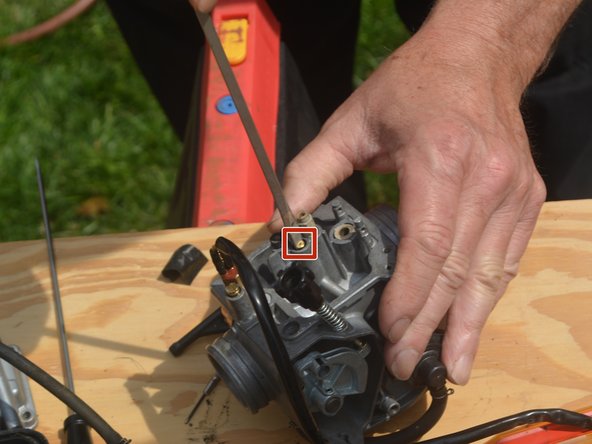
    • Use a flat blade screwdriver to unscrew and replace the orifice highlighted in the photo.

  29. 2004-2006 Honda Rancher 350 Four Wheeler Carburetor Repair, Replace Orifice #2: 29 단계, 이미지 1/1
    • Use a flat blade screwdriver to unscrew and replace the orifice shown in the photo.

  30. 2004-2006 Honda Rancher 350 Four Wheeler Carburetor Repair, Replace Orifice #3: 30 단계, 이미지 1/1
    • Use a flat blade screwdriver to unscrew and replace the orifice shown in the photo.

  31. 2004-2006 Honda Rancher 350 Four Wheeler Carburetor Repair, Replace Float Inlet Needle and Spring: 31 단계, 이미지 1/3 2004-2006 Honda Rancher 350 Four Wheeler Carburetor Repair, Replace Float Inlet Needle and Spring: 31 단계, 이미지 2/3 2004-2006 Honda Rancher 350 Four Wheeler Carburetor Repair, Replace Float Inlet Needle and Spring: 31 단계, 이미지 3/3
    • Replace the float inlet needle and spring provided in the carburetor kit.

    • Use pliers to re-attach the float to the carburetor by pressing in the float pin.

  32. 2004-2006 Honda Rancher 350 Four Wheeler Carburetor Repair, Replace Float Bowl Gasket: 32 단계, 이미지 1/1
    • Remove the old gasket from the float bowl assembly and replace it with the new gasket provided in the kit.

결론

There are other optional parts included in the kit that you can replace if they are worn-out on your specific carburetor. Once you have finished replacing all of the old parts, reassemble your device by following these instructions in reverse order.

다른 9명이 해당 안내서를 완성하였습니다.

MASConsultants

회원 가입일: 04/03/17

391 평판

안내서 1개 작성함

댓글 2개

It was a good article until step # 7. This is not a gas line. It is an engine vent line that goes from the engine to the air cleaner box. It has nothing to do with gasoline.

Norma Johnson - 답글

Thanks for your feedback - this was absolutely a mistake and I have updated the article to correct it.

MASConsultants -

댓글 쓰기

조회 통계:

24 시간 전: 8

7일 전: 51

30일 전: 290

전체 시간: 44,672