주요 콘텐츠로 건너뛰기

3DR Iris Plus Quadcopter Battery Connector Replacement

필요한 것

  1. 3DR Iris Plus Quadcopter Battery Connector Replacement, Battery: 1 단계, 이미지 1/1
    • Power off the drone by holding down the power button.

    • Remove the battery by disconnecting it from the main battery connector.

    • Press the power button again to ensure all electricity is discharged.

    • This step is imperative as it is dangerous to handle drone components with a running current!

  2. 3DR Iris Plus Quadcopter Battery Connector Replacement, Gimbal: 2 단계, 이미지 1/3 3DR Iris Plus Quadcopter Battery Connector Replacement, Gimbal: 2 단계, 이미지 2/3 3DR Iris Plus Quadcopter Battery Connector Replacement, Gimbal: 2 단계, 이미지 3/3
    • If your drone is equipped with it, remove the video transmitter.

    • Disconnect all cables from the gimbal.

    • If your drone has neither the gimbal or video transmitter, you can skip this step.

  3. 3DR Iris Plus Quadcopter Battery Connector Replacement: 3 단계, 이미지 1/2 3DR Iris Plus Quadcopter Battery Connector Replacement: 3 단계, 이미지 2/2
    • Unscrew the 16 mm screw attaching the gimbal mount to the body of the drone using the 3 mm Hex screwdriver/key.

  4. 3DR Iris Plus Quadcopter Battery Connector Replacement: 4 단계, 이미지 1/2 3DR Iris Plus Quadcopter Battery Connector Replacement: 4 단계, 이미지 2/2
    • Rotate the drone 180 degrees.

    • Unscrew the other 16mm gimbal mount screw using the 3 mm Hex screwdriver/key.

  5. 3DR Iris Plus Quadcopter Battery Connector Replacement: 5 단계, 이미지 1/1
    • Remove the gimbal mount from the body of the drone.

  6. 3DR Iris Plus Quadcopter Battery Connector Replacement, Bottom Shell: 6 단계, 이미지 1/2 3DR Iris Plus Quadcopter Battery Connector Replacement, Bottom Shell: 6 단계, 이미지 2/2
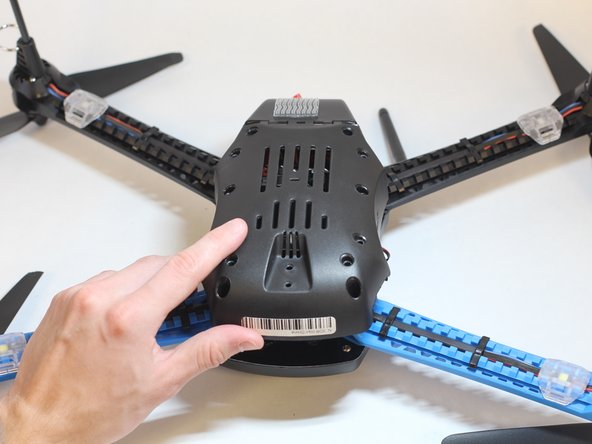
    • Remove the eight 11mm screws attaching the underbody of the drone using the 2mm Hex screwdriver/key.

  7. 3DR Iris Plus Quadcopter Battery Connector Replacement: 7 단계, 이미지 1/3 3DR Iris Plus Quadcopter Battery Connector Replacement: 7 단계, 이미지 2/3 3DR Iris Plus Quadcopter Battery Connector Replacement: 7 단계, 이미지 3/3
    • Remove the two larger, 12mm screws attached to the Go Pro mount using the 3mm Hex screwdriver/key.

    • Lift to remove the mount.

  8. 3DR Iris Plus Quadcopter Battery Connector Replacement: 8 단계, 이미지 1/3 3DR Iris Plus Quadcopter Battery Connector Replacement: 8 단계, 이미지 2/3 3DR Iris Plus Quadcopter Battery Connector Replacement: 8 단계, 이미지 3/3
    • Feed both wires through the grill of the bottom shell.

    • Lift to remove the shell.

    • There are two cables tethering the shell to the body of the drone. It is difficult and unnecessary to remove them. Simply lay the shell to the side.

  9. 3DR Iris Plus Quadcopter Battery Connector Replacement, Battery Connector: 9 단계, 이미지 1/2 3DR Iris Plus Quadcopter Battery Connector Replacement, Battery Connector: 9 단계, 이미지 2/2
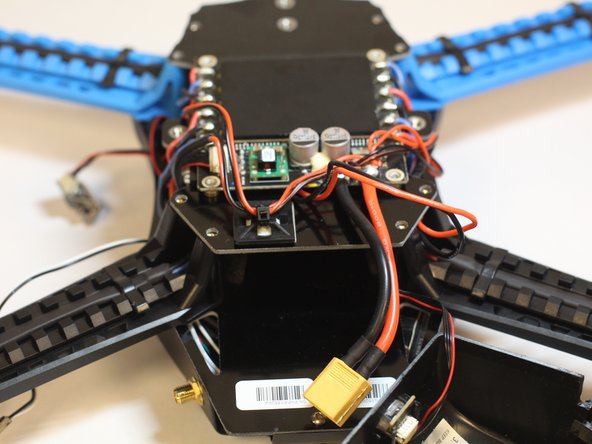
    • Identify the power line by locating the black and red wire pair with the largest gauge (wire thickness) extending from the board with a large black heat sink.

    • The power line also has a female XT60 connector attached on the opposite end.

  10. 3DR Iris Plus Quadcopter Battery Connector Replacement: 10 단계, 이미지 1/1
    • Cut and remove the damaged portion of the power cable with wire strippers or end cutters.

    • Take a new XT60 male connector with pre-attached wires (at least 14 AWG) and solder it to what is left of the connected power line.

    • You can purchase the XT60 male connectors through Amazon or most hobbyist drone shops.

    • Make sure that once the wire has been reassembled to electrically isolate any exposed wire using electrical tape or heat shrink.

결론

To reassemble your device, follow these instructions in reverse order.

다른 2명이 해당 안내서를 완성하였습니다.

Jason SooHoo

회원 가입일: 02/10/20

314 평판

안내서 1개 작성함

Cal Poly, Team S7-G5, Regan Winter 2020 Cal Poly, Team S7-G5, Regan Winter 2020 회원

CPSU-REGAN-W20S7G5

5 회원들

안내서 9개 작성하였습니다

댓글 0개

댓글 쓰기

조회 통계:

24 시간 전: 0

7일 전: 0

30일 전: 1

전체 시간: 245