주요 콘텐츠로 건너뛰기

68cc Gas Bike Compression Head Replacement

필요한 것

  1. 68cc Gas Bike Compression Head Replacement, Compression Head: 1 단계, 이미지 1/1
    • Clean the compression head with an alcohol based cleaner to ensure a perfect fit on the engine.

    • DO NOT use soap or an acid based cleaner. They will ruin the compression head.

  2. 68cc Gas Bike Compression Head Replacement: 2 단계, 이미지 1/2 68cc Gas Bike Compression Head Replacement: 2 단계, 이미지 2/2
    • Detach the rubber CDI from the spark plug by gently pulling up and away from the engine.

    • The rubber part that grabs the spark plug on the CDI is very delicate and may break with excessive force, use minimal force

  3. 68cc Gas Bike Compression Head Replacement: 3 단계, 이미지 1/2 68cc Gas Bike Compression Head Replacement: 3 단계, 이미지 2/2
    • Place the spark plug tool on the spark plug and twist it counter clockwise to loosen it.

    • After loosening the spark plug all the way, remove it by lifting up.

  4. 68cc Gas Bike Compression Head Replacement: 4 단계, 이미지 1/3 68cc Gas Bike Compression Head Replacement: 4 단계, 이미지 2/3 68cc Gas Bike Compression Head Replacement: 4 단계, 이미지 3/3
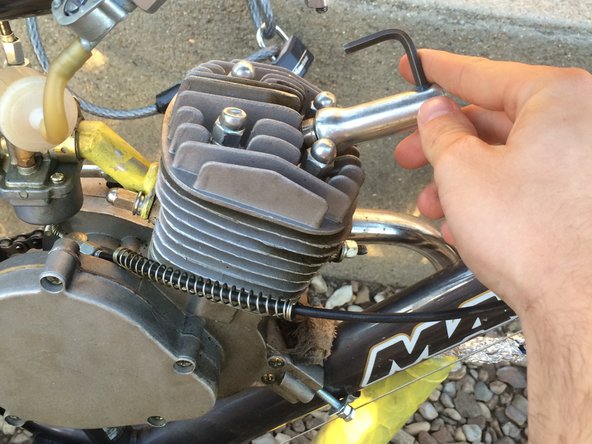
    • Place your 3/8" wrench on any of the four top cap nuts on the compression head currently on the bike.

    • Turn the wrench counter clock wise to loosen the cap nut and remove it. Then remove the washer and the locking washer. Repeat this for all cap nuts.

    • Keep the washers and lock washers with the cap nut they were with on the compression head, it is not recommended to mix them up.

    • Use the flat head screw driver to remove washers stuck to the compression head.

    • Sometimes the bolt gets stuck on the nut and comes out, do not worry, this is normal.

  5. 68cc Gas Bike Compression Head Replacement: 5 단계, 이미지 1/3 68cc Gas Bike Compression Head Replacement: 5 단계, 이미지 2/3 68cc Gas Bike Compression Head Replacement: 5 단계, 이미지 3/3
    • Remove the compression head by lifting up.

    • Remove the head gasket from the engine. Sometimes the head gasket gets stuck to the compression, remove the head gasket if it is stuck to the compression head.

    • Clean metal head gasket with the rubbing alcohol.

    • Reinstall metal head gasket on the engine after cleaning.

    • Without the head gasket properly cleaned and replaced onto the engine the engine will not run properly.

  6. 68cc Gas Bike Compression Head Replacement: 6 단계, 이미지 1/3 68cc Gas Bike Compression Head Replacement: 6 단계, 이미지 2/3 68cc Gas Bike Compression Head Replacement: 6 단계, 이미지 3/3
    • Place the new compression head on the engine.

    • Place the washers and locking washers back in their respective places and place the cap nuts on top. Hand tighten the bolts.

  7. 68cc Gas Bike Compression Head Replacement: 7 단계, 이미지 1/2 68cc Gas Bike Compression Head Replacement: 7 단계, 이미지 2/2
    • This is important information for the next few steps.

    • This is nut #1, the one on the right closest to the camera.

    • This is nut #2, the one on the right farthest from the camera.

    • This is nut #3, the one on the right farthest from the camera.

    • This is nut #4, the one on the left closest to the camera.

    • Pay close attention to the relation of the nuts to the carburetor and the exhaust.

    • If you are looking at the engine from this view the handle bars will be to your right and the seat will be to your left.

  8. 68cc Gas Bike Compression Head Replacement: 8 단계, 이미지 1/2 68cc Gas Bike Compression Head Replacement: 8 단계, 이미지 2/2
    • THE NEXT TWO STEPS ARE VERY IMPORTANT AND MAY HINDER PERFORMANCE OR CAUSE ENGINE FAILURE IF DONE INCORRECTLY.

    • Using your 3/8” wrench, place it on the first cap nut labeled in the picture above. This is the cap nut in the red circle. Tighten it 2 full turns clock wise.

    • Next, place the wrench on cap screw three and tighten it 2 full turns clock wise. Cap screw three is the one labeled with by yellow arrows or circles.

  9. 68cc Gas Bike Compression Head Replacement: 9 단계, 이미지 1/2 68cc Gas Bike Compression Head Replacement: 9 단계, 이미지 2/2
    • Place the wrench on cap screw two and tighten it 2 full turns clock wise. Cap screw three is the one labeled with by orange arrows or circles.

    • Place the wrench on cap screw four and tighten for 2 turns. Cap screw four is labeled in green.

  10. 68cc Gas Bike Compression Head Replacement: 10 단계, 이미지 1/1
    • Repeat the tightening pattern two more times to make sure that all screws have the same amount of tightness one them.

    • The tightening sequence is 1 to 3 to2 to 4, and repeat. Or color wise, red to yellow to orange to green.

  11. 68cc Gas Bike Compression Head Replacement: 11 단계, 이미지 1/2 68cc Gas Bike Compression Head Replacement: 11 단계, 이미지 2/2
    • Use the spark plug tool to reinstall the spark plug by screwing it in clock wise.

    • Reattach the rubber CDI to the spark plug.

    • Make a quick visual inspection to make sure nothing looks out of the ordinary.

    • You have now installed a new compression head on your 68cc gas bike!

    • Go out for a short ride to test the new compression head to make sure all components are properly installed.

결승점

다른 9명이 해당 안내서를 완성하였습니다.

Jake DeBoer

회원 가입일: 09/29/15

415 평판

안내서 1개 작성함

Cal Poly, Team 15-1, Green Fall 2015 Cal Poly, Team 15-1, Green Fall 2015 회원

CPSU-GREEN-F15S15G1

5 회원들

안내서 6개 작성하였습니다

댓글 0개

댓글 쓰기

조회 통계:

24 시간 전: 4

7일 전: 17

30일 전: 50

전체 시간: 1,766