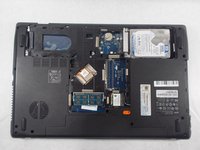
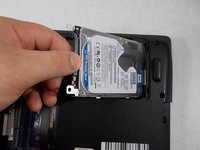
주요 콘텐츠로 건너뛰기

ACER Aspire 7750G-6645 Hard Drive Replacement

필요한 것

  1. ACER Aspire 7750G-6645 Hard Drive Replacement, Back Cover: 1 단계, 이미지 1/1
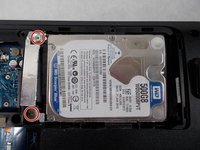
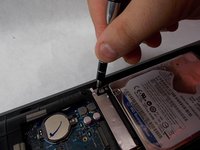
    • Remove three 60mm Phillips #00 screws that are holding the bottom cover in place.

  2. ACER Aspire 7750G-6645 Hard Drive Replacement: 2 단계, 이미지 1/1
    • Lift up the back cover of the device, you may need to use a spudger to assist.

  3. ACER Aspire 7750G-6645 Hard Drive Replacement, Hard Drive: 3 단계, 이미지 1/3 ACER Aspire 7750G-6645 Hard Drive Replacement, Hard Drive: 3 단계, 이미지 2/3 ACER Aspire 7750G-6645 Hard Drive Replacement, Hard Drive: 3 단계, 이미지 3/3
    • Remove two 4mm Phillips #00 screws that are holding the hard drive in place.

  4. ACER Aspire 7750G-6645 Hard Drive Replacement: 4 단계, 이미지 1/2 ACER Aspire 7750G-6645 Hard Drive Replacement: 4 단계, 이미지 2/2
    • Push the hard drive to the right and push it upward to remove. You may need a spudger or plastic opening tool to assist you with this step.

결론

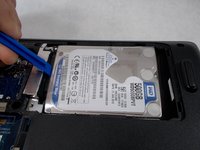
To reassemble your device, follow these instructions in reverse order.

다른 한 분이 해당 안내서를 완성하였습니다.

Thong

회원 가입일: 03/18/19

199 평판

안내서 2개 작성하였습니다

UMass Dartmouth, Team S1-G2, Botvin Spring 2019 UMass Dartmouth, Team S1-G2, Botvin Spring 2019 회원

UMASSD-BOTVIN-S19S1G2

4 회원들

안내서 6개 작성하였습니다

댓글 0개

댓글 쓰기

조회 통계:

24 시간 전: 1

7일 전: 4

30일 전: 18

전체 시간: 2,231