소개
If you notice your ACER Aspire V5(571P-6609) laptop is making excessive fan noise or overheating, it might be the result of excess dust buildup. The fan circulates air through the system to keep the components cool. The circulation of cool air is integral to the lifespan of your laptop. After years of exposure to dust-filled air, the laptop fan can get clogged; When this happens, you should consider cleaning the fan.
필요한 것
-
-
Place the laptop on a non-static surface and power it off completely. Strap the static-resistant wristband on to either of your wrists.
-
-
-
Close the laptop and flip over. Locate the battery slide release. This guide marks the location with a red circle
-
Use a pointed tool (we used a screwdriver) to slide the release to the left when facing the laptop from the non-battery side.
-
Gently pull the battery away from the laptop with the slide release held open.
-
-
-
-
Beneath the keyboard, remove the undercarriage panel to access the motherboard. Remove the six screws marked in this image.
-
Detach the two cables marked in this picture by pulling upwards on the plastic lock mechanism above the flex cable with the tweezers.
-
Gently pull the cable out with tweezers.
-
-
-
Slide Jimmy Tool in between front and back panel of the laptop as demonstrated in this photo.
-
Slowly rotate the Jimmy Tool in hand until the top panel pops loose. repeat on all sides until the top panel is free of the main body.
-
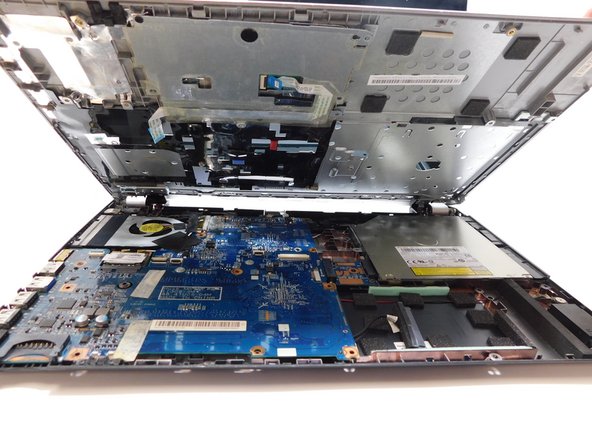
Gently lift the top panel free of the main body. You now have access to the Motherboard.
-


To reassemble your device, follow these instructions in reverse order.
To reassemble your device, follow these instructions in reverse order.
팀

Gateway, Team 1-1, Pee Fall 2022 Gateway, Team 1-1, Pee Fall 2022 회원
GCC-PEE-F22S1G1
4 회원들
안내서 6개 작성하였습니다