주요 콘텐츠로 건너뛰기

ASUS Eee Pad Transformer microSD Card Slot, HDMI Port, and Headphone Jack Replacement

필요한 것

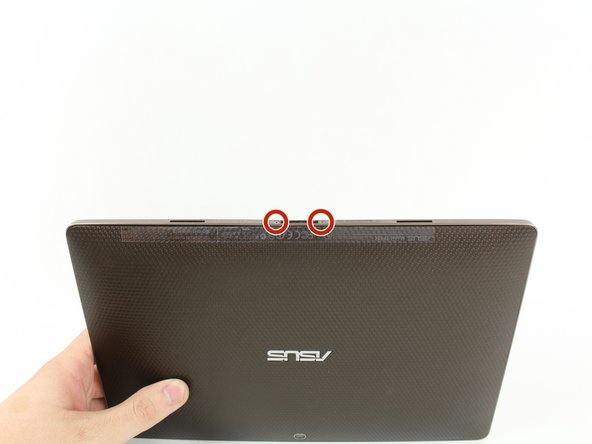
  1. ASUS Eee Pad Transformer microSD Card Slot, HDMI Port, and Headphone Jack Replacement, Back Panel: 1 단계, 이미지 1/2 ASUS Eee Pad Transformer microSD Card Slot, HDMI Port, and Headphone Jack Replacement, Back Panel: 1 단계, 이미지 2/2
    • Use T5 Torx Screwdriver to remove two 4.5 millimeter T5 screws on either side of the port on the bottom of the tablet.

  2. ASUS Eee Pad Transformer microSD Card Slot, HDMI Port, and Headphone Jack Replacement: 2 단계, 이미지 1/3 ASUS Eee Pad Transformer microSD Card Slot, HDMI Port, and Headphone Jack Replacement: 2 단계, 이미지 2/3 ASUS Eee Pad Transformer microSD Card Slot, HDMI Port, and Headphone Jack Replacement: 2 단계, 이미지 3/3
    • Use the Plastic Opening Tool to pry between the main tablet body and the outer rim casing. Remove the outer rim casing by prying all the way around the device and pulling the rim upward.

    • The physical buttons are located on the outside of the rim on the right side, proceed with the guide to locate internal buttons.

  3. ASUS Eee Pad Transformer microSD Card Slot, HDMI Port, and Headphone Jack Replacement: 3 단계, 이미지 1/1
    • Remove the four 2 millimeter Phillips #00 screws at the corners of the tablet.

  4. ASUS Eee Pad Transformer microSD Card Slot, HDMI Port, and Headphone Jack Replacement: 4 단계, 이미지 1/1
    • Use a Phillips #00 Screwdriver to remove the three 3 millimeter screws securing the front panel to the back panel found above the camera area, on the top portion of the tablet.

  5. ASUS Eee Pad Transformer microSD Card Slot, HDMI Port, and Headphone Jack Replacement: 5 단계, 이미지 1/1
    • Use a Phillips #00 Screwdriver to remove the three 3 millimeter screws securing the front panel to the back panel found on the bottom portion of the tablet near the port.

  6. ASUS Eee Pad Transformer microSD Card Slot, HDMI Port, and Headphone Jack Replacement: 6 단계, 이미지 1/2 ASUS Eee Pad Transformer microSD Card Slot, HDMI Port, and Headphone Jack Replacement: 6 단계, 이미지 2/2
    • Remove back panel by pulling away from the remaining device.

  7. ASUS Eee Pad Transformer microSD Card Slot, HDMI Port, and Headphone Jack Replacement, Remove screws: 7 단계, 이미지 1/1
    • Use a Phillips #00 Screwdriver to remove the three 3 millimeter screws found on back side of the device to the left of the rear-facing camera.

  8. ASUS Eee Pad Transformer microSD Card Slot, HDMI Port, and Headphone Jack Replacement, Lift up flaps: 8 단계, 이미지 1/2 ASUS Eee Pad Transformer microSD Card Slot, HDMI Port, and Headphone Jack Replacement, Lift up flaps: 8 단계, 이미지 2/2
    • Use Plastic Opening Tool to lift up the two white flaps.

  9. ASUS Eee Pad Transformer microSD Card Slot, HDMI Port, and Headphone Jack Replacement, Remove wire clip: 9 단계, 이미지 1/2 ASUS Eee Pad Transformer microSD Card Slot, HDMI Port, and Headphone Jack Replacement, Remove wire clip: 9 단계, 이미지 2/2
    • Use Tweezers to unclip the wire from the back panel by pulling straight outward from the device.

  10. ASUS Eee Pad Transformer microSD Card Slot, HDMI Port, and Headphone Jack Replacement, Pull out panel: 10 단계, 이미지 1/3 ASUS Eee Pad Transformer microSD Card Slot, HDMI Port, and Headphone Jack Replacement, Pull out panel: 10 단계, 이미지 2/3 ASUS Eee Pad Transformer microSD Card Slot, HDMI Port, and Headphone Jack Replacement, Pull out panel: 10 단계, 이미지 3/3
    • Pull microSD Card, HDMI Port, and Headphone Jack panel straight out from tablet.

    • Use Plastic Opening Tool to remove the wire on the panel by hooking it around the white clip and pulling straight out from the panel.

결론

To reassemble your device, follow these instructions in reverse order.

다른 4명이 해당 안내서를 완성하였습니다.
Sandy Babich

회원 가입일: 09/23/14

1,885 평판

안내서 5개 작성하였습니다

Cal Poly, Team 13-9, Forte Fall 2014 Cal Poly, Team 13-9, Forte Fall 2014 회원

CPSU-FORTE-F14S13G9

5 회원들

안내서 12개 작성하였습니다

댓글 0개

댓글 쓰기

조회 통계:

24 시간 전: 0

7일 전: 0

30일 전: 1

전체 시간: 3,869