주요 콘텐츠로 건너뛰기

ASUS Portable AiO PT2001 Heat Sink and Fan Replacement

필요한 것

  1. ASUS Portable AiO PT2001 Heat Sink and Fan Replacement, Back Panel: 1 단계, 이미지 3개 중 1개 ASUS Portable AiO PT2001 Heat Sink and Fan Replacement, Back Panel: 1 단계, 이미지 3개 중 2개 ASUS Portable AiO PT2001 Heat Sink and Fan Replacement, Back Panel: 1 단계, 이미지 3개 중 3개
    • Remove the grey scuff guard at the bottom of the PC by pressing down on it, and pulling it away.

    • Lift the hinge and remove the grey rubber tabs on either side of the PC’s model information.

    • Remove the two 7.62mm Phillips #1 screws beneath the rubber tabs under the hinge and the four 7.62mm Phillips #1 screws where the scuff guard was removed.

    • Remove the two 4.74mm Phillips #1 screws under the hinge (near the hinge joints) and a 4.74mm Phillips #1 screw under the handle.

  2. ASUS Portable AiO PT2001 Heat Sink and Fan Replacement: 2 단계, 이미지 3개 중 1개 ASUS Portable AiO PT2001 Heat Sink and Fan Replacement: 2 단계, 이미지 3개 중 2개 ASUS Portable AiO PT2001 Heat Sink and Fan Replacement: 2 단계, 이미지 3개 중 3개
    • Use 1-2 plastic opening tools or nylon spudgers to firmly pry open the back panel.

    • We recommend that you start prying the panel where the scuff guard was removed.

    • Prying the back panel will cause loud popping noises. This is just the sound of the clips that hold the back panel to the PC popping off.

    • Using excess force while prying can break the clips that hold the back panel and can damage the ports on the side of the PC.

  3. ASUS Portable AiO PT2001 Heat Sink and Fan Replacement: 3 단계, 이미지 3개 중 1개 ASUS Portable AiO PT2001 Heat Sink and Fan Replacement: 3 단계, 이미지 3개 중 2개 ASUS Portable AiO PT2001 Heat Sink and Fan Replacement: 3 단계, 이미지 3개 중 3개
    • Disconnect the three cables connecting the back panel ports to the motherboard.

    • Flip up the locking latch holding the two ribbon cables with a plastic opening tool and pull the cables out.

    • Gently wiggle the third connector out of its socket.

  4. ASUS Portable AiO PT2001 Heat Sink and Fan Replacement, Heat Sink and Fan: 4 단계, 이미지 2개 중 1개 ASUS Portable AiO PT2001 Heat Sink and Fan Replacement, Heat Sink and Fan: 4 단계, 이미지 2개 중 2개
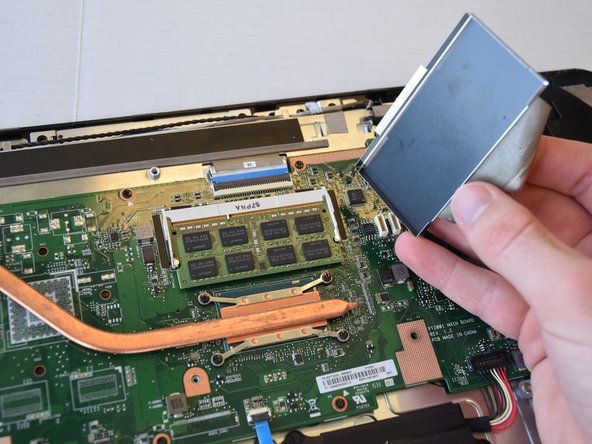
    • Remove the tape attached to the heat sink and the metal enclosure.

    • Lift the metal enclosure off.

  5. ASUS Portable AiO PT2001 Heat Sink and Fan Replacement: 5 단계, 이미지 1개 중 1개
    • Remove the four 3.0 mm Phillips #1 screws attaching the heat sink to the motherboard.

    • Remove the three 4.0 mm Phillips #1 screws connecting the fan to the device.

  6. ASUS Portable AiO PT2001 Heat Sink and Fan Replacement: 6 단계, 이미지 1개 중 1개
    • Lift the heat sink and fan assembly off of the device.

    • When putting the heat sink back into place, reapply thermal paste to the underside of the heat sink where it rests on the motherboard.

결론

To reassemble your device, follow these instructions in reverse order.

작성자

1다른 기여자 명과 함께

Elliot Kane

회원 가입일: 04/17/18

381 평판

안내서 2개를 작성함

Cal Poly, Team S17-G5, Livingston Spring 2018 Cal Poly, Team S17-G5, Livingston Spring 2018 회원

CPSU-LIVINGSTON-S18S17G5

4 회원들

안내서 16개를 작성함

0가이드 댓글

댓글 쓰기

조회 통계:

지난 24시간: 1

지난 7일: 2

지난 30일: 7

전체 시간: 432