주요 콘텐츠로 건너뛰기

ASUS Portable AiO PT2001 Speaker Replacement

필요한 것

  1. ASUS Portable AiO PT2001 Speaker Replacement, Back Panel: 1 단계, 이미지 1/3 ASUS Portable AiO PT2001 Speaker Replacement, Back Panel: 1 단계, 이미지 2/3 ASUS Portable AiO PT2001 Speaker Replacement, Back Panel: 1 단계, 이미지 3/3
    • Remove the grey scuff guard at the bottom of the PC by pressing down on it, and pulling it away.

    • Lift the hinge and remove the grey rubber tabs on either side of the PC’s model information.

    • Remove the two 7.62mm Phillips #1 screws beneath the rubber tabs under the hinge and the four 7.62mm Phillips #1 screws where the scuff guard was removed.

    • Remove the two 4.74mm Phillips #1 screws under the hinge (near the hinge joints) and a 4.74mm Phillips #1 screw under the handle.

  2. ASUS Portable AiO PT2001 Speaker Replacement: 2 단계, 이미지 1/3 ASUS Portable AiO PT2001 Speaker Replacement: 2 단계, 이미지 2/3 ASUS Portable AiO PT2001 Speaker Replacement: 2 단계, 이미지 3/3
    • Use 1-2 plastic opening tools or nylon spudgers to firmly pry open the back panel.

    • We recommend that you start prying the panel where the scuff guard was removed.

    • Prying the back panel will cause loud popping noises. This is just the sound of the clips that hold the back panel to the PC popping off.

    • Using excess force while prying can break the clips that hold the back panel and can damage the ports on the side of the PC.

  3. ASUS Portable AiO PT2001 Speaker Replacement: 3 단계, 이미지 1/3 ASUS Portable AiO PT2001 Speaker Replacement: 3 단계, 이미지 2/3 ASUS Portable AiO PT2001 Speaker Replacement: 3 단계, 이미지 3/3
    • Disconnect the three cables connecting the back panel ports to the motherboard.

    • Flip up the locking latch holding the two ribbon cables with a plastic opening tool and pull the cables out.

    • Gently wiggle the third connector out of its socket.

  4. ASUS Portable AiO PT2001 Speaker Replacement, Speaker: 4 단계, 이미지 1/2 ASUS Portable AiO PT2001 Speaker Replacement, Speaker: 4 단계, 이미지 2/2
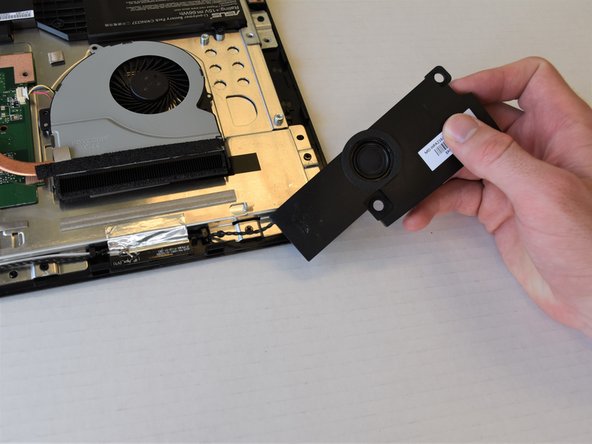
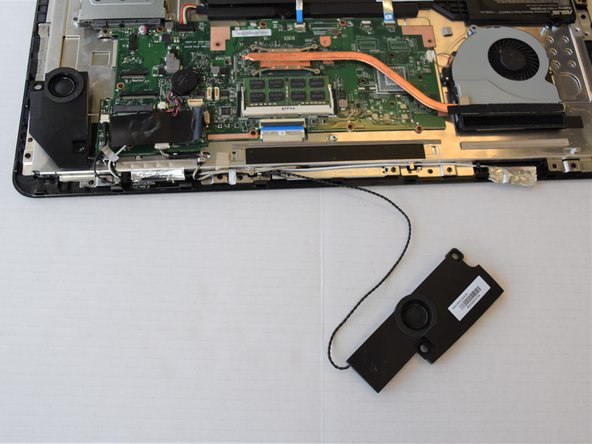
    • The two in-house speakers are located near the sides of the device with the motherboard in between.

    • Remove the two 2.35 mm Phillips #1 screws from each speaker.

  5. ASUS Portable AiO PT2001 Speaker Replacement: 5 단계, 이미지 1/2 ASUS Portable AiO PT2001 Speaker Replacement: 5 단계, 이미지 2/2
    • The two speakers are attached to each other with a cord that is threaded along the side of the casing. Gently pull the wire out

    • The cord is secured under two pieces of tape with multiple other wires. Make sure that you only remove the wire connecting the speakers.

    • Keep in mind that when replacing the wires, you will need to secure the tape again. Accordingly, be careful not to tear the tape when peeling it.

  6. ASUS Portable AiO PT2001 Speaker Replacement: 6 단계, 이미지 1/1
    • Pull the cord attached to the speaker out of the motherboard

결론

To reassemble your device, follow these instructions in reverse order.

다른 한 분이 해당 안내서를 완성하였습니다.

Erich Fenczik Warnock

회원 가입일: 04/17/18

193 평판

안내서 2개 작성하였습니다

Cal Poly, Team S17-G5, Livingston Spring 2018 Cal Poly, Team S17-G5, Livingston Spring 2018 회원

CPSU-LIVINGSTON-S18S17G5

4 회원들

안내서 16개 작성하였습니다

댓글 0개

댓글 쓰기

조회 통계:

24 시간 전: 0

7일 전: 1

30일 전: 5

전체 시간: 257