소개
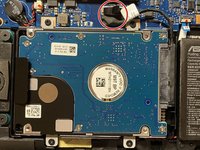
This guide will document the process of replacing an old hard drive of an ASUS Q524U Notebook PC laptop computer. When ones computer begins to scramble up folder and file names, frequently crashes when booting up Windows, begins to lose files and folders, and even has a long wait time to access folders and files that means the current hard drive is about to die.
This guide will demonstrate how people can save their important files and folders by replacing the failing hard drive. Be sure to power off the laptop and unplug from any power source prior to beginning your repair, including disconnecting the battery cable once you are inside the device.
필요한 것
-
-
Turn the laptop on its back, and place it on a flat and smooth surface. Identify the location of the back panels screws.
-
-


다른 3명이 해당 안내서를 완성하였습니다.
팀

University of Memphis, Team S3-G15, Willis Fall 2020 University of Memphis, Team S3-G15, Willis Fall 2020 회원
UM-WILLIS-F20S3G15
1 회원
안내서 1개 작성