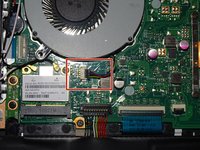
주요 콘텐츠로 건너뛰기

ASUS Vivobook Q301LA-BSI5T17 Fan/Heatsink Replacement

필요한 것

  1. ASUS Vivobook Q301LA-BSI5T17 Fan/Heatsink Replacement, Back Case Housing: 1 단계, 이미지 1개 중 1개
    • Remove all ten 6mm Phillips #1 screws from the bottom of the computer chassis.

  2. ASUS Vivobook Q301LA-BSI5T17 Fan/Heatsink Replacement: 2 단계, 이미지 1개 중 1개
    • Carefully pry open the back cover from the laptop and place it to the side.

  3. ASUS Vivobook Q301LA-BSI5T17 Fan/Heatsink Replacement, Fan: 3 단계, 이미지 1개 중 1개
    • Remove three 5mm Phillips #1 screws that are holding the fan in place.

  4. ASUS Vivobook Q301LA-BSI5T17 Fan/Heatsink Replacement: 4 단계, 이미지 2개 중 1개 ASUS Vivobook Q301LA-BSI5T17 Fan/Heatsink Replacement: 4 단계, 이미지 2개 중 2개
    • Carefully unplug the fan cable from the motherboard using a spudger or plastic opening tool.

  5. ASUS Vivobook Q301LA-BSI5T17 Fan/Heatsink Replacement: 5 단계, 이미지 2개 중 1개 ASUS Vivobook Q301LA-BSI5T17 Fan/Heatsink Replacement: 5 단계, 이미지 2개 중 2개
    • Carefully use your hands to remove the fan by pulling it from the heatsink housing.

    • Do not use excessive force; there is a potential to break the plastic.

결론

To reassemble your device, follow these instructions in reverse order.

작성자

7다른 기여자 명과 함께

Amrinder Singh

회원 가입일: 04/09/19

277 평판

안내서 3개를 작성함

IUPUI, Team S1-G2, Hovde Spring 2019 IUPUI, Team S1-G2, Hovde Spring 2019 회원

IUPUI-HOVDE-S19S1G2

3 회원들

안내서 4개를 작성함

댓글 0개

댓글 쓰기

조회 통계:

지난 24시간: 0

지난 7일: 2

지난 30일: 2

전체 시간: 315