주요 콘텐츠로 건너뛰기

ASUS Vivobook Q301LA-BSI5T17 Memory Card Replacement

필요한 것

  1. ASUS Vivobook Q301LA-BSI5T17 Memory Card Replacement, Back Case Housing: 1 단계, 이미지 1/1
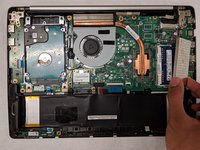
    • Remove all ten 6mm Phillips #1 screws from the bottom of the computer chassis.

  2. ASUS Vivobook Q301LA-BSI5T17 Memory Card Replacement: 2 단계, 이미지 1/1
    • Carefully pry open the back cover from the laptop and place it to the side.

  3. ASUS Vivobook Q301LA-BSI5T17 Memory Card Replacement, Memory Card: 3 단계, 이미지 1/2 ASUS Vivobook Q301LA-BSI5T17 Memory Card Replacement, Memory Card: 3 단계, 이미지 2/2
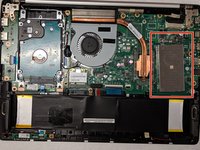
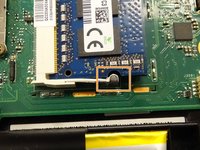
    • Lift the perforated metal cover up from the motherboard to expose the memory cards.

  4. ASUS Vivobook Q301LA-BSI5T17 Memory Card Replacement: 4 단계, 이미지 1/2 ASUS Vivobook Q301LA-BSI5T17 Memory Card Replacement: 4 단계, 이미지 2/2
    • Once the cover is removed the RAM will be accessible.

    • Use your fingertips to pry out the metal guards outlining both of the sides of the memory card.

    • The RAM stick should then pop up to rest at an angle to the motherboard.

  5. ASUS Vivobook Q301LA-BSI5T17 Memory Card Replacement: 5 단계, 이미지 1/1
    • Using your fingertips, slide the memory card out from the plastic housing and remove it from the board.

    • Be sure to remove the card at the same angle at which it rests to avoid damaging the card or the contacts of the slot.

결론

To reassemble your device, follow these instructions in reverse order.

Mark Fanelli

회원 가입일: 04/09/19

97 평판

안내서 1개 작성함

IUPUI, Team S1-G2, Hovde Spring 2019 IUPUI, Team S1-G2, Hovde Spring 2019 회원

IUPUI-HOVDE-S19S1G2

3 회원들

안내서 4개 작성하였습니다

댓글 0개

댓글 쓰기

조회 통계:

24 시간 전: 1

7일 전: 2

30일 전: 3

전체 시간: 421