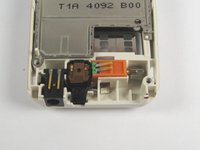
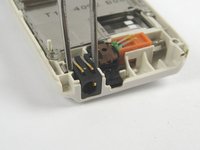
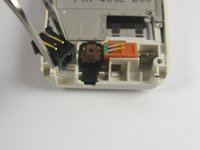
주요 콘텐츠로 건너뛰기

Accessing Nokia 3100b DC Input

필요한 것

  1. Accessing Nokia 3100b DC Input, Battery: 1 단계, 이미지 1개 중 1개
    • Make sure your phone is turned off.

  2. Accessing Nokia 3100b DC Input: 2 단계, 이미지 1개 중 1개
    • Press the button on the back of the phone and slide the back panel off.

    • Remove the battery by pulling it from the phone.

  3. Accessing Nokia 3100b DC Input, SIM Card: 3 단계, 이미지 1개 중 1개
    • Gently pull back the small metal frame holding the SIM card into place, and lift open the frame.

  4. Accessing Nokia 3100b DC Input: 4 단계, 이미지 1개 중 1개
    • Retrieve your SIM card.

  5. Accessing Nokia 3100b DC Input, Accessing Nokia 3100b DC Input: 5 단계, 이미지 1개 중 1개
    • Separate the front cover from the base.

  6. Accessing Nokia 3100b DC Input: 6 단계, 이미지 1개 중 1개
    • Using a T6 Torx screwdriver, remove the screws from the screen assembly.

  7. Accessing Nokia 3100b DC Input: 7 단계, 이미지 1개 중 1개
    • Separate the screen assembly from the base.

  8. Accessing Nokia 3100b DC Input: 8 단계, 이미지 3개 중 1개 Accessing Nokia 3100b DC Input: 8 단계, 이미지 3개 중 2개 Accessing Nokia 3100b DC Input: 8 단계, 이미지 3개 중 3개
    이 단계에 사용된 도구:
    Tweezers
    $4.99
    • Use a pair of tweezers to remove the DC input from the base.

결론

To reassemble your device, follow these instructions in reverse order.

다른 한 분이 해당 안내서를 완성하였습니다.

작성자

5다른 기여자 명과 함께

Sterling Fuentes

회원 가입일: 04/09/10

130 평판

안내서 8개를 작성함

Cal Poly, Team 29-64, Johann Spring 2010 Cal Poly, Team 29-64, Johann Spring 2010 회원

CPSU-JOHANN-S10S29G64

3 회원들

안내서 8개를 작성함

0가이드 댓글

댓글 쓰기

조회 통계:

지난 24시간: 1

지난 7일: 1

지난 30일: 8

전체 시간: 1,163