주요 콘텐츠로 건너뛰기

Acer Aspire 3 A315-21-92FX Speakers Replacement

필요한 것

  1. Acer Aspire 3 A315-21-92FX Speakers Replacement, RAM: 1 단계, 이미지 1/1
    • Flip the Acer Aspire 3 A315-21-92FX over so the back-side is oriented to the upward position.

  2. Acer Aspire 3 A315-21-92FX Speakers Replacement: 2 단계, 이미지 1/2 Acer Aspire 3 A315-21-92FX Speakers Replacement: 2 단계, 이미지 2/2
    • Remove the single 2.5mm Phillips #0 screw.

  3. Acer Aspire 3 A315-21-92FX Speakers Replacement: 3 단계, 이미지 1/1
    • Use the iFixit opening tool to remove the small cover.

  4. Acer Aspire 3 A315-21-92FX Speakers Replacement: 4 단계, 이미지 1/3 Acer Aspire 3 A315-21-92FX Speakers Replacement: 4 단계, 이미지 2/3 Acer Aspire 3 A315-21-92FX Speakers Replacement: 4 단계, 이미지 3/3
    • Press the tabs on each side of the RAM outwards, and the memory module will pop up at an angle.

  5. Acer Aspire 3 A315-21-92FX Speakers Replacement: 5 단계, 이미지 1/2 Acer Aspire 3 A315-21-92FX Speakers Replacement: 5 단계, 이미지 2/2
    • Pull the RAM slowly out of the Acer Aspire 3 A315-21-92FX.

  6. Acer Aspire 3 A315-21-92FX Speakers Replacement, Hard Drive: 6 단계, 이미지 1/1
    • Please make sure that there is no external access to the battery, and the battery is out of power.

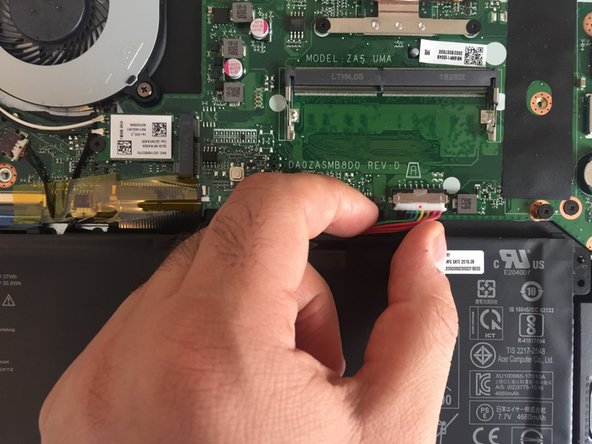
    • Flip the Acer Aspire 3 A315-21-92FX over, so the back-side is oriented to the upward position.

  7. Acer Aspire 3 A315-21-92FX Speakers Replacement: 7 단계, 이미지 1/2 Acer Aspire 3 A315-21-92FX Speakers Replacement: 7 단계, 이미지 2/2
    • Remove the single 2.5mm Phillips #0 screw.

  8. Acer Aspire 3 A315-21-92FX Speakers Replacement: 8 단계, 이미지 1/1
    • Use the iFixit opening tool to remove the cover of the hard disk.

  9. Acer Aspire 3 A315-21-92FX Speakers Replacement: 9 단계, 이미지 1/2 Acer Aspire 3 A315-21-92FX Speakers Replacement: 9 단계, 이미지 2/2
    • Pull the hard disk out of the Acer Aspire 3 A315-21-92FX slightly and slowly.

    • This laptop is missing the hard drive.

  10. Acer Aspire 3 A315-21-92FX Speakers Replacement, Battery: 10 단계, 이미지 1/1
    • Remove fourteen 2.5mm Phillips #0 screws from the back of the laptop.

    • There may be two additional screws under the hard drive cover that must be removed before attempting to remove the back cover.

  11. Acer Aspire 3 A315-21-92FX Speakers Replacement: 11 단계, 이미지 1/3 Acer Aspire 3 A315-21-92FX Speakers Replacement: 11 단계, 이미지 2/3 Acer Aspire 3 A315-21-92FX Speakers Replacement: 11 단계, 이미지 3/3
    • Use the iFixit opening tool to remove the back cover.

  12. Acer Aspire 3 A315-21-92FX Speakers Replacement: 12 단계, 이미지 1/2 Acer Aspire 3 A315-21-92FX Speakers Replacement: 12 단계, 이미지 2/2
    • Pull out the plug connecting the battery to the motherboard.

  13. Acer Aspire 3 A315-21-92FX Speakers Replacement: 13 단계, 이미지 1/2 Acer Aspire 3 A315-21-92FX Speakers Replacement: 13 단계, 이미지 2/2
    • Pull the battery out of the groove.

  14. Acer Aspire 3 A315-21-92FX Speakers Replacement, Speakers: 14 단계, 이미지 1/1
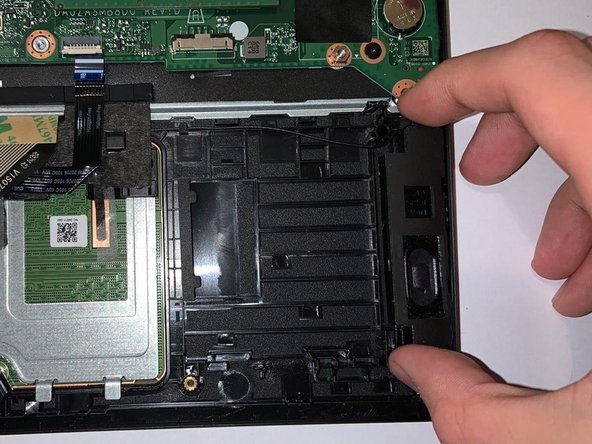
    • Remove the speaker located in the right hand of the device first using the iFixit Opening Tool.

    • Place the edge of the iFixit Opening Tool under the speaker and pull it upward.

  15. Acer Aspire 3 A315-21-92FX Speakers Replacement: 15 단계, 이미지 1/1
    • Remove the speaker from the left side of the computer using the iFixit Opening Tool.

    • Place the edge of the iFixit Opening Tool under the speaker and pull it upward.

  16. Acer Aspire 3 A315-21-92FX Speakers Replacement: 16 단계, 이미지 1/2 Acer Aspire 3 A315-21-92FX Speakers Replacement: 16 단계, 이미지 2/2
    • The cable that is connecting the speakers to the motherboard is placed under these plastic cables that are glued to the computer.

    • Remove these glued cables using the iFixit Opening Tool.

  17. Acer Aspire 3 A315-21-92FX Speakers Replacement: 17 단계, 이미지 1/3 Acer Aspire 3 A315-21-92FX Speakers Replacement: 17 단계, 이미지 2/3 Acer Aspire 3 A315-21-92FX Speakers Replacement: 17 단계, 이미지 3/3
    • Detach the speaker connector from the motherboard with your fingers or the iFixit Opening Tool.

  18. Acer Aspire 3 A315-21-92FX Speakers Replacement: 18 단계, 이미지 1/2 Acer Aspire 3 A315-21-92FX Speakers Replacement: 18 단계, 이미지 2/2
    • Remove the speakers with your hands.

결론

To reassemble your device, follow these instructions in reverse order.

다른 3명이 해당 안내서를 완성하였습니다.

gghhh

회원 가입일: 01/14/20

329 평판

안내서 1개 작성함

York University, Team S1-G5, Woodhouse Winter 2020 York University, Team S1-G5, Woodhouse Winter 2020 회원

YORK-WOODHOUSE-W20S1G5

3 회원들

안내서 4개 작성하였습니다

댓글 0개

댓글 쓰기

조회 통계:

24 시간 전: 0

7일 전: 3

30일 전: 27

전체 시간: 1,416