주요 콘텐츠로 건너뛰기

Acer Aspire 3 A315-24P-R7VH Display Assembly Replacement

필요한 것

  1. Acer Aspire 3 A315-24P-R7VH Display Assembly Replacement, Lower Case: 1 단계, 이미지 1/1
    • Power off the machine and unplug it from the wall charger.

  2. Acer Aspire 3 A315-24P-R7VH Display Assembly Replacement: 2 단계, 이미지 1/2 Acer Aspire 3 A315-24P-R7VH Display Assembly Replacement: 2 단계, 이미지 2/2
    • Close the laptop and flip it over.

    • Remove the eleven 6.5 mm Phillips screws from the lower case.

  3. Acer Aspire 3 A315-24P-R7VH Display Assembly Replacement: 3 단계, 이미지 1/1
    • Insert an opening pick between the lower case and chassis.

    • Pry around the entire perimeter until the lower case releases.

    • Remove the lower case.

  4. Acer Aspire 3 A315-24P-R7VH Display Assembly Replacement: 4 단계, 이미지 1/1
    이 단계에 사용된 도구:
    Anti-Static Wrist Strap
    $7.95
    구매
    • Optional: Put on an anti-static wrist strap. Ground yourself by connecting the metal clip at the end to any unpainted metal surface outside of the laptop.

  5. Acer Aspire 3 A315-24P-R7VH Display Assembly Replacement, Display Assembly: 5 단계, 이미지 1/3 Acer Aspire 3 A315-24P-R7VH Display Assembly Replacement, Display Assembly: 5 단계, 이미지 2/3 Acer Aspire 3 A315-24P-R7VH Display Assembly Replacement, Display Assembly: 5 단계, 이미지 3/3
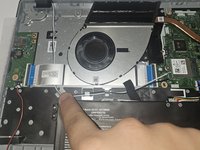
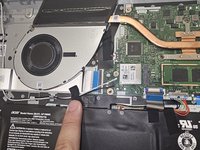
    • Disconnect the black and white antenna cables plugged into the network card on the motherboard.

    • Unscrew the four 5.5 mm Phillips screws holding the hinges of the monitor to the laptop frame.

  6. Acer Aspire 3 A315-24P-R7VH Display Assembly Replacement: 7 단계, 이미지 1/1
    • Once the hinges are unscrewed the display assembly will easily come off.

결론

To reassemble you will just follow these steps in reverse order.

AlexHarpring

회원 가입일: 09/07/23

301 평판

안내서 3개 작성하였습니다

Gateway, Team 1-1, Pee Fall 2023 Gateway, Team 1-1, Pee Fall 2023 회원

GCC-PEE-F23S1G1

4 회원들

안내서 6개 작성하였습니다

댓글 0개

댓글 쓰기

조회 통계:

24 시간 전: 1

7일 전: 5

30일 전: 27

전체 시간: 108