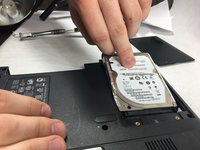
주요 콘텐츠로 건너뛰기

Acer Aspire 3003WLCi Hard Drive Replacement

필요한 것

  1. Acer Aspire 3003WLCi Hard Drive Replacement, Battery: 1 단계, 이미지 1/1
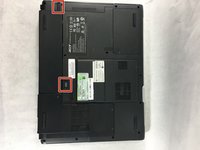
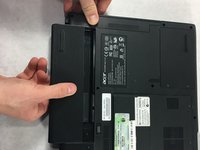
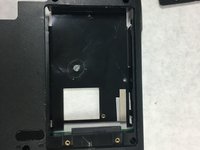
    • Turn the Acer Aspire 3003WLCi so that the bottom of the laptop is facing up. Orient it so that the battery is on your left.

  2. Acer Aspire 3003WLCi Hard Drive Replacement: 2 단계, 이미지 1/3 Acer Aspire 3003WLCi Hard Drive Replacement: 2 단계, 이미지 2/3 Acer Aspire 3003WLCi Hard Drive Replacement: 2 단계, 이미지 3/3
    • There will be two switches on the back of the laptop: one at the top of the battery, and one at the bottom.

    • Shift the bottom switch into an upward position in order to unlock the battery.

    • To unlock the upper switch, forcefully push the switch up and hold it in this position.

  3. Acer Aspire 3003WLCi Hard Drive Replacement: 3 단계, 이미지 1/2 Acer Aspire 3003WLCi Hard Drive Replacement: 3 단계, 이미지 2/2
    • While holding the upper switch in the upward position, remove the battery by pulling it out to the left.

    • You may need to be a bit forceful when pulling the battery to the left if it hasn't been removed before.

    • You have to maintain pulling the upper switch upwards, or the battery will not come out.

  4. Acer Aspire 3003WLCi Hard Drive Replacement, Hard Drive: 4 단계, 이미지 1/1
    • Locate the hard drive access panel in the upper right corner of the laptop.

  5. Acer Aspire 3003WLCi Hard Drive Replacement: 5 단계, 이미지 1/1
    • Using a Phillips #0 screwdriver, unscrew the two 5mm captive screws attached to the access panel.

    • The screws will not come out all the way. Once they are loose enough you should be able to open the panel.

  6. Acer Aspire 3003WLCi Hard Drive Replacement: 6 단계, 이미지 1/1
    • Lift and remove the panel to access the hard drive.

    • This panel can be difficult to remove. If you have trouble, use a spudger to pry the cover up.

  7. Acer Aspire 3003WLCi Hard Drive Replacement: 7 단계, 이미지 1/2 Acer Aspire 3003WLCi Hard Drive Replacement: 7 단계, 이미지 2/2
    • The hard drive is connected to the computer; simply pull it back from the connector and take it out of the laptop casing.

결론

To reassemble your device, follow these instructions in reverse order.

Tristin Viale

회원 가입일: 03/25/19

675 평판

안내서 5개 작성하였습니다

UMass Dartmouth, Team S2-G2, Bailey Spring 2019 UMass Dartmouth, Team S2-G2, Bailey Spring 2019 회원

UMASSD-BAILEY-S19S2G2

4 회원들

안내서 5개 작성하였습니다

댓글 0개

댓글 쓰기

조회 통계:

24 시간 전: 1

7일 전: 1

30일 전: 9

전체 시간: 318