주요 콘텐츠로 건너뛰기

Acer Aspire 5251-1513 Motherboard Replacement

필요한 것

  1. Acer Aspire 5251-1513 Motherboard Replacement, Battery: 1 단계, 이미지 1/1
    • Turn over the laptop so the back is facing up.

  2. Acer Aspire 5251-1513 Motherboard Replacement: 2 단계, 이미지 1/2 Acer Aspire 5251-1513 Motherboard Replacement: 2 단계, 이미지 2/2
    • Next to the battery is a switch with a lock symbol on it.

    • Unlock the switch by sliding it to reveal a red unlock symbol.

  3. Acer Aspire 5251-1513 Motherboard Replacement: 3 단계, 이미지 1/2 Acer Aspire 5251-1513 Motherboard Replacement: 3 단계, 이미지 2/2
    • Pull the other switch completely while the red unlock symbol is still present. The battery pack should pop up a bit.

  4. Acer Aspire 5251-1513 Motherboard Replacement: 4 단계, 이미지 1/2 Acer Aspire 5251-1513 Motherboard Replacement: 4 단계, 이미지 2/2
    • Remove the battery pack via the indentation at the top of the battery in between the two switches.

  5. Acer Aspire 5251-1513 Motherboard Replacement, Motherboard: 5 단계, 이미지 1/1
    • Unscrew the 8.6 mm screws on the back panel with a Phillips #0 screwdriver.

  6. Acer Aspire 5251-1513 Motherboard Replacement: 6 단계, 이미지 1/2 Acer Aspire 5251-1513 Motherboard Replacement: 6 단계, 이미지 2/2
    • Using a plastic opening tool, lift up the panel and remove it completely.

  7. Acer Aspire 5251-1513 Motherboard Replacement: 7 단계, 이미지 1/2 Acer Aspire 5251-1513 Motherboard Replacement: 7 단계, 이미지 2/2
    • Flip the laptop over as shown.

    • Locate the six tabs keeping the keyboard in place.

    • The tabs are hard to see because they are in-between the keys and the top cover but if you look close, there are black tabs you can push in so they are invisible.

  8. Acer Aspire 5251-1513 Motherboard Replacement: 8 단계, 이미지 1/1
    • Pull on the edge of the keyboard using a spudger or your hands.

    • As you pull on the keyboard, push the tabs in one by one using small tweezers.

    • The keyboard may feel like its bending as you pop it out, but don't worry.

  9. Acer Aspire 5251-1513 Motherboard Replacement: 9 단계, 이미지 1/1
    • Once you pop it out and its separated, slowly turn it over to reveal its attachment to the connector.

    • Do not pull the keyboard out too hard because you risk damaging both the connector and the laptop.

  10. Acer Aspire 5251-1513 Motherboard Replacement: 10 단계, 이미지 1/1
    • Using tweezers, slide the the tab down. This will release the connector that you can gently pull out of the socket.

    • If it does not come out easily, then you did not release it with the tabs and you risk ripping the connector.

  11. Acer Aspire 5251-1513 Motherboard Replacement: 11 단계, 이미지 1/1
    • Once freed, remove the keyboard entirely and put it aside.

  12. Acer Aspire 5251-1513 Motherboard Replacement: 12 단계, 이미지 1/2 Acer Aspire 5251-1513 Motherboard Replacement: 12 단계, 이미지 2/2
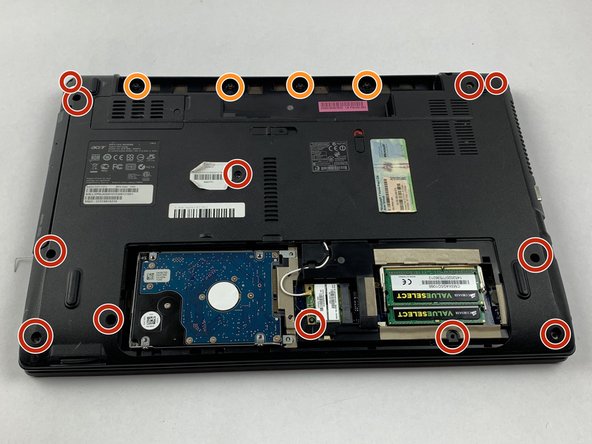
    • Flip the computer gently so that the back is facing you.

    • Remove all 12 of the 7.6 mm screws on the backside with a Phillips #0 screwdriver.

    • Remove 4 of the 5.4 mm screws on the backside with a Phillips #00 screwdriver.

  13. Acer Aspire 5251-1513 Motherboard Replacement: 13 단계, 이미지 1/1
    • Flip the computer back over.

    • Unscrew the seven 5.6 mm screws located on the top cover using a Phillips #0 screwdriver.

  14. Acer Aspire 5251-1513 Motherboard Replacement: 14 단계, 이미지 1/1
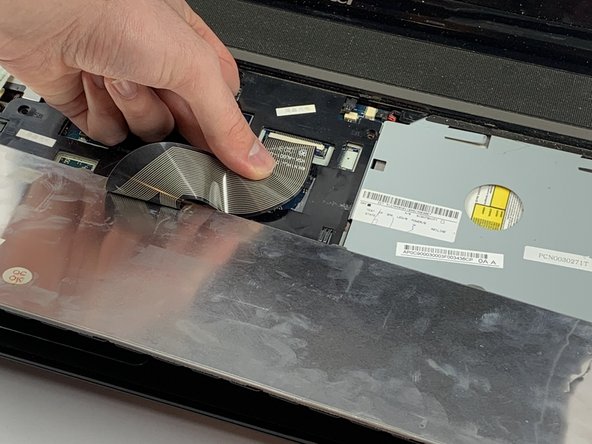
    • Locate the 4 connectors that must also be disconnected.

  15. Acer Aspire 5251-1513 Motherboard Replacement: 15 단계, 이미지 1/1
    • Disconnect the connector using tweezers to pull down the brown tabs.

    • For the smaller right and left speaker cables, pull out the black tab completely also using tweezers.

  16. Acer Aspire 5251-1513 Motherboard Replacement: 16 단계, 이미지 1/2 Acer Aspire 5251-1513 Motherboard Replacement: 16 단계, 이미지 2/2
    • Using a plastic spudger or your hands, carefully lift up the corner of the top panel.

    • Continue to lift the panel until it is removed completely.

  17. Acer Aspire 5251-1513 Motherboard Replacement: 17 단계, 이미지 1/2 Acer Aspire 5251-1513 Motherboard Replacement: 17 단계, 이미지 2/2
    • For the video cable connector, use tweezers to pull up on the white tabs to release the connector.

    • Remove the remaining connectors using the same technique from previous steps: pull on brown tabs using a tweezer.

  18. Acer Aspire 5251-1513 Motherboard Replacement: 18 단계, 이미지 1/1
    • Unscrew the 5.6 mm screws keeping the motherboard in place using a Phillips #0 screwdriver.

  19. Acer Aspire 5251-1513 Motherboard Replacement: 19 단계, 이미지 1/1
    • Lift up the motherboard from its base slowly.

    • Please be careful because the motherboard is still attached to the computer through a DC Jack cable.

  20. Acer Aspire 5251-1513 Motherboard Replacement: 20 단계, 이미지 1/2 Acer Aspire 5251-1513 Motherboard Replacement: 20 단계, 이미지 2/2
    • Disconnect the cable attached to the bottom of the motherboard.

    • Pull on the brown tab using tweezers until its completely disconnected and remove the motherboard.

결론

To reassemble your device, follow these instructions in reverse order.

다른 3명이 해당 안내서를 완성하였습니다.

Gicely Rodriguez

회원 가입일: 02/14/19

1,029 평판

안내서 5개 작성하였습니다

USF Tampa, Team S1-G6, Leahy Spring 2019 USF Tampa, Team S1-G6, Leahy Spring 2019 회원

USFT-LEAHY-S19S1G6

4 회원들

안내서 5개 작성하였습니다

댓글 한 개

ola tudo bem?

voce sabe a ultima versao da bios?

julio garcia - 답글

댓글 쓰기

조회 통계:

24 시간 전: 1

7일 전: 4

30일 전: 26

전체 시간: 1,371