주요 콘텐츠로 건너뛰기

Acer Aspire 5349-2592 Hard Drive Replacement

필요한 것

  1. Acer Aspire 5349-2592 Hard Drive Replacement, Battery: 1 단계, 이미지 1/1
    • Turn the laptop over so that the back is facing you.

  2. Acer Aspire 5349-2592 Hard Drive Replacement: 2 단계, 이미지 1/1
    • Push the laptop battery release lock.

  3. Acer Aspire 5349-2592 Hard Drive Replacement: 3 단계, 이미지 1/1
    • Now that the Acer-Aspire 5349-2592 laptop battery is unlocked, press the battery release button down.

  4. Acer Aspire 5349-2592 Hard Drive Replacement: 4 단계, 이미지 1/1
    • Holding down the laptop battery release button, gently pull the battery away from the laptop.

  5. Acer Aspire 5349-2592 Hard Drive Replacement, Back plate: 5 단계, 이미지 1/1
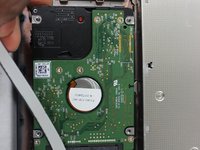
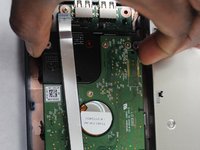
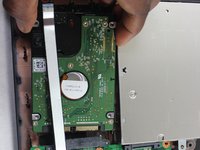
    • Remove all of the screws located on the back of the laptop using your Phillips #0 screwdriver.

  6. Acer Aspire 5349-2592 Hard Drive Replacement: 6 단계, 이미지 1/1
    • Pry open the backplate using the iFixit opening tool and remove the backplate from the device.

  7. Acer Aspire 5349-2592 Hard Drive Replacement, Hard Drive: 7 단계, 이미지 1/1
    • Remove the the pin strip.

  8. Acer Aspire 5349-2592 Hard Drive Replacement: 8 단계, 이미지 1/1
    • Remove the two screws from the caddy using the Phillips #0 screwdriver.

  9. Acer Aspire 5349-2592 Hard Drive Replacement: 9 단계, 이미지 1/1
    • Slide out the caddy.

  10. Acer Aspire 5349-2592 Hard Drive Replacement: 10 단계, 이미지 1/3 Acer Aspire 5349-2592 Hard Drive Replacement: 10 단계, 이미지 2/3 Acer Aspire 5349-2592 Hard Drive Replacement: 10 단계, 이미지 3/3
    • Slightly lift up the hard drive and pull it out from the device.

결론

To reassemble your device, follow these instructions in reverse order.

다른 3명이 해당 안내서를 완성하였습니다.

Abderahmane Naidjate

회원 가입일: 04/03/19

547 평판

안내서 6개 작성하였습니다

UMass Dartmouth, Team S1-G3, Simcock Spring 2019 UMass Dartmouth, Team S1-G3, Simcock Spring 2019 회원

UMASSD-SIMCOCK-S19S1G3

4 회원들

안내서 7개 작성하였습니다

댓글 0개

댓글 쓰기

조회 통계:

24 시간 전: 1

7일 전: 5

30일 전: 17

전체 시간: 1,744