주요 콘텐츠로 건너뛰기

Acer Aspire 5750-6667 Optical Drive Replacement

필요한 것

  1. Acer Aspire 5750-6667 Optical Drive Replacement, Battery: 1 단계, 이미지 2개 중 1개 Acer Aspire 5750-6667 Optical Drive Replacement, Battery: 1 단계, 이미지 2개 중 2개
    • Unplug the charging cable from the laptop and the wall. Failure to disconnect the charging cable could result in electric shock.

    • Turn the laptop over.

    • Locate the orange switch next to the battery.

  2. Acer Aspire 5750-6667 Optical Drive Replacement: 2 단계, 이미지 3개 중 1개 Acer Aspire 5750-6667 Optical Drive Replacement: 2 단계, 이미지 3개 중 2개 Acer Aspire 5750-6667 Optical Drive Replacement: 2 단계, 이미지 3개 중 3개
    이 단계에 사용된 도구:
    Tweezers
    $4.99
    • Using a small tool such as tweezers or a pen, slide the orange switch completely to the left to unlock the battery.

    • While holding the orange switch in place, lift the battery by the lip and pull it away from the laptop.

  3. Acer Aspire 5750-6667 Optical Drive Replacement, Optical Drive: 3 단계, 이미지 2개 중 1개 Acer Aspire 5750-6667 Optical Drive Replacement, Optical Drive: 3 단계, 이미지 2개 중 2개
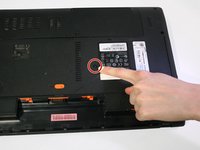
    • Locate the black screw just above the battery.

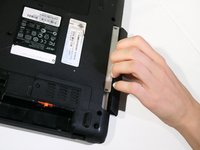
    • Remove the black screw holding the optical drive in place by using a Phillips #0 screwdriver.

  4. Acer Aspire 5750-6667 Optical Drive Replacement: 4 단계, 이미지 2개 중 1개 Acer Aspire 5750-6667 Optical Drive Replacement: 4 단계, 이미지 2개 중 2개
    • Pull the optical drive free from the laptop.

결론

To reassemble your device, follow these instructions in reverse order.

작성자

3다른 기여자 명과 함께

Chelsea Taylor

회원 가입일: 01/18/17

383 평판

안내서 3개를 작성함

0가이드 댓글

댓글 쓰기

조회 통계:

지난 24시간: 1

지난 7일: 3

지난 30일: 14

전체 시간: 1,427