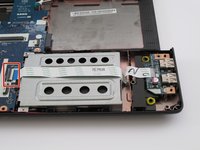
주요 콘텐츠로 건너뛰기

Acer Aspire E5-571 Hard Drive Replacement

필요한 것

  1. Acer Aspire E5-571 Hard Drive Replacement, Battery: 1 단계, 이미지 1/1
    • Make sure the laptop is shut down.

    • Flip the laptop upside down. Rotate it so the battery faces you.

  2. Acer Aspire E5-571 Hard Drive Replacement: 2 단계, 이미지 1/1
    • Place the pointed end of a spudger into the battery lock. Slide the battery lock to the left using the spudger. A "click" sound will accompany the release of the battery.

  3. Acer Aspire E5-571 Hard Drive Replacement: 3 단계, 이미지 1/1
    • Pull the battery towards you to remove it from the laptop.

  4. Acer Aspire E5-571 Hard Drive Replacement, Keyboard: 4 단계, 이미지 1/1
    • Remove all eighteen 8 mm screws with a Phillips #0 screwdriver.

  5. Acer Aspire E5-571 Hard Drive Replacement: 5 단계, 이미지 1/3 Acer Aspire E5-571 Hard Drive Replacement: 5 단계, 이미지 2/3 Acer Aspire E5-571 Hard Drive Replacement: 5 단계, 이미지 3/3
    • Carefully pry apart the clips holding the keyboard in place by moving a metal spudger along the seam.

    • Be careful not to break the plastic clips. Do not remove the keyboard until told to do so.

  6. Acer Aspire E5-571 Hard Drive Replacement: 6 단계, 이미지 1/2 Acer Aspire E5-571 Hard Drive Replacement: 6 단계, 이미지 2/2
    • Carefully flip up the white hinge. Then, detach the three ZIF ribbons connected to the motherboard.

    • Remove the panel with the keyboard and the touchpad.

  7. Acer Aspire E5-571 Hard Drive Replacement, Hard Drive: 7 단계, 이미지 1/1
    • Locate the hard drive in the metal casing.

  8. Acer Aspire E5-571 Hard Drive Replacement: 8 단계, 이미지 1/1
    • Remove these two 4 mm Phillips #1 screws.

  9. Acer Aspire E5-571 Hard Drive Replacement: 9 단계, 이미지 1/2 Acer Aspire E5-571 Hard Drive Replacement: 9 단계, 이미지 2/2
    • Locate this ZIF ribbon and carefully flip the white top hinge up and bend the ribbon over to the right side.

  10. Acer Aspire E5-571 Hard Drive Replacement: 10 단계, 이미지 1/2 Acer Aspire E5-571 Hard Drive Replacement: 10 단계, 이미지 2/2
    • Slide the hard drive to the right and gently lift it off of the laptop.

  11. Acer Aspire E5-571 Hard Drive Replacement: 11 단계, 이미지 1/2 Acer Aspire E5-571 Hard Drive Replacement: 11 단계, 이미지 2/2
    • There is one screw on each side of the metal hard drive casing you remove.

    • Slide the hard drive out of the metal casing.

결론

To reassemble your device, follow these instructions in reverse order.

다른 42명이 해당 안내서를 완성하였습니다.

daniel sawyer

회원 가입일: 08/23/15

2,566 평판

안내서 5개 작성하였습니다

USF Tampa, Team 4-2, Meier Fall 2015 USF Tampa, Team 4-2, Meier Fall 2015 회원

USFT-MEIER-F15S4G2

3 회원들

안내서 5개 작성하였습니다

댓글 8개

You can't beat the internet when it comes to sorting out a problem.

Many thanks to the author of this guide, it really helped me out

Michael Lee - 답글

These are excellent clear instructions, well done and thank you

David Waterhouse - 답글

Great directions. With visual ades too...nice.

Thanks

Jackie Abbott - 답글

Thank you for the clear instructions, this is an excellent guide.

Toni-Marie Catchpaw - 답글

Very helpful guide. Thanks for that! Only thing missing was a warning about where the plastic clips were around the body to make it easier to pop those without breaking the plastic tabs on some of them. Even that isn’t all that important really.

Michael King - 답글

댓글 쓰기

조회 통계:

24 시간 전: 1

7일 전: 7

30일 전: 52

전체 시간: 44,007