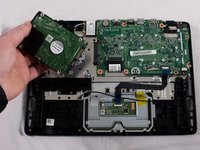
주요 콘텐츠로 건너뛰기

Acer Aspire ES1-111M-C7DE Hard Drive Replacement

필요한 것

  1. Acer Aspire ES1-111M-C7DE Hard Drive Replacement, Back Cover: 1 단계, 이미지 2개 중 1개 Acer Aspire ES1-111M-C7DE Hard Drive Replacement, Back Cover: 1 단계, 이미지 2개 중 2개
    • Unscrew the 13 6.2mm screws located on the bottom of the laptop using the JIS #0 screwdriver.

  2. Acer Aspire ES1-111M-C7DE Hard Drive Replacement: 2 단계, 이미지 3개 중 1개 Acer Aspire ES1-111M-C7DE Hard Drive Replacement: 2 단계, 이미지 3개 중 2개 Acer Aspire ES1-111M-C7DE Hard Drive Replacement: 2 단계, 이미지 3개 중 3개
    • Using a plastic opening tool, gently pry the lower case off. Place aside.

  3. Acer Aspire ES1-111M-C7DE Hard Drive Replacement, Hard Drive: 3 단계, 이미지 3개 중 1개 Acer Aspire ES1-111M-C7DE Hard Drive Replacement, Hard Drive: 3 단계, 이미지 3개 중 2개 Acer Aspire ES1-111M-C7DE Hard Drive Replacement, Hard Drive: 3 단계, 이미지 3개 중 3개
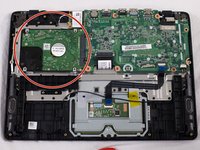
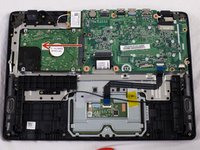
    • Locate the hard drive and slide the hard drive to the left until it disconnects from the mother board.

결론

To reassemble your device, follow these instructions in reverse order.

다른 3명이 해당 안내서를 완성하였습니다.

작성자

2다른 기여자 명과 함께

Mason Devinney

회원 가입일: 09/25/17

388 평판

안내서 3개를 작성함

USF Tampa, Team S3-G1, Cannon Fall 2017 USF Tampa, Team S3-G1, Cannon Fall 2017 회원

USFT-CANNON-F17S3G1

4 회원들

안내서 6개를 작성함

0가이드 댓글

댓글 쓰기

조회 통계:

지난 24시간: 1

지난 7일: 5

지난 30일: 15

전체 시간: 2,213