주요 콘텐츠로 건너뛰기

Acer Aspire ES1-332 LCD Screen Replacement

필요한 것

동영상 개요

  1. Acer Aspire ES1-332 LCD Screen Replacement, LCD Screen: 1 단계, 이미지 3개 중 1개 Acer Aspire ES1-332 LCD Screen Replacement, LCD Screen: 1 단계, 이미지 3개 중 2개 Acer Aspire ES1-332 LCD Screen Replacement, LCD Screen: 1 단계, 이미지 3개 중 3개
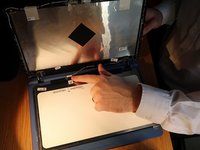
    • Grab a spudger and work your way around the outer edge of the screen

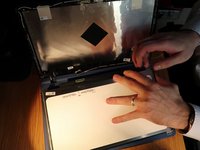
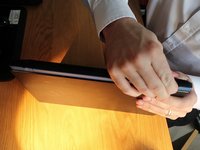
    • Lean the screen all the way back to remove the plastic frame from the hinges at the bottom

  2. Acer Aspire ES1-332 LCD Screen Replacement: 2 단계, 이미지 2개 중 1개 Acer Aspire ES1-332 LCD Screen Replacement: 2 단계, 이미지 2개 중 2개
    • Unscrew the 4 screws around the edge of the screen

    • Lean the screen all the way forward on to the keyboard

  3. Acer Aspire ES1-332 LCD Screen Replacement: 3 단계, 이미지 2개 중 1개 Acer Aspire ES1-332 LCD Screen Replacement: 3 단계, 이미지 2개 중 2개
    • Peal up the sticky tape next to the screen connector

    • Pull the connector down carefully away from the screen and disconnect it

  4. Acer Aspire ES1-332 LCD Screen Replacement: 4 단계, 이미지 3개 중 1개 Acer Aspire ES1-332 LCD Screen Replacement: 4 단계, 이미지 3개 중 2개 Acer Aspire ES1-332 LCD Screen Replacement: 4 단계, 이미지 3개 중 3개
    • connect the new screen and screw back in place

    • Turn on the screen to test before putting the screen frame back on

    • Tilt the screen all the way back and push the frame back on hinges 1st.

    • Finally lean the laptop on its edge and clip the back on the hinges back in place.

결승점

다른 한 분이 해당 안내서를 완성하였습니다.

작성자

1다른 기여자 명과 함께

Nick Myers

회원 가입일: 04/15/18

5,114 평판

안내서 30개를 작성함

0가이드 댓글

댓글 쓰기

조회 통계:

지난 24시간: 0

지난 7일: 4

지난 30일: 18

전체 시간: 886