소개
This guide provides instructions on removing the hard drive from your Acer Aspire ES1-711-p1UV laptop. You may need to follow this guide if your laptop is having troubles loading multiple pages or tabs, or is low on memory. If these issues are occuring, you may need to replace your hard drive to install new memory.
필요한 것
-
-
Place the laptop face down on a flat, clean surface.
-
Remove all twenty-seven 7 mm screws on the back cover of the laptop with a Phillips #0 screwdriver. Screws are circled in red on the diagram.
-
-


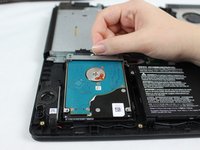
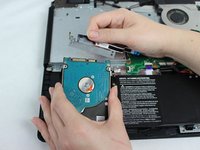
To reassemble your device, follow these instructions in reverse order.
To reassemble your device, follow these instructions in reverse order.
다른 3명이 해당 안내서를 완성하였습니다.
팀

Sam Houston State, Team S17-G3, Blackburne Spring 2018 Sam Houston State, Team S17-G3, Blackburne Spring 2018 회원
SHSU-BLACKBURNE-S18S17G3
3 회원들
안내서 3개를 작성함