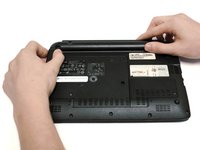
주요 콘텐츠로 건너뛰기

Acer Aspire One 532h-2527 Back Plate Replacement

단지 전제 조건
이 안내서는 다른 안내서의 선행 작업으로 사용하기 위한 것입니다. 그 자체로는 불완전합니다.

필요한 것

  1. Acer Aspire One 532h-2527  Back Plate Replacement, Battery: 1 단계, 이미지 1개 중 1개
    • Press the power button to turn off the netbook.

  2. Acer Aspire One 532h-2527  Back Plate Replacement: 2 단계, 이미지 1개 중 1개
    • Place the netbook bottom-side-up on a flat surface.

    • Locate the unlock latch on the top right corner of the back.

  3. Acer Aspire One 532h-2527  Back Plate Replacement: 3 단계, 이미지 1개 중 1개
    • To unlock the battery, slide the lock latch in the direction indicated by the unlocking icon. You should see the orange indicator which means that the latch is unlocked.

  4. Acer Aspire One 532h-2527  Back Plate Replacement: 4 단계, 이미지 3개 중 1개 Acer Aspire One 532h-2527  Back Plate Replacement: 4 단계, 이미지 3개 중 2개 Acer Aspire One 532h-2527  Back Plate Replacement: 4 단계, 이미지 3개 중 3개
    • On the opposite side, slide and hold the release latch.

    • Gently slide the battery out.

  5. Acer Aspire One 532h-2527  Back Plate Replacement, Back Plate: 5 단계, 이미지 1개 중 1개
    • Use a #0 Phillips screwdriver to remove the three 6mm screws from the larger back plate.

  6. Acer Aspire One 532h-2527  Back Plate Replacement: 6 단계, 이미지 1개 중 1개
    • Use the plastic opening tool on the recessed notch at the bottom of the larger plate to gently lift the plate.

  7. Acer Aspire One 532h-2527  Back Plate Replacement: 7 단계, 이미지 1개 중 1개
    • Once the plate becomes unhinged, gently rotate the plate to take it off of the device.

결론

To reassemble your device, follow these instructions in reverse order.

작성자

2다른 기여자 명과 함께

Jair Burgos

회원 가입일: 09/15/16

425 평판

안내서 3개를 작성함

USF Tampa, Team 11-6, Blackwell Fall 2016 USF Tampa, Team 11-6, Blackwell Fall 2016 회원

USFT-BLACKWELL-F16S11G6

3 회원들

안내서 12개를 작성함

댓글 0개

댓글 쓰기

조회 통계:

지난 24시간: 0

지난 7일: 2

지난 30일: 6

전체 시간: 89