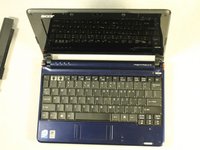
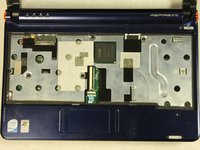
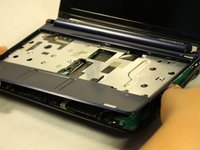
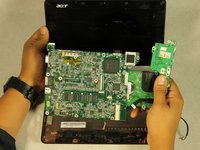
주요 콘텐츠로 건너뛰기

Acer Aspire One A150-1570 Motherboard Replacement

필요한 것

  1. Acer Aspire One A150-1570 Motherboard Replacement, Keyboard: 1 단계, 이미지 1/1
    • Flip device over so that the battery is farthest from you.

    • Identify the switch on the upper left corner and push it left to be in "unlocked" position.

  2. Acer Aspire One A150-1570 Motherboard Replacement: 2 단계, 이미지 1/2 Acer Aspire One A150-1570 Motherboard Replacement: 2 단계, 이미지 2/2
    • Identify the latch on the upper right hand corner. Drag and hold the latch to the right.

    • Pull the battery out.

  3. Acer Aspire One A150-1570 Motherboard Replacement: 3 단계, 이미지 1/2 Acer Aspire One A150-1570 Motherboard Replacement: 3 단계, 이미지 2/2
    • Now flip device back over to show the keyboard.

    • Locate the three tabs at the top of the keyboard.

  4. Acer Aspire One A150-1570 Motherboard Replacement: 4 단계, 이미지 1/3 Acer Aspire One A150-1570 Motherboard Replacement: 4 단계, 이미지 2/3 Acer Aspire One A150-1570 Motherboard Replacement: 4 단계, 이미지 3/3
    • Start on the top-right and use the spudger to push off the tab from the keyboard.

    • Move to the middle tab while still holding the right side up so the tab doesn't fall back into place.

    • Continue to hold up keyboard while disconnecting the last tab.

    • DO NOT lift keyboard yet. This will be addressed in the next step.

  5. Acer Aspire One A150-1570 Motherboard Replacement: 5 단계, 이미지 1/3 Acer Aspire One A150-1570 Motherboard Replacement: 5 단계, 이미지 2/3 Acer Aspire One A150-1570 Motherboard Replacement: 5 단계, 이미지 3/3
    • Here you can see that the keyboard is still attached to the device.

    • Use the Spudger to lift the ZIF (Zero Insertion Force) to release the keyboard ribbon.

    • Once tab is lifted, the keyboard ribbon should come right out.

  6. Acer Aspire One A150-1570 Motherboard Replacement, Internal Wireless Card: 6 단계, 이미지 1/1
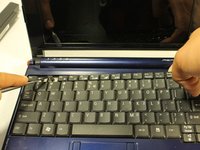
    • Close and flip the device over so you can have a good view of all the screws.

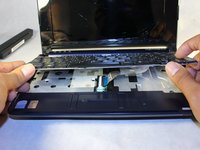
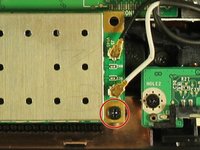
    • Locate and remove the three 3.9mm screws where the battery was removed from.

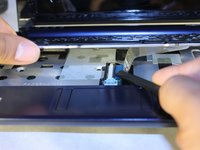
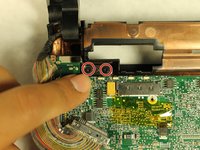
    • Locate and and remove the two 5.8mm screws located underneath the bumpers.

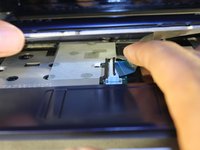
    • Locate and remove the three 5.8mm remaining screws at the top of the device.

  7. Acer Aspire One A150-1570 Motherboard Replacement: 7 단계, 이미지 1/3 Acer Aspire One A150-1570 Motherboard Replacement: 7 단계, 이미지 2/3 Acer Aspire One A150-1570 Motherboard Replacement: 7 단계, 이미지 3/3
    • Flip and reopen device to where you can view the internal panel.

    • Locate the ZIF connecting the mouse panel to the motherboard.

    • Flip up the black plastic hinge and carefully pull out the ZIF connector.

  8. Acer Aspire One A150-1570 Motherboard Replacement: 8 단계, 이미지 1/1
    • Locate and remove all five 4.7mm black screws.

    • Locate and remove the one 4.3mm silver screw.

  9. Acer Aspire One A150-1570 Motherboard Replacement: 9 단계, 이미지 1/2 Acer Aspire One A150-1570 Motherboard Replacement: 9 단계, 이미지 2/2
    • Pick a corner and slowly lift up the panel while running your finger underneath to pop off the seals.

    • Make sure to move slowly. You do not want to crack the plastic from being to rough or moving to fast.

  10. Acer Aspire One A150-1570 Motherboard Replacement: 10 단계, 이미지 1/2 Acer Aspire One A150-1570 Motherboard Replacement: 10 단계, 이미지 2/2
    • Locate the internal wireless card.

    • Remove the one 3.9mm screw holding it down.

  11. Acer Aspire One A150-1570 Motherboard Replacement: 11 단계, 이미지 1/3 Acer Aspire One A150-1570 Motherboard Replacement: 11 단계, 이미지 2/3 Acer Aspire One A150-1570 Motherboard Replacement: 11 단계, 이미지 3/3
    • Carefully disconnect the black and white cable from the internal wireless card.

    • Pull the internal wireless card straight out.

  12. Acer Aspire One A150-1570 Motherboard Replacement, Motherboard: 12 단계, 이미지 1/1
    • Locate and remove the four 3.9mm screws on the right side of your device.

  13. Acer Aspire One A150-1570 Motherboard Replacement: 13 단계, 이미지 1/2 Acer Aspire One A150-1570 Motherboard Replacement: 13 단계, 이미지 2/2
    • Locate the display cable in the upper left corner of your device.

    • Carefully disconnect the display cable.

  14. Acer Aspire One A150-1570 Motherboard Replacement: 14 단계, 이미지 1/2 Acer Aspire One A150-1570 Motherboard Replacement: 14 단계, 이미지 2/2
    • Locate the speaker cable at the bottom of the mother board.

    • Carefully pull the cable to disconnect the speaker from the mother board.

  15. Acer Aspire One A150-1570 Motherboard Replacement: 15 단계, 이미지 1/2 Acer Aspire One A150-1570 Motherboard Replacement: 15 단계, 이미지 2/2
    • Locate and remove the last two remaining 4.7mm screws in the upper left corner of the motherboard.

    • Gently lift the motherboard off the device frame.

결론

To reassemble your device, follow these instructions in reverse order.

다른 한 분이 해당 안내서를 완성하였습니다.

Briana Naranjo

회원 가입일: 10/10/16

369 평판

안내서 3개 작성하였습니다

Sam Houston State, Team 12-5, Blackburne Fall 2016 Sam Houston State, Team 12-5, Blackburne Fall 2016 회원

SHSU-BLACKBURNE-F16S12G5

4 회원들

안내서 8개 작성하였습니다

댓글 0개

댓글 쓰기

조회 통계:

24 시간 전: 0

7일 전: 1

30일 전: 12

전체 시간: 1,127