주요 콘텐츠로 건너뛰기

Acer Aspire One Cloudbook 11 AO1-131-C7DW WiFi Module Replacement

필요한 것

  1. Acer Aspire One Cloudbook 11 AO1-131-C7DW WiFi Module Replacement, Back Panel: 1 단계, 이미지 1/3 Acer Aspire One Cloudbook 11 AO1-131-C7DW WiFi Module Replacement, Back Panel: 1 단계, 이미지 2/3 Acer Aspire One Cloudbook 11 AO1-131-C7DW WiFi Module Replacement, Back Panel: 1 단계, 이미지 3/3
    • Power the laptop off.

    • Flip the laptop over and position it so the opening faces you.

    • Remove the rubber foot located near the opening side of the device using tweezers.

  2. Acer Aspire One Cloudbook 11 AO1-131-C7DW WiFi Module Replacement: 2 단계, 이미지 1/2 Acer Aspire One Cloudbook 11 AO1-131-C7DW WiFi Module Replacement: 2 단계, 이미지 2/2
    • Unscrew the five 5-mm screws using the PH0 screwdriver.

  3. Acer Aspire One Cloudbook 11 AO1-131-C7DW WiFi Module Replacement: 3 단계, 이미지 1/3 Acer Aspire One Cloudbook 11 AO1-131-C7DW WiFi Module Replacement: 3 단계, 이미지 2/3 Acer Aspire One Cloudbook 11 AO1-131-C7DW WiFi Module Replacement: 3 단계, 이미지 3/3
    • Identify the HDMI port located in the side of the laptop opposite to the power button.

    • Insert the plastic opening tool into the divet of the back panel located above the HDMI port.

    • Pry along the laptop frame until the back panel comes loose.

    • Do not pull the back panel too hard as the battery is still connected to the back panel and the motherboard. This can damage your device.

  4. Acer Aspire One Cloudbook 11 AO1-131-C7DW WiFi Module Replacement: 4 단계, 이미지 1/2 Acer Aspire One Cloudbook 11 AO1-131-C7DW WiFi Module Replacement: 4 단계, 이미지 2/2
    • Rotate the device so the opening faces you again.

    • Hold the back panel away from the laptop and remove the 4-mm screw using the PH0 screwdriver.

    • This screw is fastening the battery to the laptop.

    • Lift the back panel gently.

  5. Acer Aspire One Cloudbook 11 AO1-131-C7DW WiFi Module Replacement: 5 단계, 이미지 1/2 Acer Aspire One Cloudbook 11 AO1-131-C7DW WiFi Module Replacement: 5 단계, 이미지 2/2
    • Unplug the cable that connects the battery to the motherboard.

    • Detach the back panel, which still includes the battery.

  6. Acer Aspire One Cloudbook 11 AO1-131-C7DW WiFi Module Replacement, WiFi Module: 6 단계, 이미지 1/2 Acer Aspire One Cloudbook 11 AO1-131-C7DW WiFi Module Replacement, WiFi Module: 6 단계, 이미지 2/2
    • Position the computer so the opening side faces you.

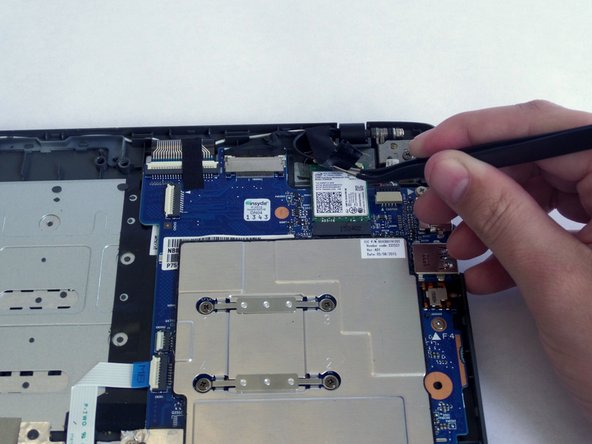
    • Remove the tape holding the WiFi module using tweezers.

  7. Acer Aspire One Cloudbook 11 AO1-131-C7DW WiFi Module Replacement: 7 단계, 이미지 1/1
    • Unplug the white and black wires by lifting them up by hand or using tweezers.

  8. Acer Aspire One Cloudbook 11 AO1-131-C7DW WiFi Module Replacement: 8 단계, 이미지 1/1
    • Remove the 3-mm screw that holds the WiFi module to the motherboard using the PH0 screwdriver.

  9. Acer Aspire One Cloudbook 11 AO1-131-C7DW WiFi Module Replacement: 9 단계, 이미지 1/2 Acer Aspire One Cloudbook 11 AO1-131-C7DW WiFi Module Replacement: 9 단계, 이미지 2/2
    • Pull the WiFi module out of the connector.

결론

To reassemble your device, follow these instructions in reverse order.

다른 한 분이 해당 안내서를 완성하였습니다.

Luz Villegas

회원 가입일: 09/08/17

452 평판

안내서 4개 작성하였습니다

CSU Fullerton, Team S1-G4, Bruce Fall 2017 CSU Fullerton, Team S1-G4, Bruce Fall 2017 회원

CSUF-BRUCE-F17S1G4

3 회원들

안내서 6개 작성하였습니다

댓글 0개

댓글 쓰기

조회 통계:

24 시간 전: 0

7일 전: 2

30일 전: 7

전체 시간: 570