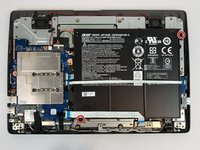
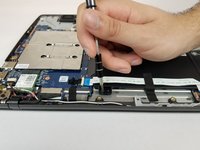
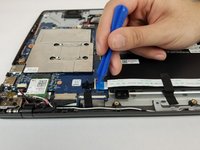
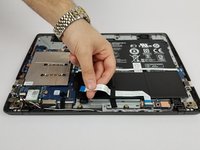
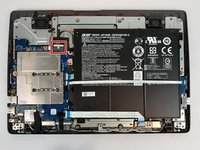
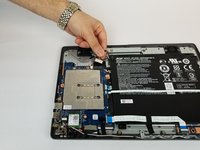
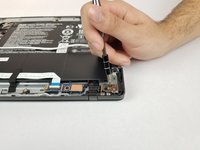
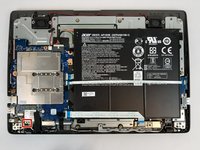
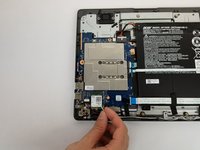
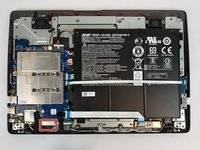
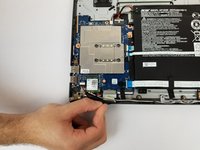
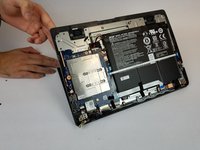
주요 콘텐츠로 건너뛰기

Acer Aspire One Cloudbook 14 AO1-431-C8G8 Display Replacement

필요한 것

  1. Acer Aspire One Cloudbook 14 AO1-431-C8G8 Display Replacement, Back Panel: 1 단계, 이미지 1/2 Acer Aspire One Cloudbook 14 AO1-431-C8G8 Display Replacement, Back Panel: 1 단계, 이미지 2/2
    • Remove the ten 7mm Phillips #0 screws from the bottom.

  2. Acer Aspire One Cloudbook 14 AO1-431-C8G8 Display Replacement: 2 단계, 이미지 1/2 Acer Aspire One Cloudbook 14 AO1-431-C8G8 Display Replacement: 2 단계, 이미지 2/2
    • Insert a plastic opening tool under the bottom cover and slid it around the perimeter until all of the clips release.

  3. Acer Aspire One Cloudbook 14 AO1-431-C8G8 Display Replacement, Battery: 3 단계, 이미지 1/2 Acer Aspire One Cloudbook 14 AO1-431-C8G8 Display Replacement, Battery: 3 단계, 이미지 2/2
    • Remove the two 5mm Phillips #0 screws from the battery.

  4. Acer Aspire One Cloudbook 14 AO1-431-C8G8 Display Replacement: 4 단계, 이미지 1/3 Acer Aspire One Cloudbook 14 AO1-431-C8G8 Display Replacement: 4 단계, 이미지 2/3 Acer Aspire One Cloudbook 14 AO1-431-C8G8 Display Replacement: 4 단계, 이미지 3/3
    • Use a spudger to flip up the retaining flaps on the ribbon cable ZIF sockets.

    • Remove the ribbon cables from the sockets.

  5. Acer Aspire One Cloudbook 14 AO1-431-C8G8 Display Replacement: 5 단계, 이미지 1/3 Acer Aspire One Cloudbook 14 AO1-431-C8G8 Display Replacement: 5 단계, 이미지 2/3 Acer Aspire One Cloudbook 14 AO1-431-C8G8 Display Replacement: 5 단계, 이미지 3/3
    • Disconnect the battery from the motherboard.

    • Remove the battery.

  6. Acer Aspire One Cloudbook 14 AO1-431-C8G8 Display Replacement, Display: 6 단계, 이미지 1/2 Acer Aspire One Cloudbook 14 AO1-431-C8G8 Display Replacement, Display: 6 단계, 이미지 2/2
    • The battery is installed in these pictures but should always be removed before any part replacement.

    • Remove the four 5mm Phillips #0 screws from the display hinge.

  7. Acer Aspire One Cloudbook 14 AO1-431-C8G8 Display Replacement: 7 단계, 이미지 1/2 Acer Aspire One Cloudbook 14 AO1-431-C8G8 Display Replacement: 7 단계, 이미지 2/2
    • Disconnect the two antenna cables from the Wi-fi card.

  8. Acer Aspire One Cloudbook 14 AO1-431-C8G8 Display Replacement: 8 단계, 이미지 1/2 Acer Aspire One Cloudbook 14 AO1-431-C8G8 Display Replacement: 8 단계, 이미지 2/2
    • Disconnect the display cable by pulling it down and towards you.

  9. Acer Aspire One Cloudbook 14 AO1-431-C8G8 Display Replacement: 9 단계, 이미지 1/2 Acer Aspire One Cloudbook 14 AO1-431-C8G8 Display Replacement: 9 단계, 이미지 2/2
    • Lift the bottom half of the computer away from the screen while keeping the screen flat on the table surface.

    • This will allow the hinges holding the screen in place to lift up.

  10. Acer Aspire One Cloudbook 14 AO1-431-C8G8 Display Replacement: 10 단계, 이미지 1/1
    • While the screen is flat on the surface, slide the bottom half of the computer towards the top of the screen to separate the two halves.

    • The screen is now completely removed from the bottom half of the computer.

결론

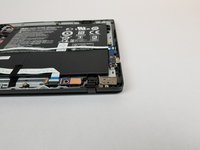
To reassemble your device, follow these instructions in reverse order.

다른 한 분이 해당 안내서를 완성하였습니다.

Joseph

회원 가입일: 01/25/18

685 평판

안내서 6개 작성하였습니다

USF Tampa, Team S20-G1, Passmore Spring 2018 USF Tampa, Team S20-G1, Passmore Spring 2018 회원

USFT-PASSMORE-S18S20G1

3 회원들

안내서 6개 작성하였습니다

댓글 0개

댓글 쓰기

조회 통계:

24 시간 전: 2

7일 전: 8

30일 전: 17

전체 시간: 1,619