주요 콘텐츠로 건너뛰기

Acer Aspire One D257 HDD Replacement

필요한 것

  1. Acer Aspire One D257 HDD Replacement, Battery: 1 단계, 이미지 1/1
    • Put the netbook, so the back side is upwards.

  2. Acer Aspire One D257 HDD Replacement: 2 단계, 이미지 1/1
    • Push the right lock to the right so the red filed is visible on the left.

  3. Acer Aspire One D257 HDD Replacement: 3 단계, 이미지 1/1
    • Now move the left lock which is spring loaded to the leftand keep it there. Then with the other hand remove the battery by pulling down.

    • When reassembeling the new battery push it up into the netbook and do lock the right by moving it to the left so the red field disappears.

  4. Acer Aspire One D257 HDD Replacement, Keyboard: 4 단계, 이미지 1/2 Acer Aspire One D257 HDD Replacement, Keyboard: 4 단계, 이미지 2/2
    • Open the lid othe the netbook. Use the Jimmy from the upper left corner of the keyboard. Put it between the keyboard and th casing and move it to the right. It might help to use a metal spudger to push in the pins holding the keyboard in place.

    • Then move down along the sides where there is one pin on each side. After that twist the keyboard towards you.

  5. Acer Aspire One D257 HDD Replacement: 5 단계, 이미지 1/1
    • Now open the brown connector so the flat cable is loose. Then you can remove the keyboard.

  6. Acer Aspire One D257 HDD Replacement, Acer Aspire One D257 opening the hatch: 6 단계, 이미지 1/1
    • Remove the 5 screws marked with "Door".

  7. Acer Aspire One D257 HDD Replacement: 7 단계, 이미지 1/2 Acer Aspire One D257 HDD Replacement: 7 단계, 이미지 2/2
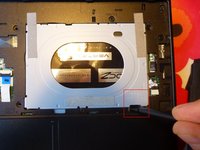
    • Use a spudger or flat screwdriver to push down the hatch where it is marked "Door release".

    • Now you can carfully remove the hatch.

    • When reassembling the hatch look that the noses are aimed at the appropriate holes in the case, then you can press down the rest of the hatch onto the netbook.

  8. Acer Aspire One D257 HDD Replacement, Harddisk Drive: 8 단계, 이미지 1/1
    • The hard disk drive is under the lighgrey casing and not screw to it.

  9. Acer Aspire One D257 HDD Replacement: 9 단계, 이미지 1/1
    • Now push the HDD downwards with the finger through the hole.

  10. Acer Aspire One D257 HDD Replacement: 10 단계, 이미지 1/1
    • Remove the Sata connector from the hard disk drive.

    • Now you can connect any Sata-HDD or SDD.

결론

To reassemble your device, follow these instructions in reverse order.

다른 7명이 해당 안내서를 완성하였습니다.

다음 번역가들에게 특별히 감사 드립니다:

de en

100%

이 번역자 분들은 저희가 세상을 수리하는데 동참해 주시는 분입니다! 기여하시겠습니까?
번역 시작하기 ›

Claes

회원 가입일: 02/01/16

3,400 평판

안내서 6개 작성하였습니다

Master Techs Master Techs 회원

Community

322 회원들

안내서 2,519개 작성하였습니다

댓글 7개

very helpful

many thanks

Pablo Tassinari - 답글

You are missing a few steps.

Arctic W. Fox - 답글

@Arctic W. Fox What steps are you missing?

Claes - 답글

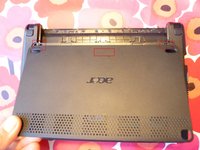
The HD is removed through the back - there are about 5 screws (marked "Door") that need to be removed once the keyboard is removed. :-)

basestationzero - 답글

Thanks for the feedback, I added the steps at least in the German Guide do not know how long it takes for the steps to show up in the translated English Version.

Claes -

댓글 쓰기

조회 통계:

24 시간 전: 1

7일 전: 6

30일 전: 48

전체 시간: 11,681