주요 콘텐츠로 건너뛰기

Acer Aspire TimelineU M5-481TG Keyboard Replacement

필요한 것

  1. Acer Aspire TimelineU M5-481TG Keyboard Replacement, Keyboard: 1 단계, 이미지 1/1
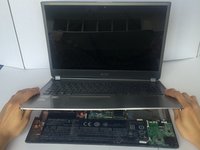
    • With the laptop closed and powered off, place the laptop screen side down.

    • Turn the laptop so that the hinges are closest to you.

    • Remove sixteen 6 mm screws from the bottom of the laptop with the Phillips #00 screwdriver.

  2. Acer Aspire TimelineU M5-481TG Keyboard Replacement: 2 단계, 이미지 1/2 Acer Aspire TimelineU M5-481TG Keyboard Replacement: 2 단계, 이미지 2/2
    • Flip the laptop over and open the lid.

    • Use the plastic opening tool with the half centimeter wide tip to gently separate the bottom case of the laptop from the keyboard.

    • Potential for device damage: Do not apply too much force or you may break the clips.

    • Gently pull the keyboard upwards to a 45 degree angle.

  3. Acer Aspire TimelineU M5-481TG Keyboard Replacement: 3 단계, 이미지 1/3 Acer Aspire TimelineU M5-481TG Keyboard Replacement: 3 단계, 이미지 2/3 Acer Aspire TimelineU M5-481TG Keyboard Replacement: 3 단계, 이미지 3/3
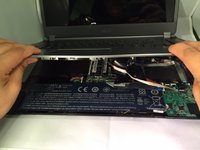
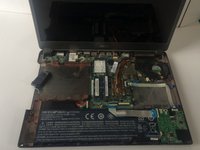
    • Hold the keyboard open with one hand to extend the three cables (white, black and copper) still connecting the bottom of the keyboard to the back case.

    • Be sure you are prying up the hinged retaining flap, not the connector itself.

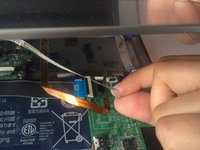
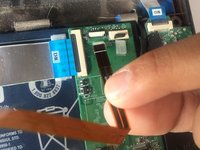
    • Use your fingernail to flip up the small retaining flap of each zero insertion force connector and then gently pull each ribbon cable out one at a time.

    • The white line on this ribbon cable marks the edge of the connection area. To reinstall, insert the cable into the connector up to this line and then close the retaining flap. If the cable doesn’t insert easily up to (or very near to) this line, it’s probably misaligned and needs to be gently removed and repositioned.

  4. Acer Aspire TimelineU M5-481TG Keyboard Replacement: 4 단계, 이미지 1/2 Acer Aspire TimelineU M5-481TG Keyboard Replacement: 4 단계, 이미지 2/2
    • Use both hands to remove the keyboard.

    • Potential for device damage: Do not pull too forcibly or you could damage your keyboard.

결론

To reassemble your device, follow these instructions in reverse order.

다른 3명이 해당 안내서를 완성하였습니다.

Christina Crasto

회원 가입일: 03/07/16

475 평판

안내서 3개 작성하였습니다

Marist, Team 1-2, Laflen Spring 2016 Marist, Team 1-2, Laflen Spring 2016 회원

MARS-LAFLEN-S16S1G2

3 회원들

안내서 6개 작성하였습니다

댓글 한 개

my problem is how to replace the keyboard not how to dismantle it

roniejunbautista - 답글

댓글 쓰기

조회 통계:

24 시간 전: 0

7일 전: 0

30일 전: 0

전체 시간: 2,710