주요 콘텐츠로 건너뛰기

Acer Aspire TimelineX 4830T-6682 Fan Replacement

필요한 것

  1. Acer Aspire TimelineX 4830T-6682 Fan Replacement, Lower Back Panel: 1 단계, 이미지 1/3 Acer Aspire TimelineX 4830T-6682 Fan Replacement, Lower Back Panel: 1 단계, 이미지 2/3 Acer Aspire TimelineX 4830T-6682 Fan Replacement, Lower Back Panel: 1 단계, 이미지 3/3
    • Remove the single screw with a Phillips #0 screwdriver.

    • Use a plastic opening tool on the upper part of the panel to remove it and access the RAM.

    • The other way to remove the panel is by sliding it away from the laptop. The difficulty of sliding it depends on the condition of your laptop.

  2. Acer Aspire TimelineX 4830T-6682 Fan Replacement, RAM: 2 단계, 이미지 1/3 Acer Aspire TimelineX 4830T-6682 Fan Replacement, RAM: 2 단계, 이미지 2/3 Acer Aspire TimelineX 4830T-6682 Fan Replacement, RAM: 2 단계, 이미지 3/3
    • After the panel has been removed, locate the RAM. It should be on the lower right.

    • There are pins around the RAM that need to be pulled back. After the pins are removed, pull the RAM chip towards you to remove it.

  3. Acer Aspire TimelineX 4830T-6682 Fan Replacement, Keyboard: 3 단계, 이미지 1/1
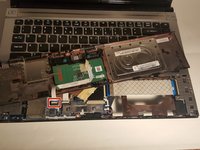
    • Remove the eleven screws that hold that back panel to the laptop using a J0 Phillips screwdriver bit.

  4. Acer Aspire TimelineX 4830T-6682 Fan Replacement: 4 단계, 이미지 1/3 Acer Aspire TimelineX 4830T-6682 Fan Replacement: 4 단계, 이미지 2/3 Acer Aspire TimelineX 4830T-6682 Fan Replacement: 4 단계, 이미지 3/3
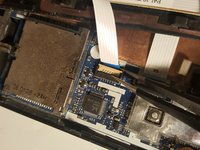
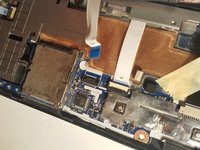
    • Place the laptop in the upright position, the lower front touchpad panel should be easily detatched at this point.

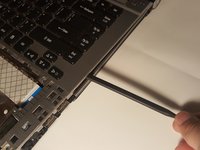
    • Remove the lower front touchpad panel by using an angled tweezers to disconnect the only wired tape connected to the motherboard.

  5. Acer Aspire TimelineX 4830T-6682 Fan Replacement: 5 단계, 이미지 1/1
    • Next, disconnect the 4 wired tapes of the keyboard from the motherboard just like we did with the lower front touchpad panel.

  6. Acer Aspire TimelineX 4830T-6682 Fan Replacement: 6 단계, 이미지 1/2 Acer Aspire TimelineX 4830T-6682 Fan Replacement: 6 단계, 이미지 2/2
    • Finally, using an opening tool, gently pry along the edge of the keyboard to separate it from the laptop.

  7. Acer Aspire TimelineX 4830T-6682 Fan Replacement, Battery: 7 단계, 이미지 1/1
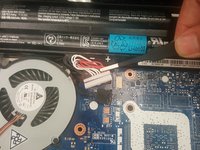
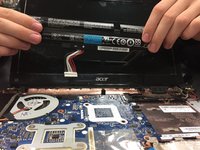
    • The battery will be on the side closest to the screen.

    • Gently lift it out. It will still be attached by white, red, and black wires.

  8. Acer Aspire TimelineX 4830T-6682 Fan Replacement: 8 단계, 이미지 1/2 Acer Aspire TimelineX 4830T-6682 Fan Replacement: 8 단계, 이미지 2/2
    • Pull the white plug, it should easily detach.

    • Remove the battery from the device.

  9. Acer Aspire TimelineX 4830T-6682 Fan Replacement, Fan: 9 단계, 이미지 1/1
    • Remove the 3.4mm by 1.9mm screws with a Phillips #0 screwdriver from the fan's heatsink.

  10. Acer Aspire TimelineX 4830T-6682 Fan Replacement: 10 단계, 이미지 1/1
    • Remove the plastic fan dust protector

  11. Acer Aspire TimelineX 4830T-6682 Fan Replacement: 11 단계, 이미지 1/1
    • Remove the two 3.4mm by 1.9mm screws that are now exposed

  12. Acer Aspire TimelineX 4830T-6682 Fan Replacement: 12 단계, 이미지 1/2 Acer Aspire TimelineX 4830T-6682 Fan Replacement: 12 단계, 이미지 2/2
    • Separate the fan from the heat sink

결론

To reassemble your device, follow these instructions in reverse order.

다른 한 분이 해당 안내서를 완성하였습니다.

Jon Brunsell

회원 가입일: 07/10/19

592 평판

안내서 6개 작성하였습니다

IUPUI, Team S1-G1, Beck Spring 2020 IUPUI, Team S1-G1, Beck Spring 2020 회원

IUPUI-BECK-S20S1G1

3 회원들

안내서 6개 작성하였습니다

댓글 2개

Where do i get the replacement fan? Are they generic. What size do I ask for?

Daisy K - 답글

The fans are not generic even though the same fan might be used for several laptop models the frame of the fan might be different. A replacement fan can be purchased online by searching for the laptop model and fan. Here is an example of an Amazon search I did for the Acer Aspire 4830T fan:

https://www.amazon.com/wangpeng-Cooling-...

Best Regards

Jon Brunsell - 답글

댓글 쓰기

조회 통계:

24 시간 전: 0

7일 전: 3

30일 전: 8

전체 시간: 657