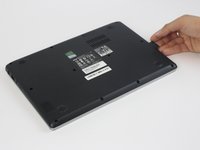
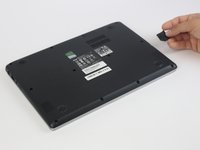
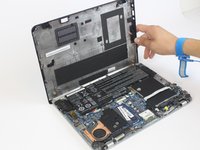
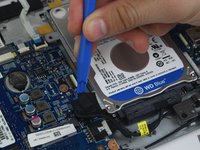
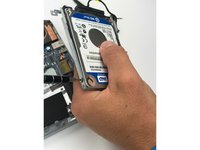
주요 콘텐츠로 건너뛰기

Acer Aspire V5-122P-0468 Hard Drive Replacement

필요한 것

  1. Acer Aspire V5-122P-0468 Hard Drive Replacement, Battery: 1 단계, 이미지 1/2 Acer Aspire V5-122P-0468 Hard Drive Replacement, Battery: 1 단계, 이미지 2/2
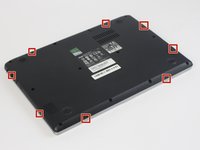
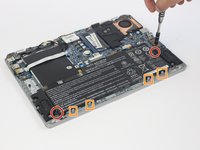
    • Remove the nine 4mm screws with a PH0 screwdriver.

    • Remove the two 6mm screws with a PH0 screwdriver.

  2. Acer Aspire V5-122P-0468 Hard Drive Replacement: 2 단계, 이미지 1/2 Acer Aspire V5-122P-0468 Hard Drive Replacement: 2 단계, 이미지 2/2
    • Remove the black rubber tab on the back of the computer

    • Remove the 4mm screw hidden underneath the black tab with a PH0 screwdriver.

  3. Acer Aspire V5-122P-0468 Hard Drive Replacement: 3 단계, 이미지 1/2 Acer Aspire V5-122P-0468 Hard Drive Replacement: 3 단계, 이미지 2/2
    • Orient the computer upside down, with the hinges facing away from you.

    • Find the black plastic piece in the SD card slot on the right side of the computer.

    • Remove the plastic piece by sliding it out of the SD card slot.

  4. Acer Aspire V5-122P-0468 Hard Drive Replacement: 4 단계, 이미지 1/3 Acer Aspire V5-122P-0468 Hard Drive Replacement: 4 단계, 이미지 2/3 Acer Aspire V5-122P-0468 Hard Drive Replacement: 4 단계, 이미지 3/3
    • Insert a spudger at these eight locations to disengage the plastic tabs from the housing cover, and pry apart.

    • Continue around the entire perimeter of the cover with the spudger.

    • Use a spudger to pry the cover around I/O ports.

  5. Acer Aspire V5-122P-0468 Hard Drive Replacement: 5 단계, 이미지 1/3 Acer Aspire V5-122P-0468 Hard Drive Replacement: 5 단계, 이미지 2/3 Acer Aspire V5-122P-0468 Hard Drive Replacement: 5 단계, 이미지 3/3
    • Remove the two 4mm screws using a PH0 screwdriver.

    • Depress the tabs holding the battery with a spudger.

    • Disconnect the battery connector from the motherboard using a spudger.

    • Pull the battery up and away from the laptop to remove.

  6. Acer Aspire V5-122P-0468 Hard Drive Replacement, Hard Drive: 6 단계, 이미지 1/3 Acer Aspire V5-122P-0468 Hard Drive Replacement, Hard Drive: 6 단계, 이미지 2/3 Acer Aspire V5-122P-0468 Hard Drive Replacement, Hard Drive: 6 단계, 이미지 3/3
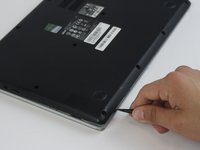
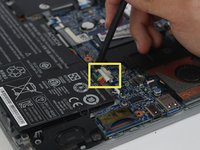
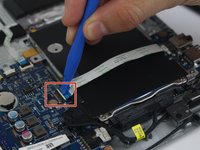
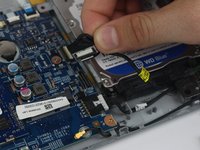
    • Use a plastic opening tool to pop the latch up on the ZIF connector up.

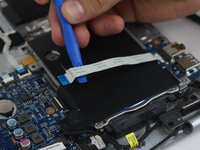
    • Pull out the ribbon cable to disconnect it from one side.

    • The cable can be left connected to the other side.

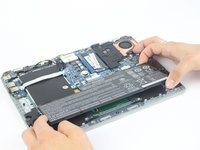
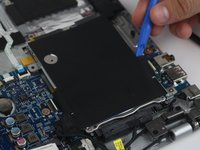
    • Remove the black isolation pad.

  7. Acer Aspire V5-122P-0468 Hard Drive Replacement: 7 단계, 이미지 1/2 Acer Aspire V5-122P-0468 Hard Drive Replacement: 7 단계, 이미지 2/2
    • Disconnect the data connector from the motherboard using a plastic opening tool.

  8. Acer Aspire V5-122P-0468 Hard Drive Replacement: 8 단계, 이미지 1/1
    • Remove three 4mm Phillips #0 screws.

    • Remove hard drive with rail attached from laptop.

  9. Acer Aspire V5-122P-0468 Hard Drive Replacement: 9 단계, 이미지 1/2 Acer Aspire V5-122P-0468 Hard Drive Replacement: 9 단계, 이미지 2/2
    • Remove the four 3mm Phillips #0 screws located on the side of the rails.

    • Separate the hard drive from the mounting rail.

결론

To reassemble your device, follow these instructions in reverse order.

다른 2명이 해당 안내서를 완성하였습니다.

Nat McCormick

회원 가입일: 02/15/18

801 평판

안내서 5개 작성하였습니다

USF Tampa, Team S16-G1, Boczar Spring 2018 USF Tampa, Team S16-G1, Boczar Spring 2018 회원

USFT-BOCZAR-S18S16G1

5 회원들

안내서 10개 작성하였습니다

댓글 한 개

What would be the correct hard drive upgrade. Something to make this laptop faster mines the 500gb the processor is and dual core prossee a4-1250

Lara Mcneese - 답글

댓글 쓰기

조회 통계:

24 시간 전: 0

7일 전: 2

30일 전: 8

전체 시간: 2,324