주요 콘텐츠로 건너뛰기

Acer Aspire V5-122P-0889 Hard drive Replacement

필요한 것

  1. Acer Aspire V5-122P-0889 Hard drive Replacement, Battery: 1 단계, 이미지 1/2 Acer Aspire V5-122P-0889 Hard drive Replacement, Battery: 1 단계, 이미지 2/2
    • Start the process of removing the bottom cover of the laptop by unscrewing the 8mm screws in the top right and left corners.

    • Remove the remaining 9 visible screws, which are 5mm in length.

    • Every screw in this laptop can be removed with a Phillips #0 screwdriver.

  2. Acer Aspire V5-122P-0889 Hard drive Replacement: 2 단계, 이미지 1/2 Acer Aspire V5-122P-0889 Hard drive Replacement: 2 단계, 이미지 2/2
    • Towards the top right corner of the laptop, there is a rubber piece covering the final screw holding the cover on, as well as a set of pins. Use your fingernail to remove this piece of rubber, and then unscrew the hidden 5mm screw.

  3. Acer Aspire V5-122P-0889 Hard drive Replacement: 3 단계, 이미지 1/2 Acer Aspire V5-122P-0889 Hard drive Replacement: 3 단계, 이미지 2/2
    • Going around the edges of the laptop, apply light to moderate amounts of pressure away from the laptop to unseat the cover so that it can be removed. Once you have removed the cover, place it face-up in a safe place to avoid getting the inside of the cover dirty.

    • If you are having trouble unseating the cover by hand, a nylon spudger can be run around the perimeter of the laptop to help lift the cover away from the case.

  4. Acer Aspire V5-122P-0889 Hard drive Replacement: 4 단계, 이미지 1/2 Acer Aspire V5-122P-0889 Hard drive Replacement: 4 단계, 이미지 2/2
    • Carefully unscrew the two 5mm screws holding the battery in place.

  5. Acer Aspire V5-122P-0889 Hard drive Replacement: 5 단계, 이미지 1/1
    • Carefully use light upward pressure to unseat the battery from the case, but do not pull on the cord or try and completely remove the battery from the case.

  6. Acer Aspire V5-122P-0889 Hard drive Replacement: 6 단계, 이미지 1/2 Acer Aspire V5-122P-0889 Hard drive Replacement: 6 단계, 이미지 2/2
    • Finally, disconnect the battery from the motherboard by undoing the power connector. To undo the connector, simply apply light to moderate pull on the sides of the connector.

  7. Acer Aspire V5-122P-0889 Hard drive Replacement, Hard drive: 7 단계, 이미지 1/2 Acer Aspire V5-122P-0889 Hard drive Replacement, Hard drive: 7 단계, 이미지 2/2
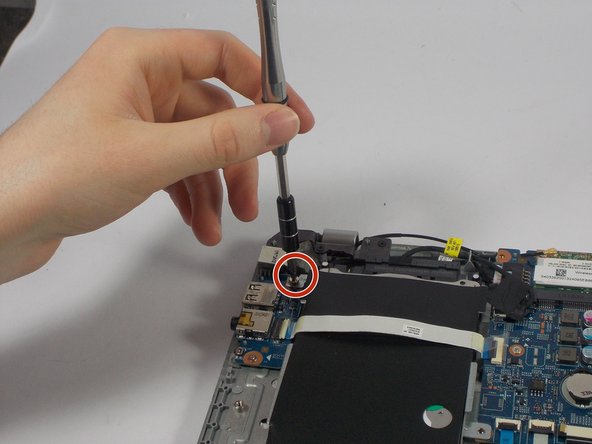
    • Remove the the two screws that hold the hard drive tray in place.

  8. Acer Aspire V5-122P-0889 Hard drive Replacement: 8 단계, 이미지 1/1
    • Remove the SATA cable that is attached to the top of the hard drive.

  9. Acer Aspire V5-122P-0889 Hard drive Replacement: 9 단계, 이미지 1/3 Acer Aspire V5-122P-0889 Hard drive Replacement: 9 단계, 이미지 2/3 Acer Aspire V5-122P-0889 Hard drive Replacement: 9 단계, 이미지 3/3
    • Use your fingernail to remove the plastic white piece that holds the ribbon cable in place. You can remove the cable from either side of the hard drive, but the left side is recommended.

    • After removing the plastic piece that holds the cable in place, you can lift the ribbon cable up high enough to remove the hard drive.

  10. Acer Aspire V5-122P-0889 Hard drive Replacement: 10 단계, 이미지 1/1
    • Remove the hard drive and tray from the laptop.

결론

To reassemble your device, follow these instructions in reverse order.

다른 6명이 해당 안내서를 완성하였습니다.

Katelynn couto

회원 가입일: 03/07/16

693 평판

안내서 5개 작성하였습니다

UMass Dartmouth, Team 5-1, Landers Spring 2016 UMass Dartmouth, Team 5-1, Landers Spring 2016 회원

UMASSD-LANDERS-S16S5G1

3 회원들

안내서 10개 작성하였습니다

댓글 3개

Man, I know you posted this forever ago, but do you know the size of the screws holding the hard drive in place? I need to replace them.

Even if you never get back to me, thanks for this guide, it was super helpful!

Colin Jaffe - 답글

Step 9 looked different in my case; the colors were just swapped on the motherboard’s cable-connector and I just had to flip upside a tiny black ‘cable-holder/presser’ from the side of the harddisk. @ Colin Jaffe: the size of the screws holding the harddisk-caddy to motherboard are PH1.5 cross, 2mm thick and only 3mm length. BTW: I had only 2 screws attaching the caddy around the harddisk itself (‘diagonally’ positioned) and they were standard-size; 3mm thick, 4mm long, also PH1.5 screwdriver.

Micheon - 답글

댓글 쓰기

조회 통계:

24 시간 전: 1

7일 전: 4

30일 전: 14

전체 시간: 5,334