주요 콘텐츠로 건너뛰기

Acer Aspire a515-46 SSD Replacement

필요한 것

  1. Acer Aspire a515-46 SSD Replacement, Turn off: 1 단계, 이미지 1/1
    • If laptop is not already off, hold power button for 5 seconds until screen shuts off.

    • If needed, backup any files to a USB or an external hard drive before turning off and replacing SSD.

  2. Acer Aspire a515-46 SSD Replacement, Remove Back Panel 1 of 3: 2 단계, 이미지 1/1
    • Flip the laptop over and locate the screws on the back panel.

  3. Acer Aspire a515-46 SSD Replacement, Remove Back Panel 2 of 3: 3 단계, 이미지 1/3 Acer Aspire a515-46 SSD Replacement, Remove Back Panel 2 of 3: 3 단계, 이미지 2/3 Acer Aspire a515-46 SSD Replacement, Remove Back Panel 2 of 3: 3 단계, 이미지 3/3
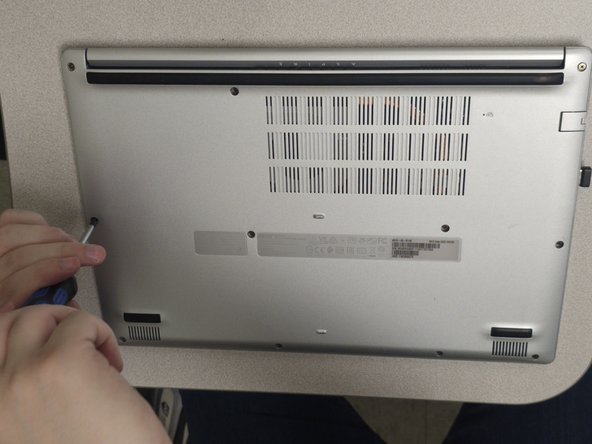
    • Using a Philips head screwdriver, remove all of the screws on the back panel.

  4. Acer Aspire a515-46 SSD Replacement, Remove Back Panel 3 of 3: 4 단계, 이미지 1/3 Acer Aspire a515-46 SSD Replacement, Remove Back Panel 3 of 3: 4 단계, 이미지 2/3 Acer Aspire a515-46 SSD Replacement, Remove Back Panel 3 of 3: 4 단계, 이미지 3/3
    • Use a small screwdriver or prybar to pry the back panel away from the laptop.

  5. Acer Aspire a515-46 SSD Replacement, Remove Battery 1 of 3: 5 단계, 이미지 1/2 Acer Aspire a515-46 SSD Replacement, Remove Battery 1 of 3: 5 단계, 이미지 2/2
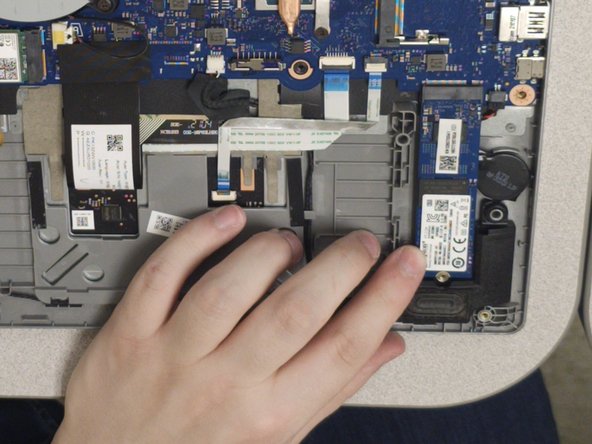
    • Remove the two pieces of tape holding the battery connector and wires.

  6. Acer Aspire a515-46 SSD Replacement, Remove Battery 2 of 3: 6 단계, 이미지 1/3 Acer Aspire a515-46 SSD Replacement, Remove Battery 2 of 3: 6 단계, 이미지 2/3 Acer Aspire a515-46 SSD Replacement, Remove Battery 2 of 3: 6 단계, 이미지 3/3
    • Using your fingernails, pinch the battery connector on both sides and pull it straight back until it is removed from the socket.

  7. Acer Aspire a515-46 SSD Replacement, Remove Battery 3 of 3: 7 단계, 이미지 1/2 Acer Aspire a515-46 SSD Replacement, Remove Battery 3 of 3: 7 단계, 이미지 2/2
    • Pull up and remove the battery from the compartment.

  8. Acer Aspire a515-46 SSD Replacement, Replace SSD 1 of 3: 8 단계, 이미지 1/2 Acer Aspire a515-46 SSD Replacement, Replace SSD 1 of 3: 8 단계, 이미지 2/2
    • Use a small Philips head screwdriver to remove the screw holding the bottom of the SSD.

  9. Acer Aspire a515-46 SSD Replacement, Replace SSD 2 of 3: 9 단계, 이미지 1/2 Acer Aspire a515-46 SSD Replacement, Replace SSD 2 of 3: 9 단계, 이미지 2/2
    • Pull the SSD straight back until it is removed from the socket.

  10. Acer Aspire a515-46 SSD Replacement, Replace SSD 3 of 3: 10 단계, 이미지 1/2 Acer Aspire a515-46 SSD Replacement, Replace SSD 3 of 3: 10 단계, 이미지 2/2
    • Insert the new SSD into the socket, making sure that the notch is on the right side of the SSD.

결론

To reassemble your device, follow these instructions in reverse order.

다른 한 분이 해당 안내서를 완성하였습니다.

Am Persand

회원 가입일: 04/11/23

211 평판

안내서 1개 작성함

댓글 0개

댓글 쓰기

조회 통계:

24 시간 전: 0

7일 전: 2

30일 전: 11

전체 시간: 280