주요 콘텐츠로 건너뛰기

Acer Chromebook C710-2856 Hard Drive Replacement

필요한 것

  1. Acer Chromebook C710-2856 Hard Drive Replacement, Removing Back Cover: 1 단계, 이미지 1/2 Acer Chromebook C710-2856 Hard Drive Replacement, Removing Back Cover: 1 단계, 이미지 2/2
    • Remove the one 4.3mm Phillips #1 screw holding the back cover on.

  2. Acer Chromebook C710-2856 Hard Drive Replacement, Unscrewing the Drive: 2 단계, 이미지 1/1
    • Remove the four 2.8mm Phillips #000 screws holding the drive onto the case.

  3. Acer Chromebook C710-2856 Hard Drive Replacement, Uncovering the Pins: 3 단계, 이미지 1/1
    • Gently pull the foam protector away from the pin connectors

  4. Acer Chromebook C710-2856 Hard Drive Replacement, Disconnecting the Drive: 4 단계, 이미지 1/2 Acer Chromebook C710-2856 Hard Drive Replacement, Disconnecting the Drive: 4 단계, 이미지 2/2
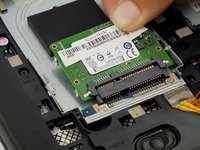
    • Gently pull the drive up and away to disconnect the hard drive from its seat

  5. Acer Chromebook C710-2856 Hard Drive Replacement, Removed Drive and Pieces: 5 단계, 이미지 1/1
    • Fully removed hard drive, screws, and foam cover

결론

To reassemble your device, follow these instructions in reverse order.

Josh Rowell

회원 가입일: 10/10/17

146 평판

안내서 1개 작성함

USF Tampa, Team S6-G5, Remmell Fall 2017 USF Tampa, Team S6-G5, Remmell Fall 2017 회원

USFT-REMMELL-F17S6G5

7 회원들

안내서 8개 작성하였습니다

댓글 0개

댓글 쓰기

조회 통계:

24 시간 전: 1

7일 전: 3

30일 전: 9

전체 시간: 334