주요 콘텐츠로 건너뛰기

이 안내서에는 최근 변경 사항이 더 있습니다. 최신 비검증 버전으로 전환하십시오.

Acer Chromebook C720-2827 Trackpad Replacement

필요한 것

  1. Acer Chromebook C720-2827 Trackpad Replacement, Back Panel Assembly: 1 단계, 이미지 1/2 Acer Chromebook C720-2827 Trackpad Replacement, Back Panel Assembly: 1 단계, 이미지 2/2
    • Remove the thirteen 6.0mm screws on the back panel using your Phillips #1 screwdriver.

  2. Acer Chromebook C720-2827 Trackpad Replacement: 2 단계, 이미지 1/2 Acer Chromebook C720-2827 Trackpad Replacement: 2 단계, 이미지 2/2
    • Pry the back panel open with the plastic opening tool.

  3. Acer Chromebook C720-2827 Trackpad Replacement, Battery: 3 단계, 이미지 1/1
    • Remove the two 6.0mm screws securing the battery with your Phillips #1 screwdriver.

  4. Acer Chromebook C720-2827 Trackpad Replacement: 4 단계, 이미지 1/2 Acer Chromebook C720-2827 Trackpad Replacement: 4 단계, 이미지 2/2
    • Carefully pull out the battery wire connected to the battery port.

  5. Acer Chromebook C720-2827 Trackpad Replacement: 5 단계, 이미지 1/1
    • Slowly lift the battery to remove it from the Chromebook.

  6. Acer Chromebook C720-2827 Trackpad Replacement, Trackpad: 6 단계, 이미지 1/3 Acer Chromebook C720-2827 Trackpad Replacement, Trackpad: 6 단계, 이미지 2/3 Acer Chromebook C720-2827 Trackpad Replacement, Trackpad: 6 단계, 이미지 3/3
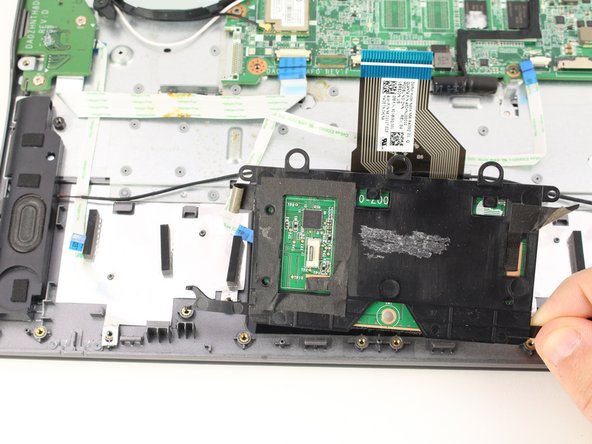
    • Using a spudger, pry up the locking bar of the ZIF connector on the trackpad and remove the ribbon cable.

  7. Acer Chromebook C720-2827 Trackpad Replacement: 7 단계, 이미지 1/3 Acer Chromebook C720-2827 Trackpad Replacement: 7 단계, 이미지 2/3 Acer Chromebook C720-2827 Trackpad Replacement: 7 단계, 이미지 3/3
    • Peel off the clear plastic covering the screws.

    • Remove the five grey 2.5 mm screws securing the trackpad with a Phillips #1 screwdriver.

    • Remove another four silver 2.9mm Phillips #1 screws from the silver bracket atop the trackpad with your driver.

  8. Acer Chromebook C720-2827 Trackpad Replacement: 8 단계, 이미지 1/2 Acer Chromebook C720-2827 Trackpad Replacement: 8 단계, 이미지 2/2
    • Lift up the silver bracket.

    • Remove the trackpad by lifting it up from the case.

결론

To reassemble your device, follow these instructions in reverse order.

다른 한 분이 해당 안내서를 완성하였습니다.

Austin Blakely

회원 가입일: 03/11/19

19,503 평판

안내서 53개 작성하였습니다

iFixit iFixit 회원

Staff

135 회원들

안내서 16,767개 작성하였습니다

댓글 0개

댓글 쓰기

조회 통계:

24 시간 전: 0

7일 전: 1

30일 전: 2

전체 시간: 239