주요 콘텐츠로 건너뛰기

Acer Chromebook C720-2848 Keyboard Replacement

필요한 것

  1. Acer Chromebook C720-2848 Keyboard Replacement, Back Cover: 1 단계, 이미지 1/2 Acer Chromebook C720-2848 Keyboard Replacement, Back Cover: 1 단계, 이미지 2/2
    • Use a Phillips head screw driver to remove the 13 screws in these locations.

  2. Acer Chromebook C720-2848 Keyboard Replacement: 2 단계, 이미지 1/3 Acer Chromebook C720-2848 Keyboard Replacement: 2 단계, 이미지 2/3 Acer Chromebook C720-2848 Keyboard Replacement: 2 단계, 이미지 3/3
    • Use a plastic spudger to pry up the bottom cover and remove it.

    • Be sure to pry along other edges if necessary to avoid damaging the back cover.

  3. Acer Chromebook C720-2848 Keyboard Replacement, Battery: 3 단계, 이미지 1/3 Acer Chromebook C720-2848 Keyboard Replacement, Battery: 3 단계, 이미지 2/3 Acer Chromebook C720-2848 Keyboard Replacement, Battery: 3 단계, 이미지 3/3
    • Unscrew the 2 battery screws.

    • Make sure you keep these screws separate from the back cover screws; they are different!

  4. Acer Chromebook C720-2848 Keyboard Replacement: 4 단계, 이미지 1/2 Acer Chromebook C720-2848 Keyboard Replacement: 4 단계, 이미지 2/2
    • Use two fingers to unplug the battery-to-motherboard connection.

  5. Acer Chromebook C720-2848 Keyboard Replacement: 5 단계, 이미지 1/1
    • Take out battery by lifting it up in the manner pictured.

  6. Acer Chromebook C720-2848 Keyboard Replacement, SSD: 6 단계, 이미지 1/2 Acer Chromebook C720-2848 Keyboard Replacement, SSD: 6 단계, 이미지 2/2
    • Unscrew screw holding SSD card in place.

    • Slide out the SSD card towards you to remove it.

    • The SSD card is the blue chip on the right connected to the motherboard.

    • Be sure to store this screw apart from the others as it is a different length.

  7. Acer Chromebook C720-2848 Keyboard Replacement, Motherboard: 7 단계, 이미지 1/3 Acer Chromebook C720-2848 Keyboard Replacement, Motherboard: 7 단계, 이미지 2/3 Acer Chromebook C720-2848 Keyboard Replacement, Motherboard: 7 단계, 이미지 3/3
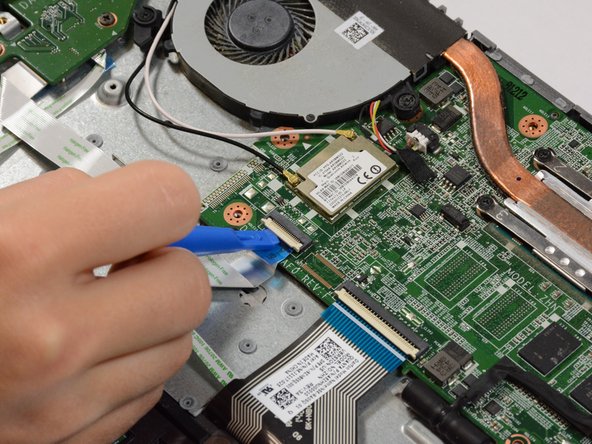
    • Remove the three ribbon cables connected to the bottom of the motherboard.

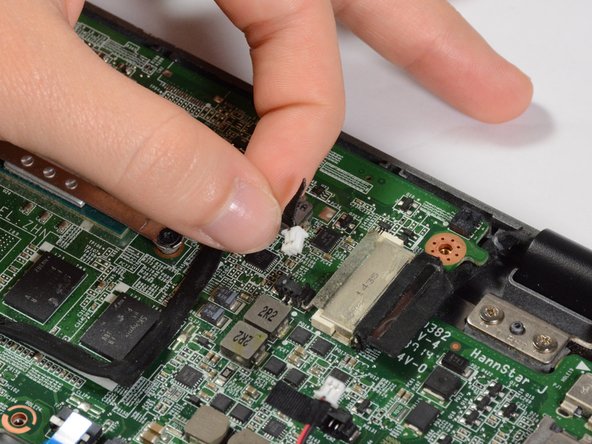
    • Use the plastic spudger to lift the white hinges from on top of the ribbon cables.

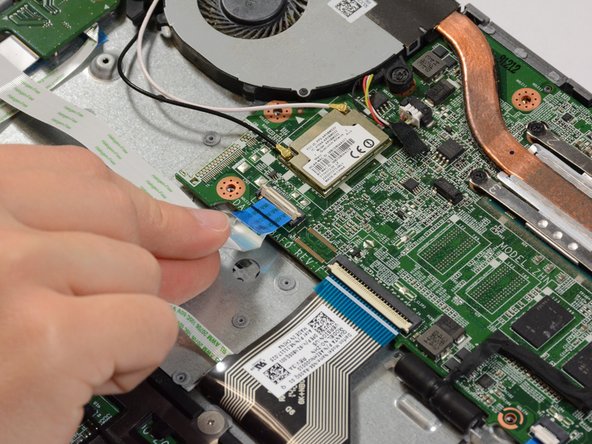
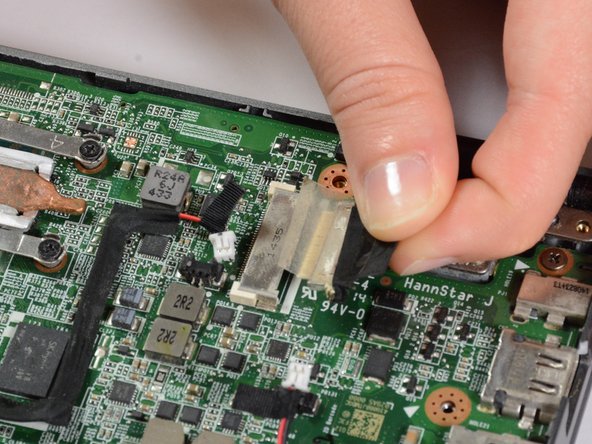
    • Then gently pull the cables out.

  8. Acer Chromebook C720-2848 Keyboard Replacement: 8 단계, 이미지 1/3 Acer Chromebook C720-2848 Keyboard Replacement: 8 단계, 이미지 2/3 Acer Chromebook C720-2848 Keyboard Replacement: 8 단계, 이미지 3/3
    • Remove 4 connectors from the right side of the motherboard.

    • All of these connectors release by simply pulling back.

    • To disconnect the connector shown in the third picture, you will need to peel back some tape first.

  9. Acer Chromebook C720-2848 Keyboard Replacement: 9 단계, 이미지 1/3 Acer Chromebook C720-2848 Keyboard Replacement: 9 단계, 이미지 2/3 Acer Chromebook C720-2848 Keyboard Replacement: 9 단계, 이미지 3/3
    • On the left side of the motherboard, remove one more connector and two cables.

    • To remove the cables, lift them up with a plastic spudger.

    • Take note of which cable connects where.

  10. Acer Chromebook C720-2848 Keyboard Replacement: 10 단계, 이미지 1/3 Acer Chromebook C720-2848 Keyboard Replacement: 10 단계, 이미지 2/3 Acer Chromebook C720-2848 Keyboard Replacement: 10 단계, 이미지 3/3
    • Remove the 2 fan screws and the 4 heat sink screws.

    • The screws don't necessarily need to be removed from the component, but rather just loosened enough to remove the component from the motherboard.

    • Now remove the fan/heat sink component.

    • Once again, make sure to keep these screws separate from all others.

  11. Acer Chromebook C720-2848 Keyboard Replacement: 11 단계, 이미지 1/2 Acer Chromebook C720-2848 Keyboard Replacement: 11 단계, 이미지 2/2
    • Remove the 2 motherboard screws.

    • Now you can remove the motherboard.

    • Be careful not to damage any of the loose connectors and cables you disconnected in the previous steps.

  12. Acer Chromebook C720-2848 Keyboard Replacement, Keyboard: 12 단계, 이미지 1/3 Acer Chromebook C720-2848 Keyboard Replacement, Keyboard: 12 단계, 이미지 2/3 Acer Chromebook C720-2848 Keyboard Replacement, Keyboard: 12 단계, 이미지 3/3
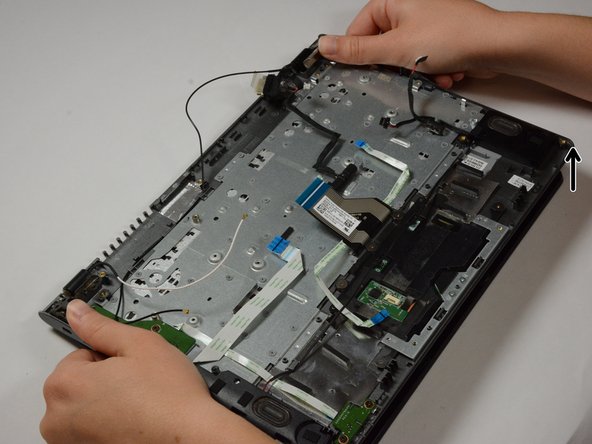
    • Remove the 4 keyboard screws.

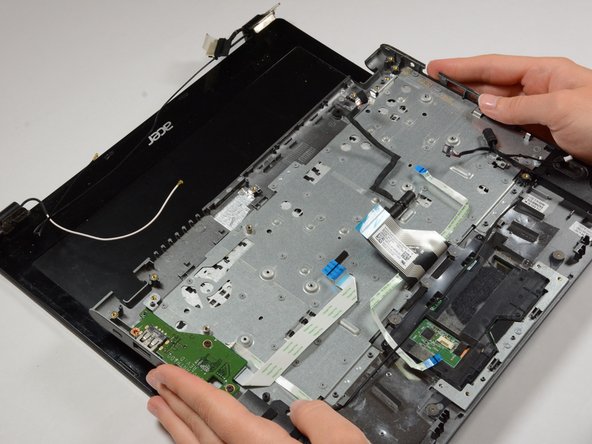
    • Lastly, remove the keyboard. To do this, slightly hinge open the laptop and pull back.

    • Make sure to be wary of the cables that connect to the display when removing the keyboard.

결론

To reassemble your device, follow these instructions in reverse order.

다른 3명이 해당 안내서를 완성하였습니다.

Richard Schmidt

회원 가입일: 03/19/18

328 평판

안내서 2개 작성하였습니다

Baylor, Team S3-G1, Williams Spring 2018 Baylor, Team S3-G1, Williams Spring 2018 회원

BU-WILLIAMS-S18S3G1

4 회원들

안내서 4개 작성하였습니다

댓글 2개

This should really be title keyboard ASSEMBLY replacement. The keyboard involves quite a bit more work on its own.

avarno - 답글

! ATTENTION ! Comme l’a dit avarno il y a quelques mois, le tutoriel ne propose QUE DE REMPLACER LE BLOC CLAVIER + PAVÉ TACTILE. Sur Ifixit on peut aussi acheter le clavier seul (ce que j’ai fait). On se retrouve bloqué à l’étape 12. J’ai posté une solution en commentaire de l’étape 12 (peut être pas très conventionnelle, à vos risques et périls !)

adrien - 답글

댓글 쓰기

조회 통계:

24 시간 전: 1

7일 전: 5

30일 전: 14

전체 시간: 636