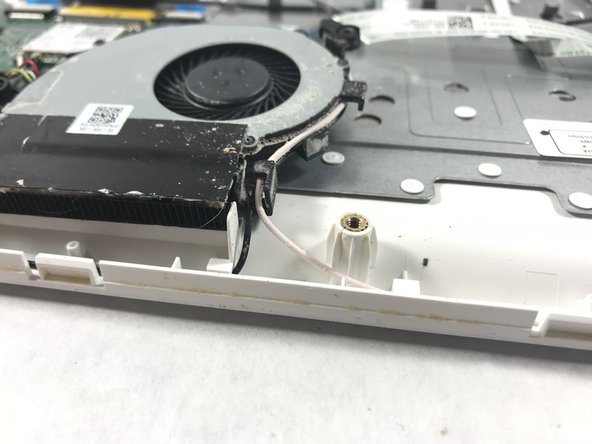
주요 콘텐츠로 건너뛰기

Acer Chromebook CB5-571-C5XU Fan Replacement

필요한 것

  1. Acer Chromebook CB5-571-C5XU Fan Replacement, Bottom Case: 1 단계, 이미지 1/2 Acer Chromebook CB5-571-C5XU Fan Replacement, Bottom Case: 1 단계, 이미지 2/2
    • Remove the following eighteen screws using a Phillips #0 screwdriver.

    • Make sure the Chromebook is unplugged and shut down, so no files are lost and there is no risk of electrocution.

  2. Acer Chromebook CB5-571-C5XU Fan Replacement: 2 단계, 이미지 1/2 Acer Chromebook CB5-571-C5XU Fan Replacement: 2 단계, 이미지 2/2
    • Using the flat side of the spudger, pry open the bottom case of the laptop.

    • Working from the front to the back, where it connects to the screen, proved to be the easiest way of popping the case off.

  3. Acer Chromebook CB5-571-C5XU Fan Replacement, Fan: 3 단계, 이미지 1/2 Acer Chromebook CB5-571-C5XU Fan Replacement, Fan: 3 단계, 이미지 2/2
    • Using a Phillips #0 screwdriver, unscrew the screw to the right of the fan.

    • Remember to have a small container to place the screw in, so it does not get lost.

  4. Acer Chromebook CB5-571-C5XU Fan Replacement: 4 단계, 이미지 1/2 Acer Chromebook CB5-571-C5XU Fan Replacement: 4 단계, 이미지 2/2
    • Using the Phillips #0 screwdriver, unscrew the four screws connecting the heatsink to the motherboard.

    • Remember to have a safe place to place the screws, so none of them get lost.

  5. Acer Chromebook CB5-571-C5XU Fan Replacement: 5 단계, 이미지 1/3 Acer Chromebook CB5-571-C5XU Fan Replacement: 5 단계, 이미지 2/3 Acer Chromebook CB5-571-C5XU Fan Replacement: 5 단계, 이미지 3/3
    • Carefully unhook the black and white wires from the circumference of the fan.

    • It might help to use the pointed end of the spudger tool to unhook the wires.

    • Do not tug too hard on the wires, as they can easily disconnect and snap off from the motherboard.

  6. Acer Chromebook CB5-571-C5XU Fan Replacement: 6 단계, 이미지 1/2 Acer Chromebook CB5-571-C5XU Fan Replacement: 6 단계, 이미지 2/2
    • Using the spudger tool, carefully remove the wires connecting the fan to the motherboard.

  7. Acer Chromebook CB5-571-C5XU Fan Replacement: 7 단계, 이미지 1/2 Acer Chromebook CB5-571-C5XU Fan Replacement: 7 단계, 이미지 2/2
    • Using the flat side of the spudger, firmly pry the fan off of the components, as well as the heatsink from the motherboard.

결론

To reassemble your device, follow these instructions in reverse order.

다른 한 분이 해당 안내서를 완성하였습니다.

Erin Moffatt

회원 가입일: 10/17/17

282 평판

안내서 2개 작성하였습니다

UMass Dartmouth, Team S6-G1, Rockett Fall 2017 UMass Dartmouth, Team S6-G1, Rockett Fall 2017 회원

UMASSD-ROCKETT-F17S6G1

3 회원들

안내서 10개 작성하였습니다

댓글 0개

댓글 쓰기

조회 통계:

24 시간 전: 0

7일 전: 2

30일 전: 8

전체 시간: 282