주요 콘텐츠로 건너뛰기

Acer Chromebook CB5-571-C5XU Speaker Replacement

필요한 것

  1. Acer Chromebook CB5-571-C5XU Speaker Replacement, Bottom Case: 1 단계, 이미지 1/2 Acer Chromebook CB5-571-C5XU Speaker Replacement, Bottom Case: 1 단계, 이미지 2/2
    • Remove the following eighteen screws using a Phillips #0 screwdriver.

    • Make sure the Chromebook is unplugged and shut down, so no files are lost and there is no risk of electrocution.

  2. Acer Chromebook CB5-571-C5XU Speaker Replacement: 2 단계, 이미지 1/2 Acer Chromebook CB5-571-C5XU Speaker Replacement: 2 단계, 이미지 2/2
    • Using the flat side of the spudger, pry open the bottom case of the laptop.

    • Working from the front to the back, where it connects to the screen, proved to be the easiest way of popping the case off.

  3. Acer Chromebook CB5-571-C5XU Speaker Replacement, Battery: 3 단계, 이미지 1/1
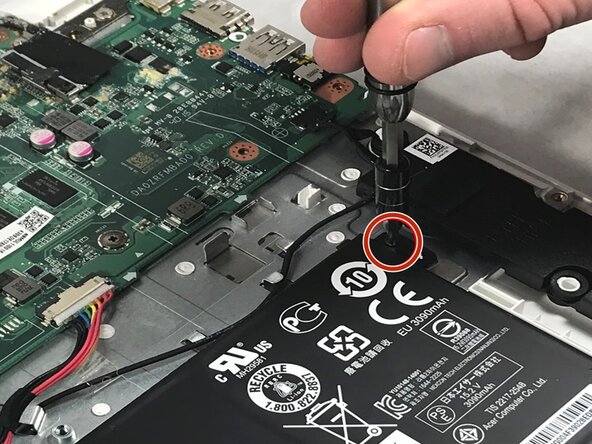
    • Using a Phillips #0 screwdriver, unscrew the screw on right side of the battery placement.

    • Be careful not to lose the screw and have a small container nearby to place it in.

  4. Acer Chromebook CB5-571-C5XU Speaker Replacement: 4 단계, 이미지 1/1
    • Using a plastic opening tool, disconnect the wires connecting the battery to the motherboard.

  5. Acer Chromebook CB5-571-C5XU Speaker Replacement: 5 단계, 이미지 1/1
    • Gently lift the battery out and remove it from the laptop casing.

  6. Acer Chromebook CB5-571-C5XU Speaker Replacement, Speakers: 6 단계, 이미지 1/2 Acer Chromebook CB5-571-C5XU Speaker Replacement, Speakers: 6 단계, 이미지 2/2
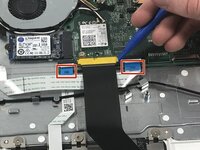
    • Use the plastic pry tool to unlatch the two tabs on either side of the black ribbon.

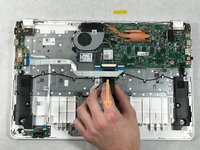
    • Gently slide the black ribbon out from its socket and under the white ribbon.

  7. Acer Chromebook CB5-571-C5XU Speaker Replacement: 7 단계, 이미지 1/1
    • Carefully remove the smaller black ribbon from the motherboard using the opening tool.

    • Be careful when prying the connector loose, its small size can make it difficult to grasp a corner of the connector.

  8. Acer Chromebook CB5-571-C5XU Speaker Replacement: 8 단계, 이미지 1/1
    • Weave the black wire connecting the two speakers out of the small metal hooks.

    • It might be helpful to take a picture of how the wire is wrapped around the hooks, as this layout is important when the wire is put back.

  9. Acer Chromebook CB5-571-C5XU Speaker Replacement: 9 단계, 이미지 1/1
    • Simply lift upwards on both speakers, and they will remove from their position.

결론

To reassemble your device, follow these instructions in reverse order.

다른 한 분이 해당 안내서를 완성하였습니다.

️Gaetan Charles

회원 가입일: 10/26/17

119 평판

안내서 1개 작성함

UMass Dartmouth, Team S6-G1, Rockett Fall 2017 UMass Dartmouth, Team S6-G1, Rockett Fall 2017 회원

UMASSD-ROCKETT-F17S6G1

3 회원들

안내서 10개 작성하였습니다

댓글 0개

댓글 쓰기

조회 통계:

24 시간 전: 2

7일 전: 4

30일 전: 9

전체 시간: 167