주요 콘텐츠로 건너뛰기

Acer Chromebook R11 CB5-132T-C1LK Motherboard Replacement

필요한 것

  1. Acer Chromebook R11 CB5-132T-C1LK Motherboard Replacement, Bottom Panel: 1 단계, 이미지 1/1
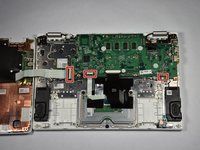
    • Using a Phillips screwdriver, remove all eleven 7.0 mm screws from the bottom of the Chromebook.

  2. Acer Chromebook R11 CB5-132T-C1LK Motherboard Replacement: 2 단계, 이미지 1/1
    • Find the seam along the edge of the device.

    • Wedge a finger into the groove and separate the panel from the device. If necessary, use a spudger.

    • The panel will still be connected to the device by internal wiring, so pull it off with some caution. It is best to flip the panel to the side once the seam has been broken.

  3. Acer Chromebook R11 CB5-132T-C1LK Motherboard Replacement, Battery: 3 단계, 이미지 1/1
    • Remove the two 4.5 mm Phillips screws located at the sides of the battery.

  4. Acer Chromebook R11 CB5-132T-C1LK Motherboard Replacement: 4 단계, 이미지 1/2 Acer Chromebook R11 CB5-132T-C1LK Motherboard Replacement: 4 단계, 이미지 2/2
    • Grip the battery connection using two plastic opening tools.

    • Carefully but firmly, pry the connector from its socket by pulling it towards the battery.

    • When reconnecting the battery to the motherboard, place the red wires closer to the edge of the device and the black wires towards the center.

  5. Acer Chromebook R11 CB5-132T-C1LK Motherboard Replacement: 5 단계, 이미지 1/1
    • Lift the battery out by pulling upward.

  6. Acer Chromebook R11 CB5-132T-C1LK Motherboard Replacement, Motherboard: 6 단계, 이미지 1/2 Acer Chromebook R11 CB5-132T-C1LK Motherboard Replacement, Motherboard: 6 단계, 이미지 2/2
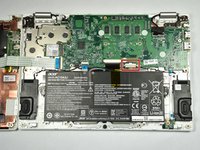
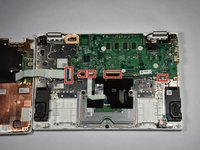
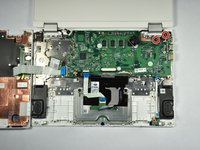
    • Orient the laptop so the motherboard side is further away from you in a landscape position.

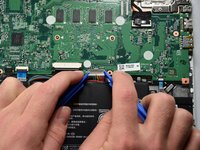
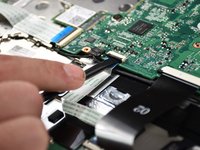
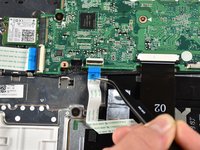
    • Use the flat end of the spudger to lift the the ZIF connector retaining flaps securing the three small ribbon cables.

  7. Acer Chromebook R11 CB5-132T-C1LK Motherboard Replacement: 7 단계, 이미지 1/1
    • Pull out the locking mechanism of the touchpad ZIF connector with the narrow end of the spudger.

  8. Acer Chromebook R11 CB5-132T-C1LK Motherboard Replacement: 8 단계, 이미지 1/3 Acer Chromebook R11 CB5-132T-C1LK Motherboard Replacement: 8 단계, 이미지 2/3 Acer Chromebook R11 CB5-132T-C1LK Motherboard Replacement: 8 단계, 이미지 3/3
    • Using tweezers, pull the five ribbon cables near the bottom of the motherboard from their sockets.

    • Using tweezers, pull the single cable near the top left of the motherboard from its socket.

  9. Acer Chromebook R11 CB5-132T-C1LK Motherboard Replacement: 9 단계, 이미지 1/1
    • Remove the screen connector from the motherboard by pulling directly upward on the black tabs.

  10. Acer Chromebook R11 CB5-132T-C1LK Motherboard Replacement: 10 단계, 이미지 1/1
    • Remove the 2.0 mm screw from the Wi-Fi card.

  11. Acer Chromebook R11 CB5-132T-C1LK Motherboard Replacement: 11 단계, 이미지 1/1
    • Slide the Wi-Fi card out from the port with tweezers.

  12. Acer Chromebook R11 CB5-132T-C1LK Motherboard Replacement: 12 단계, 이미지 1/1
    • Remove the two 4.5 mm screws and a 2.0 mm screw from the middle of the motherboard.

  13. Acer Chromebook R11 CB5-132T-C1LK Motherboard Replacement: 13 단계, 이미지 1/2 Acer Chromebook R11 CB5-132T-C1LK Motherboard Replacement: 13 단계, 이미지 2/2
    • Unscrew the two 4.5 mm screws from the top right metal tab connected to the motherboard.

    • Lift the right corner upward to remove the metal tabs from the motherboard

  14. Acer Chromebook R11 CB5-132T-C1LK Motherboard Replacement: 14 단계, 이미지 1/1
    • Lift the motherboard upward to completely remove it from the base.

결론

To reassemble your device, follow these instructions in reverse order.

다른 9명이 해당 안내서를 완성하였습니다.

Elizabeth Crisologo

회원 가입일: 04/26/17

278 평판

안내서 2개 작성하였습니다

Cal Poly, Team S23-G2, Livingston Spring 2017 Cal Poly, Team S23-G2, Livingston Spring 2017 회원

CPSU-LIVINGSTON-S17S23G2

4 회원들

안내서 12개 작성하였습니다

댓글 0개

댓글 쓰기

조회 통계:

24 시간 전: 0

7일 전: 2

30일 전: 18

전체 시간: 5,218