주요 콘텐츠로 건너뛰기

Acer Chromebook cb3-532-c47c Display Hinge Replacement

필요한 것

  1. Acer Chromebook cb3-532-c47c Display Hinge Replacement, Back Panel: 1 단계, 이미지 2개 중 1개 Acer Chromebook cb3-532-c47c Display Hinge Replacement, Back Panel: 1 단계, 이미지 2개 중 2개
    • Power off the laptop before beginning the replacement.

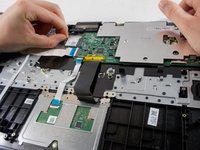
    • Using the Phillips #1 screwdriver, remove eighteen 7 mm screws from the back panel of the device.

  2. Acer Chromebook cb3-532-c47c Display Hinge Replacement: 2 단계, 이미지 2개 중 1개 Acer Chromebook cb3-532-c47c Display Hinge Replacement: 2 단계, 이미지 2개 중 2개
    • Use a plastic opening tool around the edges of the laptop and remove the back panel from the device.

  3. Acer Chromebook cb3-532-c47c Display Hinge Replacement, Remove the battery cable: 3 단계, 이미지 1개 중 1개
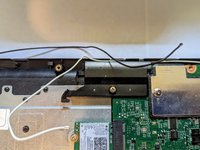
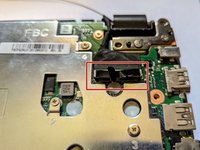
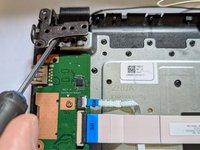
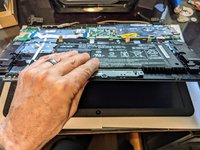
    • Push on the sides of the connector with a plastic spudger to separate the cable from the motherboard.

  4. Acer Chromebook cb3-532-c47c Display Hinge Replacement, Unplug the WiFi Antenna Connectors: 4 단계, 이미지 2개 중 1개 Acer Chromebook cb3-532-c47c Display Hinge Replacement, Unplug the WiFi Antenna Connectors: 4 단계, 이미지 2개 중 2개
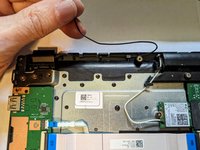
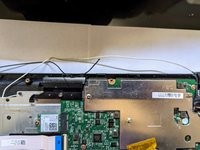
    • Firmly pull the end of the black wire attached to the Wi-Fi card upwards and remove it from the device.

    • Repeat with the white wire.

  5. Acer Chromebook cb3-532-c47c Display Hinge Replacement, Deroute the Black WiFi Wire: 5 단계, 이미지 2개 중 1개 Acer Chromebook cb3-532-c47c Display Hinge Replacement, Deroute the Black WiFi Wire: 5 단계, 이미지 2개 중 2개
    • Deroute the black wifi wire from its slot in the palm rest.

  6. Acer Chromebook cb3-532-c47c Display Hinge Replacement, Deroute the White WiFi Wire: 6 단계, 이미지 2개 중 1개 Acer Chromebook cb3-532-c47c Display Hinge Replacement, Deroute the White WiFi Wire: 6 단계, 이미지 2개 중 2개
    • Deroute the white wifi wire from the slot in the palm rest.

  7. Acer Chromebook cb3-532-c47c Display Hinge Replacement, Disconnect the Display Cable: 7 단계, 이미지 3개 중 1개 Acer Chromebook cb3-532-c47c Display Hinge Replacement, Disconnect the Display Cable: 7 단계, 이미지 3개 중 2개 Acer Chromebook cb3-532-c47c Display Hinge Replacement, Disconnect the Display Cable: 7 단계, 이미지 3개 중 3개
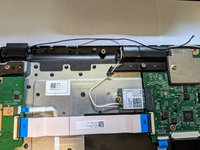
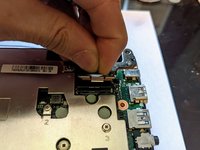
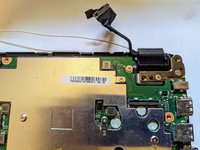
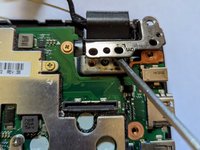
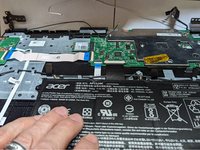
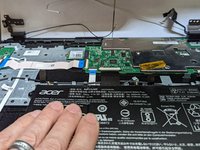
    • Pull the end of the display cable attached to the motherboard straight up to remove.

    • Rotate the cable out away from the motherboard.

  8. Acer Chromebook cb3-532-c47c Display Hinge Replacement, Remove Right Hinge Screws: 8 단계, 이미지 1개 중 1개
    • Remove the two screws from the right hinge.

  9. Acer Chromebook cb3-532-c47c Display Hinge Replacement: 9 단계, 이미지 2개 중 1개 Acer Chromebook cb3-532-c47c Display Hinge Replacement: 9 단계, 이미지 2개 중 2개
    • Insert a screwdriver or spudger under the hinge to get it started then rotate it open by hand as far as possible.

  10. Acer Chromebook cb3-532-c47c Display Hinge Replacement, Remove Left Hinge Screws: 10 단계, 이미지 1개 중 1개
    • Remove the two screws from the left hinge.

  11. Acer Chromebook cb3-532-c47c Display Hinge Replacement: 11 단계, 이미지 2개 중 1개 Acer Chromebook cb3-532-c47c Display Hinge Replacement: 11 단계, 이미지 2개 중 2개
    • Insert a screwdriver or spudger under the hinge to get it started then rotate it open by hand as far as possible.

  12. Acer Chromebook cb3-532-c47c Display Hinge Replacement, Remove the display assembly: 12 단계, 이미지 3개 중 1개 Acer Chromebook cb3-532-c47c Display Hinge Replacement, Remove the display assembly: 12 단계, 이미지 3개 중 2개 Acer Chromebook cb3-532-c47c Display Hinge Replacement, Remove the display assembly: 12 단계, 이미지 3개 중 3개
    • Lift the palm rest assembly from the front then slide it away from the hinges slightly to remove the assembly from the display.

  13. Acer Chromebook cb3-532-c47c Display Hinge Replacement, Remove the Front Bezel: 13 단계, 이미지 3개 중 1개 Acer Chromebook cb3-532-c47c Display Hinge Replacement, Remove the Front Bezel: 13 단계, 이미지 3개 중 2개 Acer Chromebook cb3-532-c47c Display Hinge Replacement, Remove the Front Bezel: 13 단계, 이미지 3개 중 3개
    • Rotate the display so the hinges are facing you, then pry off the bezel on the front of the screen using an opening pick or plastic opening tool.

  14. Acer Chromebook cb3-532-c47c Display Hinge Replacement, Remove the Left Hinge: 14 단계, 이미지 1개 중 1개
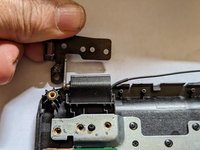
    • Remove the four screws securing the left hinge to the case; one at the top and three at the bottom.

    • Take out the left hinge.

  15. Acer Chromebook cb3-532-c47c Display Hinge Replacement, Remove the Right Hinge: 15 단계, 이미지 1개 중 1개
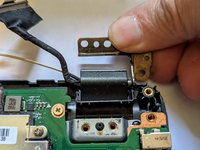
    • Remove the four screws securing the right hinge to the case; one at the top and three at the bottom.

    • Take out the right hinge.

결론

To reassemble your device, follow these instructions in reverse order.

작성자

1다른 기여자 명과 함께

Jerry Wheeler

회원 가입일: 03/21/22

72,217 평판

안내서 71개를 작성함

Oregonians Oregonians 회원

Community

8 회원들

안내서 189개를 작성함

댓글 0개

댓글 쓰기

조회 통계:

지난 24시간: 0

지난 7일: 1

지난 30일: 2

전체 시간: 290