주요 콘텐츠로 건너뛰기

Acer E5-571-54FL CPU Replacement

필요한 것

  1. Acer E5-571-54FL CPU Replacement, Battery: 1 단계, 이미지 1/1
    • Make sure the laptop is shut down.

    • Flip the laptop upside down. Rotate it so the battery faces you.

  2. Acer E5-571-54FL CPU Replacement: 2 단계, 이미지 1/1
    • Place the pointed end of a spudger into the battery lock. Slide the battery lock to the left using the spudger. A "click" sound will accompany the release of the battery.

  3. Acer E5-571-54FL CPU Replacement: 3 단계, 이미지 1/1
    • Pull the battery towards you to remove it from the laptop.

  4. Acer E5-571-54FL CPU Replacement, Keyboard: 4 단계, 이미지 1/1
    • Remove all eighteen 8 mm screws with a Phillips #0 screwdriver.

  5. Acer E5-571-54FL CPU Replacement: 5 단계, 이미지 1/3 Acer E5-571-54FL CPU Replacement: 5 단계, 이미지 2/3 Acer E5-571-54FL CPU Replacement: 5 단계, 이미지 3/3
    • Carefully pry apart the clips holding the keyboard in place by moving a metal spudger along the seam.

    • Be careful not to break the plastic clips.

  6. Acer E5-571-54FL CPU Replacement: 6 단계, 이미지 1/2 Acer E5-571-54FL CPU Replacement: 6 단계, 이미지 2/2
    • Carefully flip up the white hinge. Detach the three ZIF ribbons connected to the motherboard.

    • Remove the panel with the keyboard and the touchpad.

  7. Acer E5-571-54FL CPU Replacement, Cooling Fan: 7 단계, 이미지 1/3 Acer E5-571-54FL CPU Replacement, Cooling Fan: 7 단계, 이미지 2/3 Acer E5-571-54FL CPU Replacement, Cooling Fan: 7 단계, 이미지 3/3
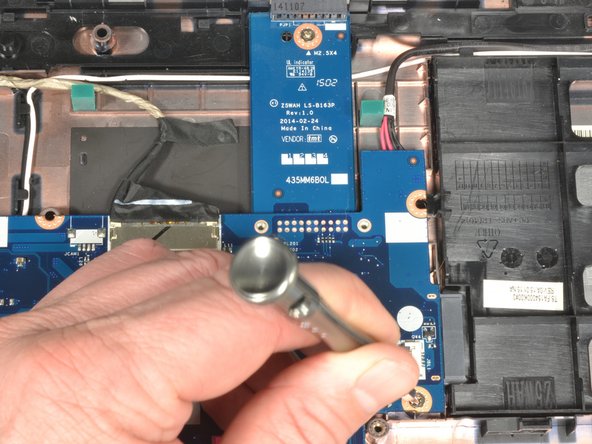
    • Locate the CPU cooling fan in the upper left corner of the laptop.

    • Using a Phillips #0 screwdriver, remove the two 4.5 mm screws that secure the fan to the case.

  8. Acer E5-571-54FL CPU Replacement: 8 단계, 이미지 1/3 Acer E5-571-54FL CPU Replacement: 8 단계, 이미지 2/3 Acer E5-571-54FL CPU Replacement: 8 단계, 이미지 3/3
    이 단계에 사용된 도구:
    Tweezers
    $4.99
    구매
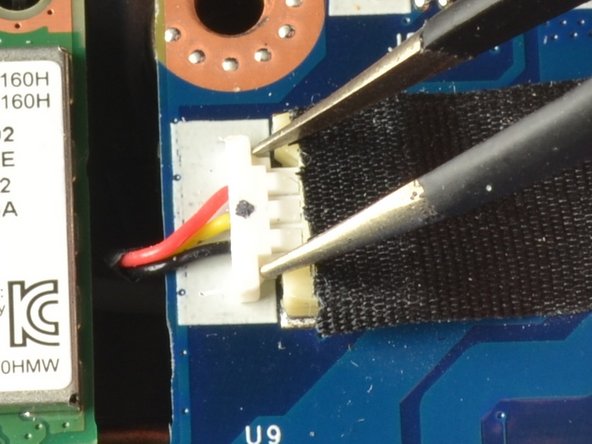
    • Place the tips of the ESD safe pointed tweezers between the plug and the socket of the fan connection.

    • Gently push the tweezers to the left to disconnect the fan plug.

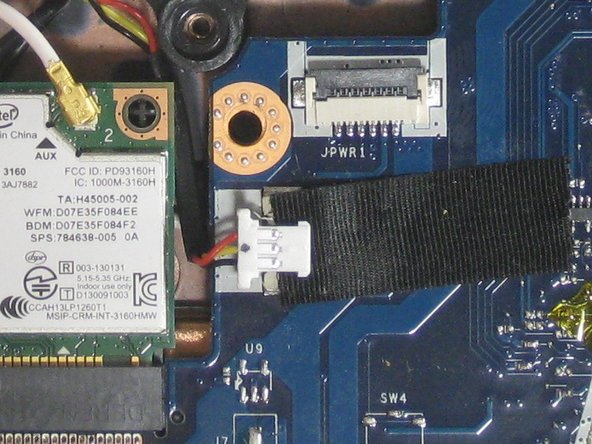
    • Move the fan connector and its wires to free them from the motherboard and the Wi-Fi card.

  9. Acer E5-571-54FL CPU Replacement: 9 단계, 이미지 1/2 Acer E5-571-54FL CPU Replacement: 9 단계, 이미지 2/2
    • Lift the curved end of the fan by about 30 degrees.

    • Use your hand to lift the fan up and to the right until it is clear of the case.

    • If you feel resistance, check if the fan connector and wires are stuck under the motherboard or under the Wi-Fi card. If the connector or wires are stuck, gently free them.

  10. Acer E5-571-54FL CPU Replacement, Wi-Fi Card: 10 단계, 이미지 1/2 Acer E5-571-54FL CPU Replacement, Wi-Fi Card: 10 단계, 이미지 2/2
    이 단계에 사용된 도구:
    Tweezers
    $4.99
    구매
    • Locate the Wi-Fi card. It is just below the fan and has a white coaxial cable and a black coaxial cable attached to it.

    • Grab the section of the white coaxial cable behind the brass connection using ESD safe blunt nose metal tweezers.

    • Carefully lift the white and black coaxial cables up and forward to disconnect the them from the Wi-Fi card.

  11. Acer E5-571-54FL CPU Replacement: 11 단계, 이미지 1/1
    • Use a Phillips #0 screwdriver to remove the 3 mm screw from the upper left corner of the Wi-Fi card.

    • The edge of WiFi card will lift up as the screw is removed.

  12. Acer E5-571-54FL CPU Replacement: 12 단계, 이미지 1/2 Acer E5-571-54FL CPU Replacement: 12 단계, 이미지 2/2
    • Grab the upper left corner of the Wi-Fi card with your fingers.

    • Gently pull the Wi-Fi card away from the socket.

  13. Acer E5-571-54FL CPU Replacement, Hard Drive: 13 단계, 이미지 1/2 Acer E5-571-54FL CPU Replacement, Hard Drive: 13 단계, 이미지 2/2
    • Locate the hard drive and its carriage at the lower right corner of the laptop.

    • Release the USB port ribbon cable by using the plastic opening tool to carefully lift up the black locking tab of the ZIF connector.

    • Move the USB port ribbon cable to the side.

  14. Acer E5-571-54FL CPU Replacement: 14 단계, 이미지 1/2 Acer E5-571-54FL CPU Replacement: 14 단계, 이미지 2/2
    • Use a Phillips #0 screwdriver to remove the two 4 mm screws securing the hard drive carriage in place.

  15. Acer E5-571-54FL CPU Replacement: 15 단계, 이미지 1/1
    • Hold the right side of the laptop in place with your right hand.

    • Put the fingers of your left hand along the top edge of the hard drive carriage.

    • Push the hard drive carriage towards your right hand to disconnect it from the motherboard.

    • This procedure may require more force then other procedures.

  16. Acer E5-571-54FL CPU Replacement: 16 단계, 이미지 1/2 Acer E5-571-54FL CPU Replacement: 16 단계, 이미지 2/2
    • Lift up the hard drive carriage on the edge closest to your body to remove it.

    • If doing the motherboard replacement guide, skip the next step.

  17. Acer E5-571-54FL CPU Replacement: 17 단계, 이미지 1/3 Acer E5-571-54FL CPU Replacement: 17 단계, 이미지 2/3 Acer E5-571-54FL CPU Replacement: 17 단계, 이미지 3/3
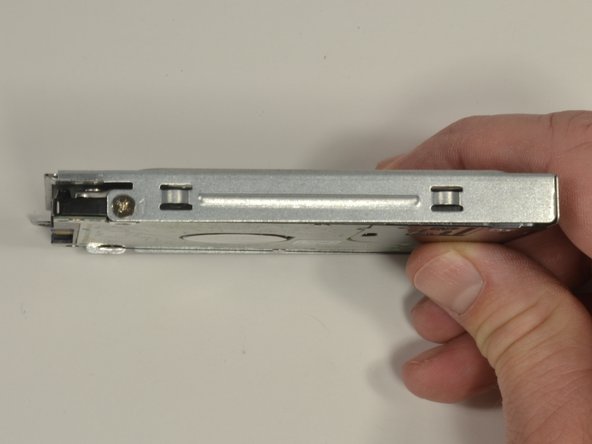
    • Hold the hard drive carriage with your non-dominant hand along one side. Ensure one of the Phillips screws is visible.

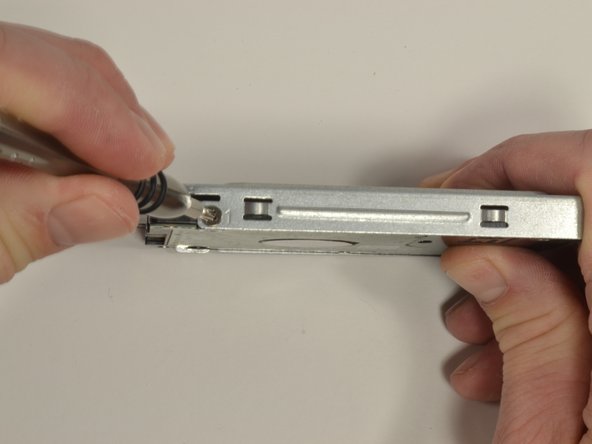
    • Using a Phillips #0 screwdriver, remove the 3 mm screw to release the side of the hard drive from the carriage.

    • Repeat the previous bullet to remove the second 3 mm Phillips #0 screw.

  18. Acer E5-571-54FL CPU Replacement, Motherboard: 18 단계, 이미지 1/2 Acer E5-571-54FL CPU Replacement, Motherboard: 18 단계, 이미지 2/2
    • Use a Phillips #0 screwdriver to remove the two 4 mm screws.

  19. Acer E5-571-54FL CPU Replacement: 19 단계, 이미지 1/2 Acer E5-571-54FL CPU Replacement: 19 단계, 이미지 2/2
    이 단계에 사용된 도구:
    Tweezers
    $4.99
    구매
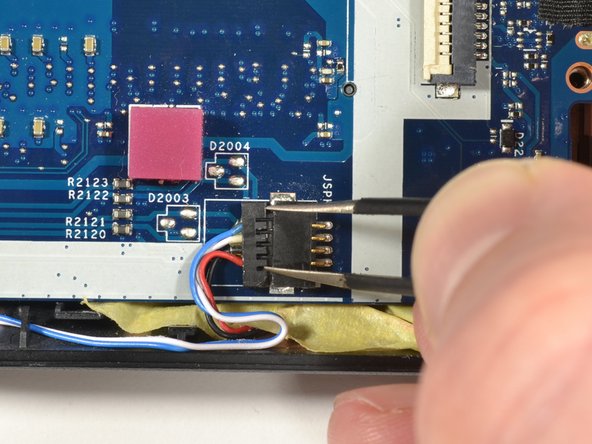
    • Place the tips of the ESD safe pointed tweezers between the plug and the socket of the speaker connection.

    • Gently push left to disconnect the speaker plug.

  20. Acer E5-571-54FL CPU Replacement: 20 단계, 이미지 1/2 Acer E5-571-54FL CPU Replacement: 20 단계, 이미지 2/2
    • Place your fingernails on each side of the screen connection plug. Gently push away from your body to disconnect the plug.

  21. Acer E5-571-54FL CPU Replacement: 21 단계, 이미지 1/1
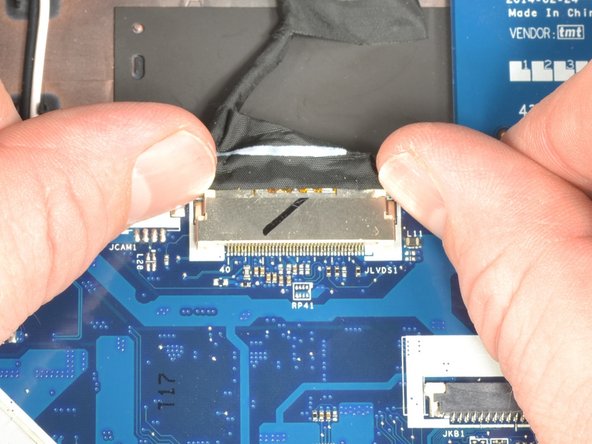
    • Carefully lift up on the right edge of the motherboard near the hard drive connector.

    • With minimal force, pull the motherboard to the right freeing the ports on the left from the case.

    • Put down the right side and allow the motherboard to rest in the case.

    • There is still one connection to be removed which lies underneath the motherboard.

    • Lift the left side of the motherboard up and turn it over so the ports are now facing right.

  22. Acer E5-571-54FL CPU Replacement: 22 단계, 이미지 1/1
    • Grip the edge of the motherboard closest to your body with your non-dominant hand.

    • Grip the power connection wires with your dominant hand and gently pull away from your body to disconnect.

  23. Acer E5-571-54FL CPU Replacement: 23 단계, 이미지 1/1
    • Lift the motherboard out of the case.

  24. Acer E5-571-54FL CPU Replacement, CPU: 24 단계, 이미지 1/1
    • Shut down the laptop.

    • Flip the laptop upside down. Rotate the laptop so the battery faces you.

  25. Acer E5-571-54FL CPU Replacement: 25 단계, 이미지 1/2 Acer E5-571-54FL CPU Replacement: 25 단계, 이미지 2/2
    • Place the pointed end of a spudger into the battery lock.

    • Slide the battery lock to the left using the spudger until you hear the battery release.

    • Pull the battery towards you to remove it from the laptop.

  26. Acer E5-571-54FL CPU Replacement: 26 단계, 이미지 1/2 Acer E5-571-54FL CPU Replacement: 26 단계, 이미지 2/2
    • Insert wisdom here.

  27. Acer E5-571-54FL CPU Replacement: 27 단계, 이미지 1/2 Acer E5-571-54FL CPU Replacement: 27 단계, 이미지 2/2
    • Remove the outer 6 mm screws located on both the top and the bottom sides of the fan.

    • Detach the power cable by pulling it out.

    • Remove the cooling fan.

  28. Acer E5-571-54FL CPU Replacement: 28 단계, 이미지 1/3 Acer E5-571-54FL CPU Replacement: 28 단계, 이미지 2/3 Acer E5-571-54FL CPU Replacement: 28 단계, 이미지 3/3
    • Remove the two 4 mm Phillips head screws that connect the hard drive to the motherboard.

    • Carefully detach the ZIF ribbon.

    • Remove the hard drive.

  29. Acer E5-571-54FL CPU Replacement: 29 단계, 이미지 1/1
    • Remove any remaining screws holding down the motherboard.

    • Remove the motherboard.

  30. Acer E5-571-54FL CPU Replacement: 30 단계, 이미지 1/3 Acer E5-571-54FL CPU Replacement: 30 단계, 이미지 2/3 Acer E5-571-54FL CPU Replacement: 30 단계, 이미지 3/3
    • Disconnect the Wi-Fi card by gently unplugging both wires connected to it.

결론

To reassemble your device, follow these instructions in reverse order.

Jennifer Hancock

회원 가입일: 09/19/19

325 평판

안내서 3개 작성하였습니다

댓글 한 개

... But this doesn't tell you how to replace the CPU!!

Robin Cowley - 답글

댓글 쓰기

조회 통계:

24 시간 전: 0

7일 전: 8

30일 전: 18

전체 시간: 709