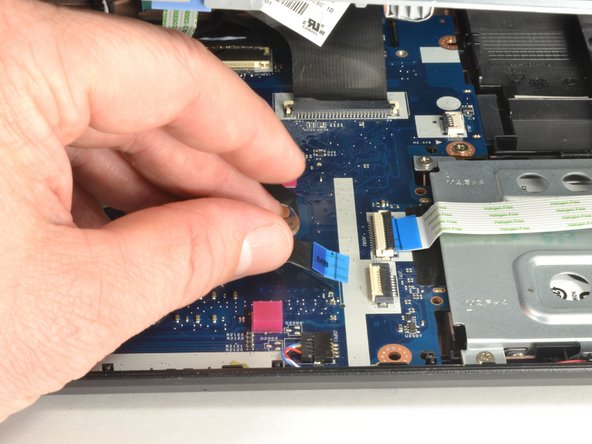
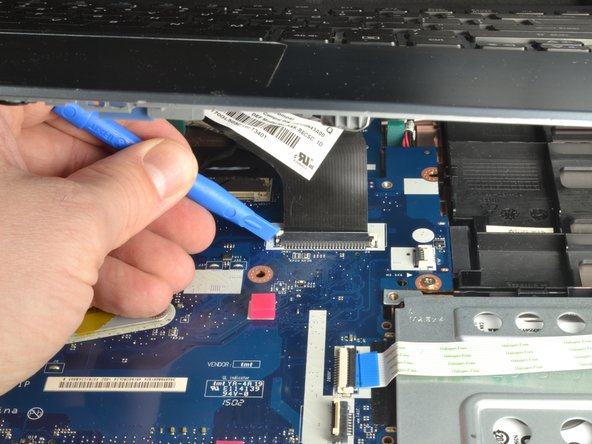
주요 콘텐츠로 건너뛰기

Acer E5-571-54FL Keyboard Replacement

필요한 것

  1. Acer E5-571-54FL Keyboard Replacement, Battery: 1 단계, 이미지 1/1
    • Power down the laptop prior to beginning.

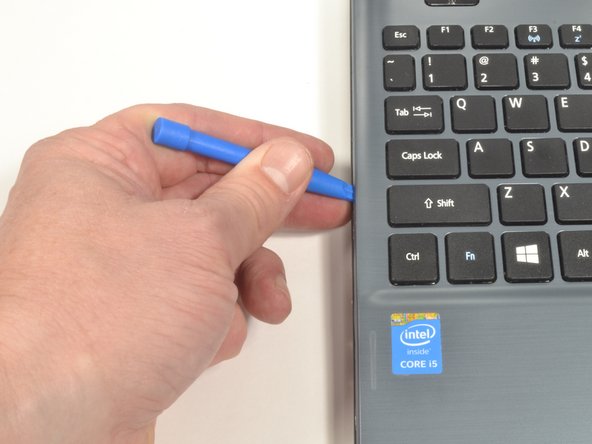
    • Turn the laptop over with the battery closest to your body.

  2. Acer E5-571-54FL Keyboard Replacement: 2 단계, 이미지 1/2 Acer E5-571-54FL Keyboard Replacement: 2 단계, 이미지 2/2
    • Insert the pointed end of a spudger into the battery release.

    • Slide the release gently all the way to the left.

    • You should hear a sound after the slide is all the way left. This lets you know the battery has disengaged.

  3. Acer E5-571-54FL Keyboard Replacement: 3 단계, 이미지 1/2 Acer E5-571-54FL Keyboard Replacement: 3 단계, 이미지 2/2
    • Place your hands on each end of the battery.

    • Pull the battery towards your body to remove it.

  4. Acer E5-571-54FL Keyboard Replacement, Keyboard: 4 단계, 이미지 1/1
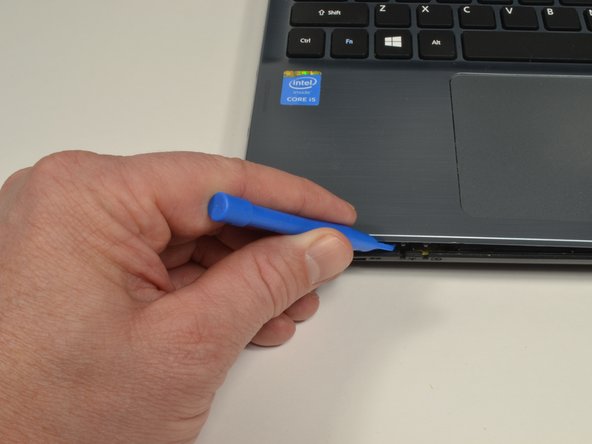
    • Using a #0 Phillips screwdriver, remove a total of eighteen identical 8mm Phillips screws and set them aside.

  5. Acer E5-571-54FL Keyboard Replacement: 5 단계, 이미지 1/1
    • Rotate the laptop 180 degrees so that the battery compartment is now furthest away from your body.

  6. Acer E5-571-54FL Keyboard Replacement: 6 단계, 이미지 1/1
    • Turn the laptop over so that you can easily open the screen to a vertical position.

  7. Acer E5-571-54FL Keyboard Replacement: 7 단계, 이미지 1/1
    • Put your fingers under the top of the keyboard assembly directly below the Acer logo.

    • Carefully pull up on the center until you hear the tabs disengage from the bottom.

  8. Acer E5-571-54FL Keyboard Replacement: 8 단계, 이미지 1/3 Acer E5-571-54FL Keyboard Replacement: 8 단계, 이미지 2/3 Acer E5-571-54FL Keyboard Replacement: 8 단계, 이미지 3/3
    • Work your way around the seam with the plastic opening tool carefully prying the base and top cover apart.

    • If you have difficulty with the plastic opening tool, use a metal spudger but be more cautious to not damage or mar your laptop case.

  9. Acer E5-571-54FL Keyboard Replacement: 9 단계, 이미지 1/1
    • When the two halves are separated, carefully lift up the front of the keyboard and touchpad assembly.

    • You will see three ribbon cables attached to the motherboard.

  10. Acer E5-571-54FL Keyboard Replacement: 10 단계, 이미지 1/3 Acer E5-571-54FL Keyboard Replacement: 10 단계, 이미지 2/3 Acer E5-571-54FL Keyboard Replacement: 10 단계, 이미지 3/3
    • Closest to the ribbon cable on the zero insertion force (ZIF) connector is a white locking tab.

    • Carefully lift up on the locking tab with the plastic opening tool to release the ribbon cable. (Picture 2)

    • Remove the ribbon cable from the connector.

  11. Acer E5-571-54FL Keyboard Replacement: 11 단계, 이미지 1/3 Acer E5-571-54FL Keyboard Replacement: 11 단계, 이미지 2/3 Acer E5-571-54FL Keyboard Replacement: 11 단계, 이미지 3/3
    • Closest to the ribbon cable on the ZIF connector is a black locking tab.

    • Carefully lift up on the locking tab with the plastic opening tool to release the ribbon cable. (Picture 2)

    • Remove the ribbon cable from the connector.

  12. Acer E5-571-54FL Keyboard Replacement: 12 단계, 이미지 1/3 Acer E5-571-54FL Keyboard Replacement: 12 단계, 이미지 2/3 Acer E5-571-54FL Keyboard Replacement: 12 단계, 이미지 3/3
    • On each side of the large connector there are two white tabs.

    • Carefully push away from you with the plastic opening tool on each white tab to release the cable. (Picture 2)

    • Remove the ribbon cable from the connector.

  13. Acer E5-571-54FL Keyboard Replacement: 13 단계, 이미지 1/3 Acer E5-571-54FL Keyboard Replacement: 13 단계, 이미지 2/3 Acer E5-571-54FL Keyboard Replacement: 13 단계, 이미지 3/3
    • Once all three ribbon cables are disconnected, lift off the top cover with the keyboard and touchpad.

결론

To reassemble your device, follow these instructions in reverse order.

다른 한 분이 해당 안내서를 완성하였습니다.

Aaron Weissman

회원 가입일: 10/23/17

1,004 평판

안내서 7개 작성하였습니다

UMass Dartmouth, Team S3-G8, Bailey Fall 2017 UMass Dartmouth, Team S3-G8, Bailey Fall 2017 회원

UMASSD-BAILEY-F17S3G8

3 회원들

안내서 8개 작성하였습니다

댓글 2개

hi there , i have a question regarding me having an issue with the keyboard ribbon cable . everytime I reconnect the ribbon cable differents keys stop working or no keys works at all . but if I left the keyboard panel and cable is well extended the whole keys are back working again .

the cable pins are connected correctly I don’t thing the issue is related to the connector end . hope someone can help

adil - 답글

Maybe the issue is with the keyboard ribbon cable itself? Or possibly how it is seated in the connector? If it is slightly askew, some of the issues you describe can happen. Try to make sure the cable is seated fully into the connector and as square to the connector as possible. Good luck.

Aaron Weissman - 답글

댓글 쓰기

조회 통계:

24 시간 전: 1

7일 전: 6

30일 전: 16

전체 시간: 1,954