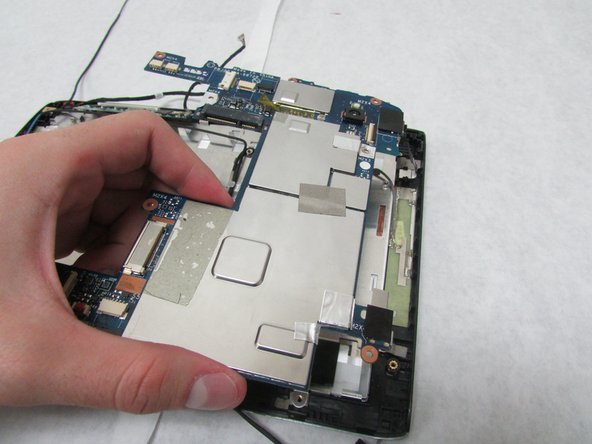
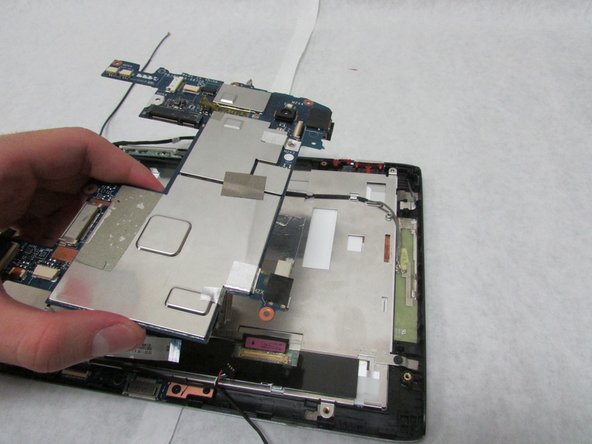
주요 콘텐츠로 건너뛰기

Acer Iconia Tab A501 Motherboard Replacement

필요한 것

  1. Acer Iconia Tab A501 Motherboard Replacement, Back Cover: 1 단계, 이미지 1/3 Acer Iconia Tab A501 Motherboard Replacement, Back Cover: 1 단계, 이미지 2/3 Acer Iconia Tab A501 Motherboard Replacement, Back Cover: 1 단계, 이미지 3/3
    • Turn off your device before opening it.

    • Use a plastic opening tool to carefully separate the back cover, starting at the volume buttons.

    • Continue separating the back cover along the short side closest to the camera and around the device.

  2. Acer Iconia Tab A501 Motherboard Replacement: 2 단계, 이미지 1/1
    • When separated enough, a little more than halfway around the device, the back cover will be easy to take off.

  3. Acer Iconia Tab A501 Motherboard Replacement, Motherboard: 3 단계, 이미지 1/1
    • Remove all tape from the device.

  4. Acer Iconia Tab A501 Motherboard Replacement: 4 단계, 이미지 1/3 Acer Iconia Tab A501 Motherboard Replacement: 4 단계, 이미지 2/3 Acer Iconia Tab A501 Motherboard Replacement: 4 단계, 이미지 3/3
    • In the next step, be careful not to squeeze too hard or scratch the motherboard.

    • Use the angled tweezers to disconnect the motherboard-battery cable from the white connector in the middle of the side opposite the docking port.

  5. Acer Iconia Tab A501 Motherboard Replacement: 5 단계, 이미지 1/3 Acer Iconia Tab A501 Motherboard Replacement: 5 단계, 이미지 2/3 Acer Iconia Tab A501 Motherboard Replacement: 5 단계, 이미지 3/3
    • Use a Phillips #1 screwdriver to remove the four 4.0 mm Philips head screws connecting the battery to the motherboard.

    • Take out the battery.

  6. Acer Iconia Tab A501 Motherboard Replacement: 6 단계, 이미지 1/3 Acer Iconia Tab A501 Motherboard Replacement: 6 단계, 이미지 2/3 Acer Iconia Tab A501 Motherboard Replacement: 6 단계, 이미지 3/3
    • Use the plastic opening tool to flip up the locking mechanism on the motherboard connected to the folded, white ribbon cable.

    • Remove the folded, white cable.

  7. Acer Iconia Tab A501 Motherboard Replacement: 7 단계, 이미지 1/3 Acer Iconia Tab A501 Motherboard Replacement: 7 단계, 이미지 2/3 Acer Iconia Tab A501 Motherboard Replacement: 7 단계, 이미지 3/3
    • Use the plastic opening tool to flip up the locking mechanism on the motherboard connected to the straight, white ribbon cable.

    • Remove the straight, white ribbon cable.

  8. Acer Iconia Tab A501 Motherboard Replacement: 8 단계, 이미지 1/3 Acer Iconia Tab A501 Motherboard Replacement: 8 단계, 이미지 2/3 Acer Iconia Tab A501 Motherboard Replacement: 8 단계, 이미지 3/3
    • In this step, be careful not to squeeze too hard or scratch the motherboard.

    • Use the angled tweezers to disconnect the cable with red, white and green wires from the beige connector slightly in from the docking port.

  9. Acer Iconia Tab A501 Motherboard Replacement: 9 단계, 이미지 1/3 Acer Iconia Tab A501 Motherboard Replacement: 9 단계, 이미지 2/3 Acer Iconia Tab A501 Motherboard Replacement: 9 단계, 이미지 3/3
    • Unscrew the 3.0 mm Phillips head screw on the speaker near the Micro-HDMI port using a Phillips #1 screwdriver.

    • Unscrew the 4.0 mm Phillips head screw on the speaker near the Micro-HDMI port using a Phillips #1 screwdriver.

    • Remove the speaker.

  10. Acer Iconia Tab A501 Motherboard Replacement: 10 단계, 이미지 1/3 Acer Iconia Tab A501 Motherboard Replacement: 10 단계, 이미지 2/3 Acer Iconia Tab A501 Motherboard Replacement: 10 단계, 이미지 3/3
    • Use the flat end of the standard Spudger to disconnect the two small, rotatable connectors attached to the wireless adapter.

  11. Acer Iconia Tab A501 Motherboard Replacement: 11 단계, 이미지 1/3 Acer Iconia Tab A501 Motherboard Replacement: 11 단계, 이미지 2/3 Acer Iconia Tab A501 Motherboard Replacement: 11 단계, 이미지 3/3
    • Use a Phillips #1 screwdriver to remove the two 3.0 mm Philips head screws holding the adapter down.

  12. Acer Iconia Tab A501 Motherboard Replacement: 12 단계, 이미지 1/2 Acer Iconia Tab A501 Motherboard Replacement: 12 단계, 이미지 2/2
    • Carefully slide the adapter out to remove it.

  13. Acer Iconia Tab A501 Motherboard Replacement: 13 단계, 이미지 1/3 Acer Iconia Tab A501 Motherboard Replacement: 13 단계, 이미지 2/3 Acer Iconia Tab A501 Motherboard Replacement: 13 단계, 이미지 3/3
    • Use the wide end of the standard Spudger to take off the rotatable connector to the 3g antenna below the rear-facing camera.

  14. Acer Iconia Tab A501 Motherboard Replacement: 14 단계, 이미지 1/3 Acer Iconia Tab A501 Motherboard Replacement: 14 단계, 이미지 2/3 Acer Iconia Tab A501 Motherboard Replacement: 14 단계, 이미지 3/3
    • In the next step, be careful not to squeeze too hard or scratch the motherboard.

    • Use the angled tweezers to disconnect the cable with red wires from the beige connector opposite the docking port.

  15. Acer Iconia Tab A501 Motherboard Replacement: 15 단계, 이미지 1/3 Acer Iconia Tab A501 Motherboard Replacement: 15 단계, 이미지 2/3 Acer Iconia Tab A501 Motherboard Replacement: 15 단계, 이미지 3/3
    • In this step, be careful not to squeeze too hard or scratch the motherboard.

    • Use the tweezers to remove touchscreen connector from the motherboard.

  16. Acer Iconia Tab A501 Motherboard Replacement: 16 단계, 이미지 1/3 Acer Iconia Tab A501 Motherboard Replacement: 16 단계, 이미지 2/3 Acer Iconia Tab A501 Motherboard Replacement: 16 단계, 이미지 3/3
    • In this step, be careful not to squeeze too hard or scratch the motherboard.

    • Use the angled tweezers to disconnect two microphone connectors, which are above the orange-brown touchscreen connector and next to the battery space.

  17. Acer Iconia Tab A501 Motherboard Replacement: 17 단계, 이미지 1/3 Acer Iconia Tab A501 Motherboard Replacement: 17 단계, 이미지 2/3 Acer Iconia Tab A501 Motherboard Replacement: 17 단계, 이미지 3/3
    • Use the plastic opening tool to flip up the locking mechanism to the white front camera port just above the rear-facing camera.

    • Disconnect the camera cable from the motherboard.

  18. Acer Iconia Tab A501 Motherboard Replacement: 18 단계, 이미지 1/3 Acer Iconia Tab A501 Motherboard Replacement: 18 단계, 이미지 2/3 Acer Iconia Tab A501 Motherboard Replacement: 18 단계, 이미지 3/3
    • Use care in the next step.

    • Use the wide, flat end of the standard Spudger to disconnect the display connector from the large, metal port next to the battery space.

  19. Acer Iconia Tab A501 Motherboard Replacement: 19 단계, 이미지 1/2 Acer Iconia Tab A501 Motherboard Replacement: 19 단계, 이미지 2/2
    • Use a Phillips #1 screwdriver to unscrew the four 4.0 mm Phillips head screws holding the motherboard in place.

  20. Acer Iconia Tab A501 Motherboard Replacement: 20 단계, 이미지 1/3 Acer Iconia Tab A501 Motherboard Replacement: 20 단계, 이미지 2/3 Acer Iconia Tab A501 Motherboard Replacement: 20 단계, 이미지 3/3
    • Remove the motherboard.

결론

To reassemble your device, follow these instructions in reverse order.

Daksh Malhotra

회원 가입일: 07/08/19

1,383 평판

안내서 8개 작성하였습니다

댓글 0개

댓글 쓰기

조회 통계:

24 시간 전: 0

7일 전: 0

30일 전: 2

전체 시간: 470