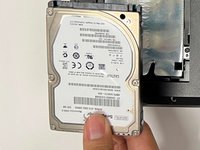
주요 콘텐츠로 건너뛰기

Acer Nitro 5 AN515-53-52FA Hard Drive Replacement

필요한 것

  1. Acer Nitro 5 AN515-53-52FA Hard Drive Replacement, Hard Drive: 1 단계, 이미지 1/3 Acer Nitro 5 AN515-53-52FA Hard Drive Replacement, Hard Drive: 1 단계, 이미지 2/3 Acer Nitro 5 AN515-53-52FA Hard Drive Replacement, Hard Drive: 1 단계, 이미지 3/3
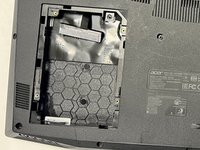
    • Place the laptops with bottom facing up.

    • Use a Phillips #0 screwdriver to remove the single 4.0 mm screw holding the black plastic HDD cover.

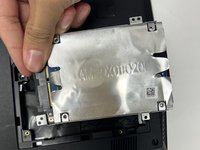
    • Use the pry tool to remove the black plastic HDD cover.

  2. Acer Nitro 5 AN515-53-52FA Hard Drive Replacement: 2 단계, 이미지 1/2 Acer Nitro 5 AN515-53-52FA Hard Drive Replacement: 2 단계, 이미지 2/2
    • Use the Phillips #0 screwdriver to remove the four 4 mm screws holding the HDD bracket in place.

    • Remove the HDD from the chassis.

  3. Acer Nitro 5 AN515-53-52FA Hard Drive Replacement: 3 단계, 이미지 1/2 Acer Nitro 5 AN515-53-52FA Hard Drive Replacement: 3 단계, 이미지 2/2
    • Unplug the HDD from the SATA port.

    • Remove HDD from bracket.

  4. Acer Nitro 5 AN515-53-52FA Hard Drive Replacement: 4 단계, 이미지 1/2 Acer Nitro 5 AN515-53-52FA Hard Drive Replacement: 4 단계, 이미지 2/2
    • Use the Phillips #0 screwdriver to remove the 4 mm screws holding the back hard drive bracket.

    • Remove the bracket from the device.

결론

To reassemble your device, follow these instructions in reverse order.

Alfredo Prieto

회원 가입일: 09/01/22

827 평판

안내서 5개 작성하였습니다

Gateway, Team 1-3, Pee Fall 2022 Gateway, Team 1-3, Pee Fall 2022 회원

GCC-PEE-F22S1G3

4 회원들

안내서 5개 작성하였습니다

댓글 0개

댓글 쓰기

조회 통계:

24 시간 전: 2

7일 전: 8

30일 전: 39

전체 시간: 956