주요 콘텐츠로 건너뛰기

Acer Nitro 5 AN515-53-55G9 SSD Replacement

필요한 것

  1. Acer Nitro 5 AN515-53-55G9 SSD Replacement, Battery: 1 단계, 이미지 3개 중 1개 Acer Nitro 5 AN515-53-55G9 SSD Replacement, Battery: 1 단계, 이미지 3개 중 2개 Acer Nitro 5 AN515-53-55G9 SSD Replacement, Battery: 1 단계, 이미지 3개 중 3개
    • Make sure laptop is off and unplugged before beginning replacement.

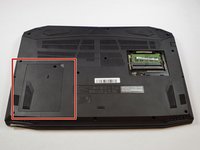
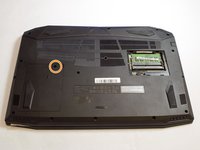
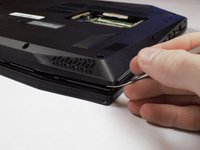
    • Flip the laptop upside down so that the bottom is facing up.

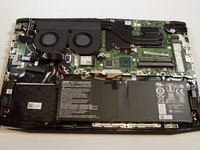
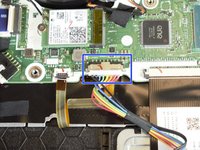
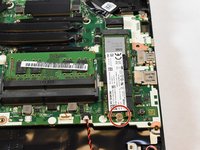
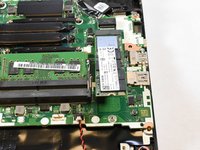
    • Identify the RAM tray on the bottom of the laptop.

  2. Acer Nitro 5 AN515-53-55G9 SSD Replacement: 2 단계, 이미지 3개 중 1개 Acer Nitro 5 AN515-53-55G9 SSD Replacement: 2 단계, 이미지 3개 중 2개 Acer Nitro 5 AN515-53-55G9 SSD Replacement: 2 단계, 이미지 3개 중 3개
    • Use the Phillips #0 screwdriver to remove the 9mm screw in the bottom left corner of the RAM tray covering.

    • Remove the RAM tray cover by prying up with a spudger.

  3. Acer Nitro 5 AN515-53-55G9 SSD Replacement: 3 단계, 이미지 3개 중 1개 Acer Nitro 5 AN515-53-55G9 SSD Replacement: 3 단계, 이미지 3개 중 2개 Acer Nitro 5 AN515-53-55G9 SSD Replacement: 3 단계, 이미지 3개 중 3개
    • Identify the Hard Drive tray to the left side of the laptop.

    • Remove screw with a #0 Philips screwdriver.

    • Lift up the Slot covering using a spunger.

  4. Acer Nitro 5 AN515-53-55G9 SSD Replacement: 4 단계, 이미지 1개 중 1개
    • Use the Phillips #0 screwdriver to remove the 9mm screws holding the back cover in place.

    • Remove the screws from the hard drive and remove it from the device.

  5. Acer Nitro 5 AN515-53-55G9 SSD Replacement: 5 단계, 이미지 3개 중 1개 Acer Nitro 5 AN515-53-55G9 SSD Replacement: 5 단계, 이미지 3개 중 2개 Acer Nitro 5 AN515-53-55G9 SSD Replacement: 5 단계, 이미지 3개 중 3개
    • Be sure you removed the hard drive. when you open the back shell and hard drive is built in this may cause damage to cable and other components.

    • Carefully remove the back shell from the device working your way around all the edges.

    • Do not forcefully try to separate the shell as you may cause harm to the shell.

  6. Acer Nitro 5 AN515-53-55G9 SSD Replacement: 6 단계, 이미지 2개 중 1개 Acer Nitro 5 AN515-53-55G9 SSD Replacement: 6 단계, 이미지 2개 중 2개
    • Removing the back shell of the computer and it will look like this.

    • The battery for the device is located at the bottom middle of the laptop at this orientation.

  7. Acer Nitro 5 AN515-53-55G9 SSD Replacement: 7 단계, 이미지 3개 중 1개 Acer Nitro 5 AN515-53-55G9 SSD Replacement: 7 단계, 이미지 3개 중 2개 Acer Nitro 5 AN515-53-55G9 SSD Replacement: 7 단계, 이미지 3개 중 3개
    • Locate the connector of the battery to the motherboard.

    • Using your fingers, slide out the connector.

  8. Acer Nitro 5 AN515-53-55G9 SSD Replacement: 8 단계, 이미지 1개 중 1개
    • Remove battery from device.

  9. Acer Nitro 5 AN515-53-55G9 SSD Replacement, SSD: 9 단계, 이미지 2개 중 1개 Acer Nitro 5 AN515-53-55G9 SSD Replacement, SSD: 9 단계, 이미지 2개 중 2개
    • Locate the SSD in the top right corner of the laptop.

  10. Acer Nitro 5 AN515-53-55G9 SSD Replacement: 10 단계, 이미지 3개 중 1개 Acer Nitro 5 AN515-53-55G9 SSD Replacement: 10 단계, 이미지 3개 중 2개 Acer Nitro 5 AN515-53-55G9 SSD Replacement: 10 단계, 이미지 3개 중 3개
    • Use the Phillips #0 screwdriver to remove the 3mm screw holding the SSD card in place.

    • The SSD will pop up at an angle when the screw is removed.

  11. Acer Nitro 5 AN515-53-55G9 SSD Replacement: 11 단계, 이미지 1개 중 1개
    • Slide the SSD out of its slot.

결론

To reassemble your device, follow these instructions in reverse order.

다른 9명이 해당 안내서를 완성하였습니다.

작성자

7다른 기여자 명과 함께

Rheo Bruer

회원 가입일: 02/05/19

979 평판

안내서 4개를 작성함

댓글 0개

댓글 쓰기

조회 통계:

지난 24시간: 2

지난 7일: 22

지난 30일: 100

전체 시간: 23,942